|
Exercise 29. Getting BOM items from the Standard parts application |
Scroll |
|
You can only perform this exercise if you have the "Standard parts" application installed on your workplace with a proper license. If the application is not available or if you don’t have the required license, please skip the exercise. |

1.Zoom in the image so that you could easily insert a bolt, a nut and a washer. They should be displayed on the left-side view.
2.Create a layout by adding a horizontal construction line, on which a centerline of a bolt connection will be located.
3.Run the Add-ons – Standard parts – Insert element command.
Find Bolt M12-6g×65 GOST 7798-70 in the application and click Select.
4.A phantom of the inserted item (graphic macro-element) will appear on the screen.
5.Please check the configuration on the Parameter panel:
•The option Create BOM items must be enabled,
•For placing the object, the Standard parts section must be selected,
•To designate the position, option Place new reference number should be selected.
6.If this is not the case, adjust the setting according to the description.
7.Place the phantom of the screw on the drawing using the snaps. The bolt head should be on the right side.
|
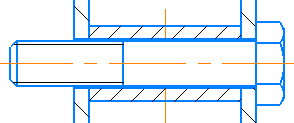
Result after inserting a bolt from the Standard parts application
The process of placing the positional leader is started.
8.Set the starting point of the first branch (the first point of the positional leader) and the landing starting point. The reference number is set automatically.
9.Confirm the placement of position  .
.
10.A phantom of the bolt for repeated inserting appears on the screen. To cancel the insertion and go back to the application to select another fastener, click Complete  on the Parameter panel header.
11.Perform insertion of objects Washer 12 GOST 6402-70 and Nut M12-6H GOST 5927-70 from the application.
When designating the reference numbers of the washer and the nut in the drawing, please use the same positional leader: the positional leader of the bolt. To that end:
11.1. When inserting the object, select Add to the existing designation from the list on the Parameter panel.
11.2. After you've inserted the item, please set the positional leader of the bolt.
Another landing will be added to the selected designation.
If a washer or nut is inserted in a section view or in an unsuitable projection (this can be seen on the phantom), use the View and Layout lists in the Displaying section on the Parameter panel to obtain the required image.
12.Add another bolt image to the drawing from the application – it should be placed on the front-side view.
Before insertion perform the following configuration step on the Parameters toolbar:
•disable the Create BOM object option so that the number of bolts does not change,
•select an option from the list Do not enter an item designation to prevent the process of creating the position line for the new bolt projection from starting,
•in the View list, select the Left option.
13.Call the command Management — BOM — Edit BOM objects and make sure that three new objects appear in the Standard parts section: Bolt, Nut and Washer.
14.View the geometry of the new objects  and make sure that the bolt, washer, and nut images are each included as part of «their» object, and that the reference number is included in all three objects.
15.You can add the bolt image created in the main view to the Bolt BOM object.
16.Arrange positions as necessary.
17.Close the subordinate mode tab.
18.Save the drawing.
