|
Setting a material in a model document. CMP Recalculation |
Scroll |
You can edit the values of system properties Material, Density, Mass, and also recalculate the CMP of the model (during recalculation, the mass of the model is determined taking into account the changes in the current density, as well as the mass of the components and solids included in the model).
These actions can be performed:
•on the Parameter Toolbar (see section Step-by-step instructions to define the material and CMP);
•on the Product BOM panels (see sections Setting the properties of the product and its constituent parts and CMP dialog);
•in the Property Editor.
To change an object’s material, density or mass in the Property Editor, perform the following actions.
1.Open the object property editing dialog box. To that end:
•select the cell with the value for the property Material, Density or Mass and press the MP Parameters button  on the Property Editor toolbar, or
•double–click the cell, or
•click the ellipsis button at the right of the selected cell, see Figure for details.
|
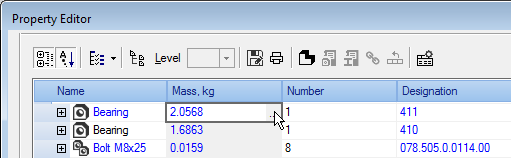
Opening a material edit dialog in a model
In the dialog box that appears you can change property values.
|
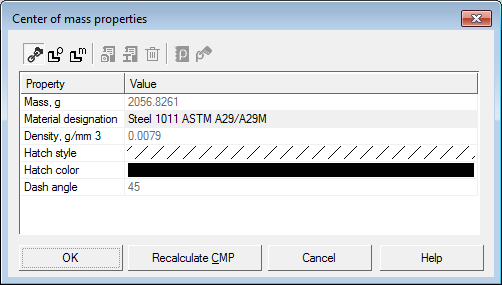
Dialog box for changing CMP values
The dialog box contains the same controls as when setting properties in the Parameter Panel (in the Model Properties command, sections Material and CMP Calculation).
2.Select the object CMP recalculation method.
 Based on the source — the property values for the component are loaded from the source file when the switch is active. As for the solid the values are loaded from the current document.
 Density Calculation — activate this toggle switch to set up the material and/or the material density for mass calculation of the model or solid.
 Calculation by mass — activate this switch to set the mass value manually. It is available in the dialog box when setting a part, an assembly or an assembly component.
|
When you open the dialog box, the enabled toggle switch means the method applied for the current object’s CMP calculation. |

3.Set new parameters: material, density or mass and hatch parameters, if required.
To update the mass value of the object, click the Recalculate CMP button in the dialog box.
After you click the button, mass properties of an object (part, component or solid) are calculated with account of CMP changes previously made for the solids and components contained within the object. The mass recalculation result is displayed in the Mass row of the dialog box.
Click OK button in the dialog box.
4.Apply the new properties to the model. To do this, click Apply in the Property Editor. The changed properties are displayed in the Editor.
5.Edit CMP of all the required objects as described in steps 1 through 4.
To recalculate mass properties of the whole model in the Property Editor, open dialog box for its root object and click Recalculate CMP.
|
When you set property values, note the following. •If a solid is being set up, then the selected material is considered this solid’s own material. •If a part is being set up, then the selected material is applied to its solids, which own material was not specified. •If an assembly is being set up, then the selected material is only applied to solids created in the assembly (not to components!) and only to those solids, which own material was not specified. •If an assembly component is being set up, then selecting a material only makes sense when this component is a part. The specified density value is applied to its solids, which own material was not specified. Material properties – hatch parameters and density, including manually set ones – are saved in the model together with the material and applied to solids of parts, components and assemblies according to the above rules. |
To cancel editing and set the object property values from the source, open the dialog box for this object and activate the From Source toggle switch. Then apply this change to the model by clicking Apply in the Property Editor.
If necessary, you can assign a material using the Select material from list  button or Select material from reference
  button on the Property Editor toolbar. In the first case, the material is selected from the density reference file and in the second case – from the external Reference connected to KOMPAS-3D.