|
Working with leader lines branches |
Scroll |
Available to designations having a leader line in the structure.
While creating or editing a designation, you can add leader line branches and create different actions with branches: delete them, manage kinks, etc. These actions are performed using characteristic points of the extension line.
Defining points of the leader line of designation perform different operations and have various forms.
•The point  allows adding branches (except geometric tolerance designation) and moving the landing/sign.
•The point  allows you to add a branch to the form tolerance designation and change the position of the tolerance table.
•The point  allows to move the endpoint of the branch, delete the branch. Besides, using the context menu of this point you can change the view of arrow on the end of the leader line.
•The point  allows to create a kink on the leader line.
•The point  at the end of the landing allows to turn the landing.
•The point at the vertex of kink allows to displace the point of kink, delete the kink.
|
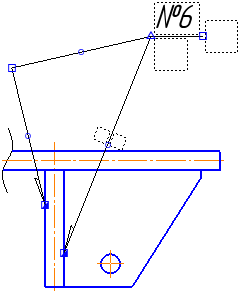
Defining points of the leader line
To create a new branch, do the following actions.
1.Click the point ,to indicate the tolerance of the form - by point.The team will enter branching mode.
2.Shift the cursor. In graphic region, a branch phantom will appear.
3.Specify the position of starting point of a branch and fix the point with a mouse click.
To create a broken line branch, indicate the points of kink while holding the <Ctrl> key.
4.After specifying the start point of a branch, a phantom of the next branch will appear. Create the desired number of branches by specifying the start point positions.
While the branch creation mode is running, other actions with the designation (entering a label, moving the designation, etc.) are not available.
5.To exit branching mode, use one of the following methods:
•press the key<Esc> — the branch phantom will disappear, the system will return to the process of creating/editing the designation,
•press the key Create object  — the creation of the symbol will be completed; the extension line will have branches that have already been created.
|
In the form tolerance notation, additional extension line branches are created individually. To add each new branch, click on one of the points |

Actions with extension line branches are available outside of branch creation mode. If the mode is enabled, disable it by pressing the key <Esc>.
Movement of defining points
To move a defining point, move the cursor to it. The shape of the cursor will change – it will turn into a quadrilateral arrow. Press <Enter> or left-click it – the point will be selected.
You can move leader line points in the following ways.
•Dragging a point with the mouse.
Click the left mouse button on the point and, without releasing it, move the cursor to the required position. Then release the mouse button.
•Moving a point using the keyboard.
Move the cursor using the arrow keys. Then press <Enter> to undo selection.
•Specifying coordinates of the defining point.
Enter new coordinates of the selected point into the field Current Point on the Parameters panel.
Adding and deleting bends
To add a bend to an already created branch, select the point on this branch and move it to the desired position. The branch will be split into two segments, and a dot will appear at the apex of the break. .
To delete a break, select the point at the peak of the break and press the key <Delete>. The point will vanish, and the offset will be rebuilt according to the position of the remaining characteristic points.
Deleting a branch
To delete an extension line branch, select the point at the end of the branch and press the <Delete> key.