|
Document print dialog box |
Scroll |
Allows you to set the desired print options for the current document and print it.
This dialog appears on the screen after you call the File — Print... command.

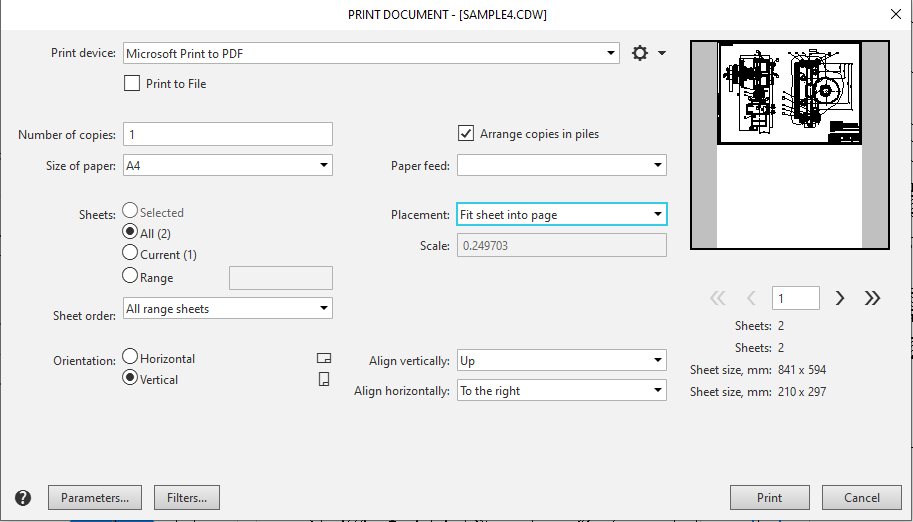
Description of Controls
Name |
Description |
||
Print device |
The field is used to display the name of the device selected for printing. |
||
|
Properties... |
This button allows you to configure additional settings for the selected printer. When you click the button, the device driver's system dialog box appears on the screen. The commands in the Properties... button menu allow you to save or load the printer configuration. To open the menu, click the triangle located to the right of the button. |
|
Print to File |
Switching on this option will make output not to the printing device (printer or plotter), but to the file with the prn extension. At the same time, the file contains a sequence of output device control commands necessary for printing the specified image. If the printer is set to print to a file (in the Port column selected option is FILE), then the Print to File option turns on automatically and becomes unavailable, i.e. its disabling is not possible. |
||
Group Copies |
|||
|
Quantity |
A field for entering the number of copies to be printed. |
|
|
Arrange in piles |
When this option is enabled, if you print multiple copies of a document, all pages of the first copy will be printed first, followed by all pages of the second copy, and so on. If this option is disabled, all the first pages of the copies will be printed first, followed by all the second pages, and so on. |
|
The Paper Group |
|||
|
Size |
A list from which you can select the paper size for printing. |
|
|
Feed |
A list from which you can select the paper feed method for printing. Not available on all printers. |
|
Range Group |
Contains a Sheets group that allows you to select sheets for printing. |
||
|
Selected |
This option allows you to print the selected portion of the document—an area containing selected objects (in a graphic document or model) or a selected text fragment (in a text document). If nothing was selected in the document before the dialog box was opened, or if a specification is being printed, the Selected option is unavailable. |
|
|
All |
This option allows you to print all pages of the document. |
|
|
Current |
This option prints the current sheet (at the time the print command is issued) of a multi-sheet document. The current sheet is: •in a text document—the sheet where the cursor is located, •in a bill of materials — the sheet on which a row is selected, •in a drawing — the sheet positioned so that it occupies the center of the document window. If the document is not a multi-sheet document or contains only one sheet, then Current Sheet is the only option available in the Sheet Range group. |
|
|
Range |
This option is available in the dialog box when printing multi-page documents. It allows you to print selected pages of the document. To select pages, enter their numbers in the field. You can enter the numbers of the pages to be printed, separating them with commas, and/or specify page ranges, for example: 1, 3, 6-13, 17, 22-25. If the number entered exceeds the number of pages in the document, a warning appears. |
|
|
Sequence |
This list is available in the dialog box when printing multi-page documents. Allows you to specify which pages in the range should be printed: all, only even, or only odd. |
|
Fitting Group |
|||
|
Placement |
The drop-down list contains the names of methods for automatically adjusting the document pages to fit the printer's sheet dimension: •Add to page, •Crop by page dimension, •Several sheets on page. |
|
|
Scale |
A field that displays the scale of the sheets when printing; it is editable when the Crop by page dimension option is selected. In all other cases, this field displays the automatically calculated scale. |
|
|
Sheets |
A field for entering or selecting from a list the number of document pages to be printed on a single page. This field appears in the dialog box if a multi-page document is being printed and Several sheets on page is selected from the layout options list. |
|
|
Gap, mm |
A field for entering the distance between the document pages on the print page. This field appears in the dialog box when printing a multi-page document and a specific fit option is selected from the list Several sheets on page. |
|
Orientation Group |
The Options group allows you to set the page orientation—portrait or landscape. |
||
Alignment Group |
|||
|
Vertically |
This list allows you to choose how to align the sheets vertically relative to the edges of the print page. The available options are: Top, Center, Bottom. |
|
|
Horizontally |
This list allows you to choose how to align sheets relative to the edges of the print page horizontally. The available options are: Right, Center, Left. |
|
Parameters... |
This button opens the print settings dialog. In this dialog, you can specify the output color, the precision of model rendering, enable or disable thin lines, and enable or disable an alternative method for rendering fills and hatches. |
||
Filters... |
This button opens the dialog box for setting print filters for document objects. In this dialog box, you can enable or disable the printing of graphic document objects based on their type. |
||
Preview window |
This window is used to view print pages—sheets of paper with layout «dead zones» (the areas at the edges of the page that the printer cannot print due to its design). A single printed page may contain one or more document pages (depending on the settings). Use the navigation buttons at the bottom of the preview window to move between pages. The field between the buttons displays the current page number. To quickly navigate to a specific page, you can enter its number in this field. |
||

|
If any items were selected in the drawing or in the text document prior to running the Print dialog, the print filter is automatically disabled (using this filter you can select individual sheet elements to be printed, e.g. borders, title block, etc.). You can enable the filter if needed. In this case, if you print a text document, the entire sheets elements will be printed, and if you print a drawing, only the parts of the elements inside the selection frame will be printed. |

|
If a multi-page document contains pages of the same size but with different orientations, all pages will adopt the orientation of the first page. You can select the desired page orientation using the Orientation options group. |
After setting all the options, click the Print button to start printing the document. To close the dialog box without printing the document, click the Cancel button.
