|
Export to database formats |
Scroll |
To transfer data to automated manufacturing control systems you may need to transform a BOM to dBase III DOS, dBase III Windows or Excel file format.
Follow these steps to export a BOM to a database table.
1.Connect the Service Tools (file komlib.rtw), if it is not connected.
2.From its section Operations with BOM, invoke the Export BOM command.
After calling the command, the dialog box for setting the BOM export parameters appears on the screen.
3.Configure the export parameters.
Tabs of the dialog and descriptions of controls located on these tabs are listed below.
4.After setting the BOM export parameters click Start Logging.
|
A faster way to write the current BOM to an Excel file is to call the File – Save as... command. In the dialog that appears, enter the file name, select the Excel files (*.xls) line from the File type list and click Save. The BOM will be saved in the default configuration to the Excel file. |

|
BOM export parameters settings dialog
File tab
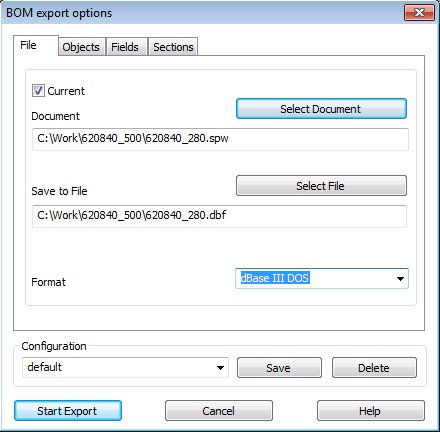
BOM export parameters settings dialog. File tab
Control |
Description |
|
Current |
If this option is enabled, the current document will be exported. |
|
Select document |
This button allows selecting a BOM for export. |
|
Document |
This field displays the name of the exported BOM. |
|
Save to file |
This field displays the name of the created file. |
|
Select file |
This button is used to specify the path to the created file. |
|
Format |
The list is used to select the type of the created file. |
|
BOM export parameters settings dialog
Objects tab
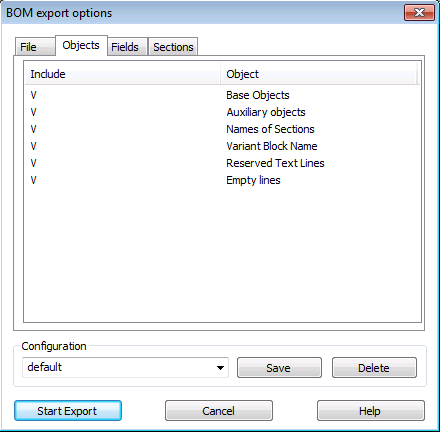
BOM export parameters settings dialog. Objects tab
Control |
Description |
|
Enable Objects |
This window displays the types of lines that exist in the active BOM: •Base objects, •Auxiliary objects, •Headers of sections, •Reserved rows, •Empty rows, •Version block headers. The types transferred to the database table are ticked in the Enable column. To exclude lines of a certain type from the list of exported lines, click on the tick sign the with the left mouse button. |
|
|
When exporting reserved and empty rows to the database table, entries with empty fields are created; and when exporting section headers and version blocks (and sometimes auxiliary objects), less informative entries are created (for example, with Parts in the Name field). As a rule, such entries are useless when processing a database in the manufacturing control system (or using other specialized and analytical software). Therefore, usually the export of the corresponding rows is disabled. To prevent entries generated from base BOM items from losing information about the section that they belong to, special fields are added to these entries (see Table BOM export parameters settings dialog. Fields Tab). |

|
BOM export parameters settings dialog
Fields tab
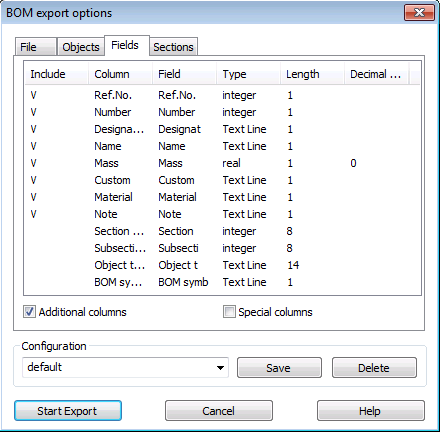
BOM export parameters settings dialog. Fields tab
Control |
Description |
|
Enable Columns |
In this window, the columns of the active BOM and the corresponding fields with the current settings are listed in a table. The fields transferred to the database table are ticked in the Enable column. To change the parameters (name, length, etc.) of a BOM field in a new document or to exclude a field from the export list, double–click on the corresponding row of the table. |
|
Additional columns |
This option controls the export of all additional columns. When it is enabled, additional columns are ticked. If you want to export certain additional graphs and not export certain other graphs, double-click on the corresponding lines and, in the dialog that appears, turn the Enable field. |
|
Special Columns |
This option controls the export of all special columns. When it is enabled, special columns will be ticked. If you want to export some special columns and not export others, double–click on the corresponding lines and enable / disable the Enable field option in the dialog that appears. |
|
|
When exporting to the database, a separate entry is created for each BOM item. Its fields correspond to the columns of the BOM sheet and the additional columns. However, in this case, information about the type of object and about the section it belongs to will be lost. To save this information, you can add special fields to the entry — Section Number, Object Type, etc. The Special Columns option is specifically designed for managing the creation of these fields. |
|

BOM export parameters settings dialog
Sections tab
BOM export parameters settings dialog. Sections tab
Control |
Description |
|
Enable Sections |
This window displays the sections that exist in the Current BOM. The items to be exported will be ticked. To exclude a section from the export list (or include a previously disabled section), click it with the left mouse button. |
|
Configuration |
To save the created BOM configuration for export (format, exported and non–exported sections, items, fields, etc.), enter the name of the new configuration in the input field and click Save. The saved configuration can be used later when calling the command to export the BOM to the database format. To delete the existing configuration, select its name from the list and click Delete. |