|
Creating BOM Items |
Scroll |
Procedure
1.Run the required Add BOM object command .
.

2.In the dialog that appears on the screen select a section for placing the item, and a template for filling its text part (if required).
3.Click Apply.
The BOM object window (see figure) containing a fragment of the BOM table: the table header and one row, appears on the screen. The table corresponds to the BOM style included in the current BOM description.
|
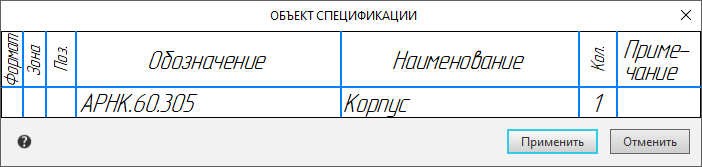
The window for entering the text part of the BOM object
Elements appear on the Parameter panel for setting the parameters of the item and its text.
4.In the BOM object window, enter or edit the textual part of BOM item.
5.If the object being created should not be included in the BOM, the style of which is included in the current description, uncheck the Apply in current BOM description option in the Parameters Panel. Details...
6.If required, fill in the additional columns and attach documents to the item..
7.Confirm the creation of the specification object by clicking the BOM object button in the window, or the Apply button, or the Create object  button on the Parameter Panel, or by pressing the <Ctrl>+<Enter> keys.
All specification objects in the document can be viewed and edited in the subordinate mode of work with BOM objects.
|
When creating a BOM object in the drawing, it is possible to pre-select graphic objects (including the positioning line-notation), which will be the geometry of the created specification object. In this case it is convenient to call the Add BOM object command from the context menu of selected objects. If necessary, the document objects can be included in the geometry of the BOM object or exclude from it later. |
