|
Linear Trimmed Dimension |
Scroll |
To set a linear trimmed dimension, follow these steps.
1.Invoke the Linear Dimension Trimmed  command.

2.Specify a segment to set the dimension trimmed from. Its name will be displayed in the Objects field, and the graphic area will display a phantom of the dimension.
3.If the image contains the axis of symmetry for the dimensioned object (centerline or a segment with the Centerline style), specify this axis. The axis must be parallel to the segment used to set the dimension from. When you select the axis, dimension value is auto-calculated as twice the distance between the segment and the axis, and a diameter sign is added to size label.
If the axis for the dimensioned element is missing, you need to enter size label manually.
4.Edit the size label, if required. To start working with the size label, press any alphanumeric key. See section on editing the dimensional inscription...
5.Set the number of decimal places in the size label. Details...
6.Set a dimension tolerance. Details...
7.Set up additional dimension parameters, if required: size label placement option, arrow display parameters, etc. Details...
8.Set the point defining position and length of the dimension line.
•If you select fixed or manual placement of size label, after you specify this point dimension creation is automatically completed. Size label is located in the middle of the dimension line; you cannot change this position.
•If you select placement of size label on the landing, you need to specify one more point – a starting point of the landing. The starting point of the leader is located in the middle of the dimension line; you cannot change this position. After the starting point of the landing is specified, dimension creation is automatically completed.
9.To complete operation of the command, click Finish  .
.
|
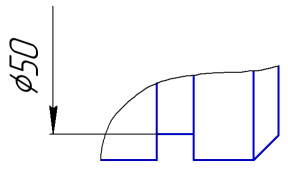
Example of setting dimension trimmed
See Also