|
"Select objects by properties" dialog box (model) |
Scroll |
Allows you to find and select model objects that share common properties, such as geometric parameters, visibility, layer membership, color, line styles, and so on.


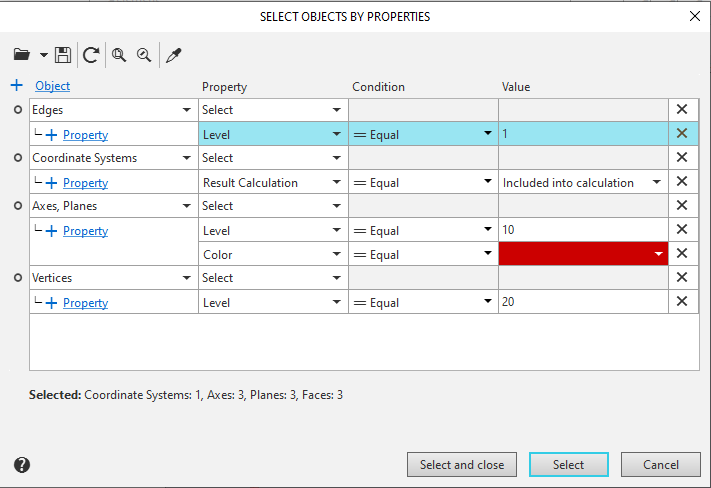
At the top of the dialog box is a toolbar with buttons; below it is a table for configuring object selection. In the Object column of the table, you select the types of objects to be selected, and in the Property, Condition, and Value columns, you specify the conditions for selecting objects of the selected types. A description of the dialog box elements is provided below.
The selected object types and selection criteria are grouped into a block. You can create one or more blocks in the dialog box.
After completing the settings, select the objects.
•To select objects based on the specified criteria and close the dialog box, click the Select and Close button.
•If you want the dialog box to remain on the screen after selecting objects, click the Select button. Information about the number of selected objects of each type will appear below the table. If no objects are found, the message "No objects found based on the selected criteria" will be displayed.
•If you want to close the dialog box without selecting any objects, click the Close button.
Learn more about selecting model objects by properties...
Description of the toolbar elements
Element |
Description |
|
|
Read from File |
This button allows you to load predefined object selection criteria from a previously created file. After clicking the button, a standard file selection dialog appears on the screen. In this dialog, open the folder, select the desired XML file, and click the Open button. The table will be populated with the data retrieved from the file. The button menu contains a drop-down list of recently opened XML files containing object selection criteria. |
|
Save to File |
This button allows you to save the current object selection criteria to an XML file. After clicking the button, a standard file save dialog appears on the screen. In the dialog, specify the folder where you want to save the document, enter a file name, and click the Save button. |
|
Undo selection |
This button deselects previously selected objects. |
|
Show All |
This button allows you to change the zoom level in the graphics area of the current tab so that the entire model is visible. |
|
Zoom to selection |
This button automatically adjusts the zoom level in the graphics area of the current tab so that all selected objects are fully visible at the highest possible zoom level. If no objects are selected, the button is unavailable. |
|
Copy from object |
This button allows you to copy a property value from a model object. It is available when setting a property value in the Value column. Clicking the button launches a subprocess that allows you to specify the object from which you want to retrieve the property value. Learn more... |


Object selection settings table
Object
The cell contains a drop-down list of object types. To select the desired type, use the checkbox next to its name. Checking the box indicates that the type has been selected.
The type names in the list are grouped together. The checkbox next to a group name allows you to select all object types within that group. Unchecking the box deselects all items in the group. If you select some (but not all) items in a group, an icon appears next to the group name instead of the checkbox.  .
.
In the upper-left corner of the drop-down list is a button Current document objects only  . This button allows you to specify the list of object types:
•When the button is pressed, the list contains the set of object types present in the current model;
•when the button is released, the list contains all possible object types.
At the top of the expanded list of objects, there is also a search field where you can search for a type by name. To find the desired object type, enter the desired characters in the search field, and then select the desired entry from the list of search results that appears.
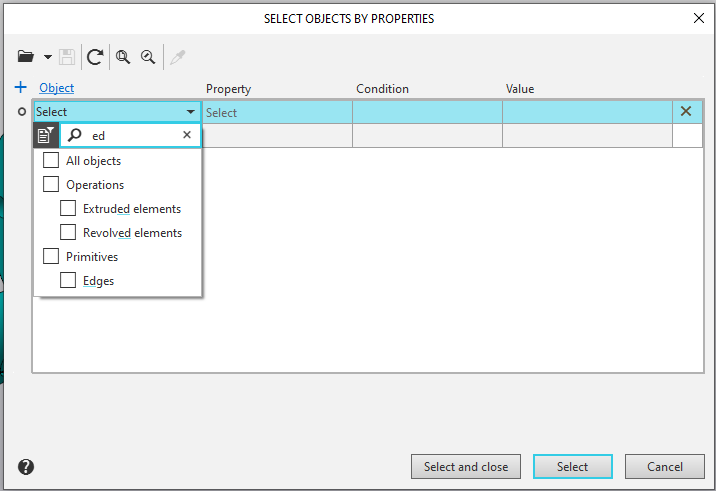
The names of the selected object types are displayed in the cell.
The "Link + Object" in the column header is used to add a block. After clicking the link, a new block will appear in the table.
Property
This column specifies the criteria used to select objects of the specified types.
The Select drop-down list in the first row of the block contains properties common to all object types specified in the block. To select a property, use the option next to its name. Enabling the option means that the property is selected. You can select one or more properties from the list. Each selected property is placed on a separate row, and its name is displayed in the corresponding cell.
At the top of the Select drop-down list is a search field where you can search for a property by name. To find the desired property, enter the search terms in the search field, and then select the desired row from the list of search results that appears.
The + Property link below the Object cell is used to add a new property. After clicking the link, a row for the new property appears in the block. To select a property, expand the drop-down list in the cell and select the desired row.
The Select list and the + Property link are unavailable if no object type is selected in the block.
Condition
The cells in this column are used to specify conditions for the selected properties.
Each cell contains a drop-down list of symbols that define the conditions for assigning values. A condition is specified for each property. The set of conditions depends on the selected property. The list may include the following options:
 Equal,
 Not equal,
 Contains,
 Does not contain,
 Starts with,
 Ends,
Ends,
 Greater Than or Equal to,
 Less Than or Equal to,
 Greater Than,
 Less,
Less,
 Range.
This condition cannot be selected if no properties have been specified in the block.
Value
Values for the selected properties are entered in this column.
Each cell is either an input field or a drop-down list of parameters, depending on the selected property. Text or a numeric value is entered into the cell using the keyboard (a period is used to separate the whole number from the decimal part). The remaining parameters are selected from drop-down lists. The lists contain only those property values (line styles, object state, etc.) that are used in this document. The drop-down color palette is the standard one.
You can also set the property value by dragging and dropping an object into the graphic area. This is what the button is for Copy from Object  on the dialog's toolbar. Clicking the button launches a subprocess that allows you to specify the object from which you want to retrieve the property value. More...
You cannot set a property value unless a condition has been selected.
Deleting rows
There is an icon on the left side of each row  , designed to remove:
•Clicking the icon in the row containing the property deletes the row,
•Clicking the icon in the first row of the block deletes the entire block.
Copying a property value from an existing object in the model is performed in a subprocess Copy from Object.
To copy a property value, follow these steps.
1.Select the Value cell in the dialog box.
2.Click the Copy from Objectbutton. The process of specifying the object from which the property value is to be retrieved will begin.
3.Hover your cursor over an object in the graphics area. The object will be highlighted, and the property name and its value will appear next to the cursor.
4.Click on the object with the mouse. The subprocess will end, and the system will return to the process of selecting objects by properties. The property value will be displayed in the corresponding cell.
If a property value was specified before the command was called, the new value will be entered into the Value cell as a result of the copy operation.
If necessary, you can interrupt the value copying subprocess by clicking the Finish button  in the header area of the Properties panel. You will be returned to the dialog, but without setting a value for the property.
