|
Specifying objects for setting a linear dimension |
Scroll |
You can specify the following to set a linear dimension:
•dimension snap points,
•base object (or objects).
Specifying dimension snap points
Both defining points of objects and separate points can be used as dimension snap points.
To set a dimension, specify two required points. Their coordinates appear in the corresponding fields in the Coordinates group on the Parameter Panel. If you need to specify a point again, unfix the field with its coordinates.
The figure below shows an example of the resulting dimension.
|
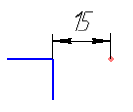
Example of setting linear dimension to two points
|
Points cannot be specified if the Selection of Main Object button is selected on the Parameter Panel or if all snaps required to specify points are disabled in the document (e. g. Nearest point, Intersection, etc.). In this case, the system is in the mode of object specification (see below). Additionally, if no reference is actuated when the mouse pointer is hovered over the object, then the object will be specified instead of the point. |

Specifying base object for setting dimension
To set a dimension, you can specify one or two base objects. The dimension is set to the extreme or specific points of objects. All available base objects are listed in the table below.
Use the following methods to specify base objects.
•Mode of Base Object Selection
To switch to this mode, press the Base Object Selection button  , located to the right of the Objects field on the Parameter panel. References will be disabled in the document.
Specify a base object. It will re-enable references; however, you will still be able to select a second base object.
Specify another base object or switch to dimension text placement.
|
The button status (pressed or released) is stored until the current system session is over. |
•Disable references
When you hover the mouse pointer over an object, one of the references included in the document is actuated. If none of the snaps is actuated, the entire object is selected.
To select the required object(s), you can:
•specify objects while holding down <Alt> (to disable all snaps temporarily),
•disable snaps that prevent the object from being specified, e. g. the Point on curve reference.
Names of selected objects are displayed in the Objects field on the Parameter panel. If you need to re-select an object, remove its name from this field.
Selection of base objects for setting linear dimension
Base objects |
Resulting dimension |
Comment |
|
Segment; spline; |
|
The dimension is set to the end points of the specified object. |
|
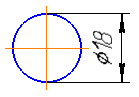
Circle |
|
The position of the dimension – horizontal or vertical – is determined by moving the cursor. Diameter sign is automatically added to the dimension text. |
|
Ellipse |
|
Dimension of one of the axes is created. The desired axis is selected by moving the cursor. |
|
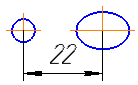
Circle and ellipse; |
|
Dimension between centers of the circle and ellipse is created. |
|
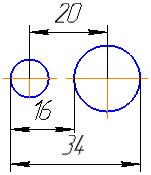
Two circles; |
|
If circles or arcs are located near a straight line connecting their centers, the dimension is created with \witness lines tangent to the circles or arcs. Concentric circles for such dimension placement need to be located near the horizontal line passing through their center. In all other cases the dimension is created between the centers of the circles or arcs. You can change the variant of dimensioning using the Result selection button group. Details... |
|
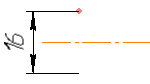
Centerline and point |
|
You can select centerline or segment with the Axis line style and use the object's separate point or specific point as a point. Dimension is set to the specified point or its symmetrical point relative to the centerline. If selection is made while the Selection of Main Object button is selected, centerline is specified first following by the point; otherwise, objects can be specified in any order. Dimension value is twice the distance between the centerline and the point. Diameter sign is automatically added to the dimension text. |