|
Thread in a hole |
Scroll |
A hole can be threaded. In this case, when creating a hole, a cosmetic thread is created along with it; the hole diameter is determined by thread parameters – the nominal diameter and the pitch. The threading may be either standard or non–standard. How threading is displayed on the screen depends on the settings.
To create thread in a hole, set the Thread toggle switch to the I position (enabled). In the upper part of the Main section of the Parameter Toolbar a control group appears to set the thread parameters, and the hole phantom displays the cosmetic thread.
|
In some central holes from the library you cannot create thread. In this case a group of controls to specify the thread parameters is missing from the Parameter Toolbar. |

1.Select the thread type from the Standard list. The list contains names of standard threads and the Non-standard thread list item.
2.Specify the threading parameters.
Standard thread:
•Click the Reference  button located on the right side of the Standard field. The Standard Thread table appears on the screen.
•Select the thread standard from the Standard list.
The table contains threading parameters as defined by particular standards (nominal thread diameter, thread pitch, internal diameter etc.).
•Select the item with desired parameters and click the Select button.
The corresponding nominal diameter and pitch of the threading matching the selected standard are displayed in the Options Panel.
Non-standard thread:
•Enter the values for thread diameter in the Diameter field and thread pitch Step field.
3.Select the method to set the thread length by clicking the desired button in the Length group.
The following methods are available.
 For specified depth:thread length is defined by the specified distance. Enter the thread length in the Length field.
The object to measure this distance from may be seen on figure below:
•for holes with counterbore – the lower border of the counterbore surface,
•for the rest of holes – the surface of hole placement.
|
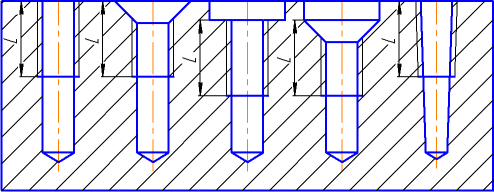
Initial border of the thread for different hole types
 For Entire Depth: the thread length is automatically determined by the hole depth.
If necessary, you can change the automatically determined final border of the thread. To do this, activate the Final Border field and specify a face or flat object up to which the thread needs to be built.
|
In a conical hole, standard thread can only be built to specified depth. The maximum depth depends on the size of the hole and is determined by the standard. |
4.If the thread is left-hand, set the Thread direction switch to the Left position. In this case the letters LH will be added to the thread designation.