|
Configuring cell borders |
Scroll |
The cells of a newly created table have the default framing: external frames of the table have the style Main, and the lines separating the rows and columns have the style Thin.
Configuring cell borders for a table is performed as part of editing process. To configure, use the control elements of the Cell group in the Table section on the Parameter Panel.
To change line style of the border of the current cell (or the selected cell range), do the following actions.
1.Select the required cell (range of cells) or table.
2.Specify the border for configuration in the Borders field. More details on choosing borders...
3.Select a line style for the specified border(s) in the Style field. More details about selecting line style...
When you finish the table editing process the new style will be used for displaying border lines.
Selecting borders for customization is done in the Borders field, where the selected cell (or cell range) is schematically displayed. The schema of a cell contains external border. The schema of a cell range also contains internal borders between individual cells. Each border has an icon of a small square. By default all the borders on the schema are selected (marked in turquoise color).
|
|
a) |
b) |
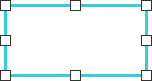
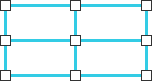
Schema
a) cell, b) cell range
The buttons located to the right of the field Borders are used to manage the selection of boundaries.
 Select External Borders — when the button is pressed, all external borders of the cell (or range of cells) are selected; if internal borders were selected, their selection is not cancelled.
 Select internal boundaries — when the button is pressed, all internal borders of the cell range are selected; if external borders were selected, their selection is not cancelled.
 Deselect all borders — when you click the button, the selection of all borders is canceled (unselected borders are displayed on the diagram as gray dashed lines).
You can select any individual border on the schema by moving the mouse pointer to it and clicking the left mouse button.
You can choose two borders at once by moving the mouse pointer to the icon on the intersection of those borders and clicking the left mouse button. The figure shows an example of selecting two borders.
|
|
|
a) |
b) |
c) |
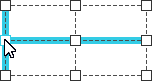
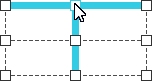
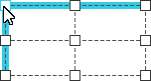
Example of selecting two borders
To remove selection of one or several borders, click the selected border or icon at the intersection of selected borders.
Choosing a line style for displaying borders
You can choose a line style for all cells from the list in the fieldStyle.
|
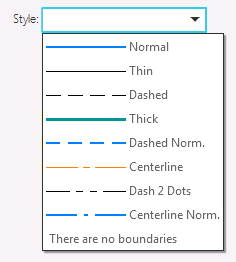
List of fields Style
This list contains all the system line styles which can be used to display cell borders. When selecting the There are no boundaries option, the display of the borders of the current cell (or selected cell range) in the graphic area is disabled.
