|
Selecting objects by properties |
Scroll |
The KOMPAS-3D system allows selecting objects that meet the set criteria. To make such a selection, use the Select objects by properties.
Using the dialog, you compose the conditions to select objects and perform their selection. And you can select not only geometric objects, dimensions, designations etc., but also whole views, all objects of a layer and so on.
The dialog allows to select and deselect chosen objects, as well as to invert the result. To select the desired operations, you use the dialog toolbar.
Types of objects to be selected are displayed in the dialog as a tree. The type names are grouped (see the picture). You can select multiple elements of a group or the entire group. Also you can select elements from different groups.
You set up the conditions for each type of objects selected in the Tree. To do this, you use elements which appear in the right-hand part of the dialog when selecting the type of objects.
After applying the setting, the following happens. The system search the document for objects of each type selected in the Dialog Tree. From these objects, those are chosen which match the specified conditions. The specified operation is applied to the chosen objects — selecting or deselecting them. If the dialog specified the inverting operation, the result is inverted.
|
Note that the types of objects specified in different groups of the dialog tree don't influence each other. For example, in the Geometry group, the Segments type is selected, and the condition is set that segments belong to View 1. In the Miscellaneous group, the Views type was selected, and the View 2 name was set. After applying the settings, all View 1 segments and entirely View 2 in the document will be selected. |

|
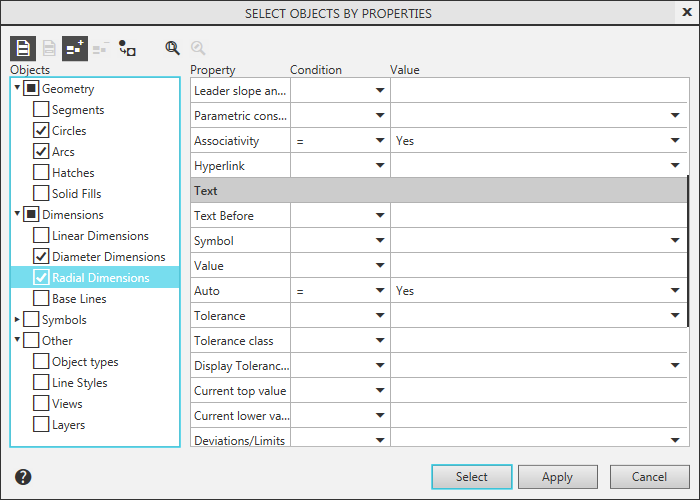
"Select objects by properties" dialog
How to work with the dialog
1.Launch the Select objects by properties dialog. To do this, run the Select — By properties...  command or click Select by properties... in the header of the Parameter Panel (if the Parameter Panel is in the process of running a command, the button is missing).
For a detailed description of the dialog controls, see the table.
2.Specify the area to apply the setting of objects. For this purpose click one of the following buttons:
 Apply to all objects,
 Apply to selected objects — available if there are selected objects in the document.
3.Select the action to perform on the objects. For this purpose click one of the following buttons:
 Add to Group — the selected objects will be highlighted,
 Exclude from group — the selected objects will be deselected; the button is available if the document contains selected objects.
|
If the document contains objects selected before, then clicking Add to Group button does the following: •if the setting is applied to all objects in the document, the selected objects will be added to the previously selected objects, •if the setting is only applied to the selected objects, the selected objects will remain selected, and the other objects will be deselected. |
4.If the result of the selection needs to be inverted, click Invert Selection  .
.
5.Choose the types of object for selection. To do this, turn on their appropriate options in the Dialog Tree.
To select all objects in a group, you can enable the option for that group.
|
Library macro-elements in the Objects Tree form a separate group with subgroups conforming to the libraries. For example, if the document has holes inserted from the Service Tools library, then the Objects Tree has a group Library macro-elements — Service Tools — Holes. Parameters for selecting library holes should be set in this group. Display of the group Library macroelements depends on the settings (see section Library Macro-element Editing). |
7.Configure the selection conditions for each of the chosen object types. The items to configure conditions are displayed in the right-hand part of the dialog when a Tree item is selected.
The procedure and specifics of configuring the conditions are described below.
8.When the configuration is complete, perform the selection of objects by clicking Select. The dialog will close. The set of objects selected in the document will meet the specified conditions.
If you need to perform multiple actions in one execution of the command, use the Apply button. In this case after selecting the objects the dialog will stay on the screen.
To complete working in the dialog without selecting objects, click Cancel.
Setting up conditions of choosing objects for selection
The items to configure conditions are displayed in the right-hand part of the dialog. Their set depends on which type of objects is chosen in the Dialog Tree.
In most cases setting up the conditions means specifying properties of objects using the table of properties. For some items of the Tree (e. g. Line Styles in the Other group), setting up the conditions is done by selecting the desired options from the pre-defined list.
To set the values of properties in the table, do the following.
1.Expand the Condition list in the desired property row and choose the condition option.
The set of available conditions depends on the type of a property.
2.Set the value for condition in the Value field. The way of setting also depends on the type of property. The values of numerical properties, for example, Length, Angle, coordinates of characteristic points, are entered from the keyboard. The values of other properties, for example, View, Style, Arrows Location, are selected from the dropdown list.
|
For quick setting the properties common to all objects of a group, select that group in the Tree and set the needed properties for it. These values will be transferred to all the objects within the group; options for all the group objects will be turned on. If the group contains objects which should not be selected, turn off their appropriate options in the Dialog Tree. |

3.Similarly set the values for all the properties needed.
Features of specifying property values
•Only objects of a selected type which meet all preset conditions simultaneously are included into a group of objects for selection. This takes into account the specified properties, the unspecified ones are ignored.
•If the table does not specify any property value when setting up the properties of objects of the chosen type, the selection group includes all the objects of that type.
•If values of properties are set, but the option of the object is disabled, then the objects are not included into the group.
•If no option is selected in the Condition column, but the value is set, then the = option is used as the condition.
If, on the contrary, the option in the Condition column is selected, but the value is not set, it is considered that the properties are not specified, i.e., all objects of the given type will fall into the group.
•If in the Property column, the View is selected, and in the Value column its number is specified, then while selecting a layer only the layers belonging to this view will be visible in the in the dropdown list.
If a view is not selected, then all the layers will be available for selection.