|
Collapsed curve |
Scroll |
Collapsing a curve is the transfer of a specified curve onto a cylindrical or conical surface. In the result, a new curve is built on the surface in such a shape that on the flat pattern it corresponds to the base object. This allows to apply a text or logo, a toolpath, a slot outline, etc., to the model face. In addition to curves, points can also be transferred to the surface.
|
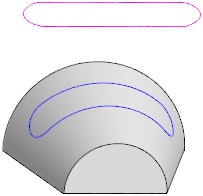
Sketch wrapped onto a conical face
There are objects for transfer to the surface:
•3D curve (including an array instance),
•entire sketch or separate curves in it,
•text in the sketch,
•edge of a solid or surface,
•an object vertex or a point in graphic area,
•a point in the sketch.
A collapsed curve (or point) may be located both within the contour of the specified face and outside it. The theoretical surface of the face is extended if needed. More details on the theoretical surface of the face...
The Collapsed curve  command is used to transfer a curve onto a cylindrical/conical face.

Step-by-step instructions
1.Specify the cylindrical or conical face in the graphic area to project the curve onto. The name of the specified object is displayed in the Surface field on the Parameter panel.
2.Specify a curve or point (or multiple objects) to move to the specified edge.
The name of object(s) is displayed in the Curves/Points field on the Parameters panel.
3.The phantom of the collapsed curve will be displayed in the graphic area if a flat curve or a point in the sketch is specified for collapsing, and the plane of the curve or sketch is tangent to the specified face or can be transformed into a tangent to it by parallel movement.
If the phantom is missing, it is required to specify a plane that determines the position of the foldable object(s). To do this, click Surface link on the Parameter panel and specify the plane or flat face that is tangent to the specified face. The name of the object will appear in the field. The specified objects are projected onto the specified plane, then the resulting projections are collapsed onto the edge.
The auxiliary plane of the required position can be built without interrupting the process of collapsing the curve. To do this, click Design plane  button located to the right of the field. The created plane will be automatically specified as the plane to place folded objects.
4.It's possible to set the name, color and display parameters of collapsed curve. To do that, use the Properties section.
5.To complete the operation, click Create object  button.
In the graphic area, a collapsed curve appears, and in the Design tree, an object with an icon and subordinate objects corresponding to the number of separate contours within the curve.
6.To complete the command, press the Finish button  .
.
See Also
Notes on working with curves having subordinate curve objects