|
Pages management |
Scroll |
The main tool for managing sheets of the drawing is the Document tree. All actions on sheets control are performed in it.
By default, the list of sheets is rolled up. To expand it, click the icon  to the left of the icon Sheets
  .
.
|
Sheets in the Drawing Tree
|
If the drawing was created on the base of a template, then the number of sheets in it and their parameters correspond to the template. Regardless of the method for creation of a drawing, the user can change the parameters of any sheet. |

|
You can change the default parameters of sheets in the First page parameters and New page parameters settings dialog. |

Selection of dimension and the sheet orientation
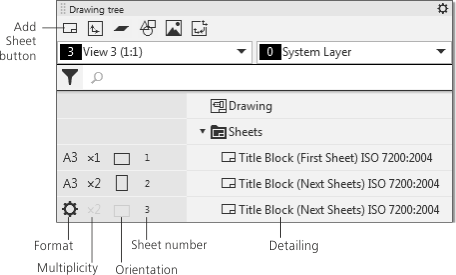
The current format, multiplicity, and orientation of the sheet are displayed as icons in the fields of the left-hand part of the Tree, See Fig..
You can change the format, multiplicity, and orientation using one of the following practices:
•Mouse-click the respective icon in the Tree. This method allows changing the parameters of sheets separately.
•A click in the format field expands a list of standard formats. The last item in the list is Custom Format; selecting it will cause a Format Setup dialog to appear, where you can set an arbitrary sheet size.
•A click in the Multiplicity field expands a list of multipliers. If the sheet sizes are custom, the multiplicity can’t be changed.
•A click in the orientation field changes the current orientation to the reversed. If the sheet sizes are custom, the orientation can’t be changed.
•Selection of sheet(s) in the Tree and call of the Formatcommand from the context menu. This method allows changing the parameters of multiple sheets simultaneously. After you run the command, a format selection dialog appears on the screen, where you can set the specified parameters.
Detailing – a set of (external and internal) frames of the sheet and tables (title block, etc.). The detailings provided with KOMPAS-3D are stored in the libraries – the *.lyt files located in the \Sys subfolder of the main system folder. Primary detailing library which is used on creation of documents – graphic.lyt. It is also possible to generate custom detailing libraries, see section Title blocks and document detailing.
Due to the fact that a detailing is assigned to each sheet, you don’t have to cross out frames and tables of the title block.
The name of the current sheet detailing is displayed in the right-hand part of the Document Tree, See Fig..
Detailing selection is performed in a separate the dialog. In it, you can select the required detailing from the current library, select another library, or give up using the detailing for a sheet. The sheet without detailing has no frames and the title block.
The Detailing selection dialog can be invoked by the following practices:
•Double-click the name of the current sheet detailing in the Drawing Tree.
•Invoke the Change detailing... Command from the context menu of any detailing table on this sheet in the graphic region of the document.
•Select a sheet (sheets) in the Drawing tree and invoke the Detailing command from the context menu. This method, unlike the previous two, allows to replace the detailing for several sheets at a time.
See Also
Storage of information on the detailing used in the document
You can add a new sheet into the drawing with one of the following practices:
•To do this, in the model tree toolbar click the Add Sheet  button in the drawing tree header.
•invoke the Insert – Sheet command.
In the Drawing tree, a new sheet can be located:
•after the selected sheet,
•after all the sheets available in the drawing (in the absence of a selected sheet).
Parameters of the added sheet (format, multiplicity, orientation, detailing) are defined by the setup of new sheets in the current drawing.
To delete one or more sheets from the drawing, select them in the Drawing tree and press the <Delete> key, or invoke the Delete command from the context menu.
The frames and title block will be deleted.
|
Drawings cannot exist without sheets. Therefore, you cannot delete the only remaining sheet in the drawing. |
You can display a selected sheet in the document’s graphic region using one of the following practices:
•Select the required sheet in the Tree of the drawing and invoke the Show sheet command from the context menu.
•Double-click the sheet icon in the Drawing Tree (it is located to the left of the detailing name).
The image in the graphic region will be shifted so that the selected sheet is found in the center of the graphic region. If, with the current scale of display, the sheet not fully visible, the scale is decreased to make it visible.