|
Changing the structure of commands of the context toolbar |
Scroll |
You can change the structure of commands of the context toolbar in the toolbar setup mode.
To initiate the setup mode, click on the  button in the right part of the context panel and call the Configure the interface... command from the menu that appears. The Command toolbar will appear on the screen.
|
In the Context bar setup mode, all elements of the system window become unavailable except for the custom toolbar and Command toolbar.
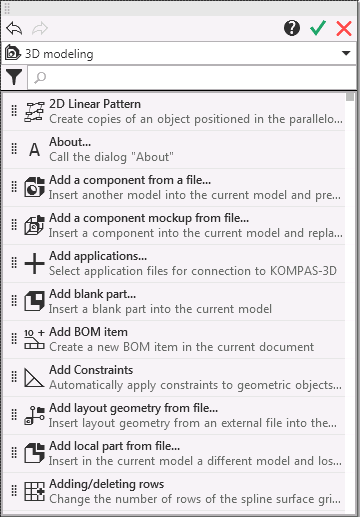
The Command toolbar contains a list of KOMPAS-3D commands.
In the setup mode, you can:
•add separators – vertical lines that separate the command buttons from each other,
•change the position of commands on the toolbar,
•remove commands from the toolbar.
The setup mode buttons are located at the top of the Command toolbar.
The Undo  button allows you to undo an action performed during the setup process, the Redo
  button allows you to redo the undone action.
To save the changes and finish the context panel setup, use the Apply and Exit  button. Exit
  button allows you to terminate the setup without saving any changes.
Adding commands to the toolbar
Use the Command toolbar to add a command to the context toolbar (see Figure).
The Command bar contains a list of KOMPAS-3D system commands. For each of the commands on the list a name, a brief description and an icon are shown (if there is no icon, the first two letters of the first two words of the command name are displayed instead).
Step-by-step instructions
1.On the Command bar, find the command you want to add to the current context bar.
For quick search of the command, enter its name in the search toolbar. If you need to search not only by name, but also by command description, press the Filters  , and then press the Command Description button.
|
The list of Toolbar commands is limited to the application area (in the same way as the list of commands in the Commands In the Tool Area Constructor). More details on commands areas of application... You can add a command that is included in any area of application to the context bar. Select the desired area using the drop-down list at the top of the Command toolbar (the selected default application area corresponds to the type of the current document). A command added from another area of application will be contained on the context toolbar, but if calling this command in the current document is not available, such command will be hidden. |

2.Place the cursor on the command string.
3.Click the left mouse button, hold it down and move the command to the context bar. While moving, the cursor takes the shape of a four-headed arrow  , and on the context toolbar, the places where a command can be placed are highlighted.
|
Adding commands to the context toolbar
4.When you reach the required position, release the mouse button.
A command button will appear on the context toolbar, and a command will be added to the toolbar setup menu to allow to control its view.
Adding a separator between the command buttons
If necessary, you can set separators between the command buttons on the context toolbar – vertical lines that will separate the buttons from each other.
To add a separator, use the Start a group command, which is called from the context menu of the buttons present on the context bar. The separator is set to the left of the button for which the command is called. You will see a checkmark next to the command name in the menu. Calling the command again removes the separator.
|
The Start a group command is present in the menu of all buttons on the context panel, except for the buttons located at its left border. |
Changing the position of the command
You can change the position of command buttons on the context toolbar by moving them with the mouse. If the toolbar consists of several rows, the buttons can be moved both within a row and between the rows.
Step-by-step instructions
1.Place the cursor on the command button.
2.Click the left mouse button, hold it down and move the mouse in the required direction.
The cursor takes the shape of a four-sided arrow , and the panel will highlight the spots where the movable button can be placed.
3.When you reach the required position, release the mouse button.
The sequence of buttons on the toolbar will change. The sequence of the corresponding commands that managing the command display, in the menu for setting up the panel.
Removing commands from the toolbar
All commands of the context toolbar, both available by default and those added during setup, can be removed. The following happens as a result of removal:
•For a default command present on the bar — the command button will be removed from the bar, but the command managing display will remain in the bar setup menu. This allows you to quickly return the button to the toolbar. For more details on managing command display...
•For a user-added command — the command button will be removed from the bar, and the command managing display will be removed from the setup menu. You can return the command to the toolbar only by adding it again from the Command toolbar. More about adding a command to the context toolbar...
|
If running a command added by the user may be necessary for further work, it is better to Disable the display of it. |

Procedure of command deletion
1.Place the cursor on the command button.
2.Click the left mouse button, hold it down and move the cursor to the free field of the system window. As you move, the cursor takes a form of a four-headed arrow
3.When you get the command outside the context bar, release the mouse button.
|
To delete a command from the context panel, you can also use the Delete object command from its context menu. |
Notes on removing commands from the context toolbar
•Vertical lines — separators can be displayed between the buttons on the context bar. If you remove a button, its corresponding separator is not removed. The separator will be automatically removed when there are no buttons left to the right of the separator.
•You cannot remove all buttons from the bar. After you remove the last of the buttons, you will not be able to complete setup and save the changes – Apply and Exit button becomes unavailable.
•The button for calling the same command can be found on different context bars. Removing a button from one of the bars does not apply to other bars.