|
Tool Area Constructor |
Scroll |
While working in Interface setting mode In the KOMPAS-3D window, the Tool Area Constructor window is displayed (see illustrations below).
The Constructor is used to change the structure of the Tool Area items. It allows you to add the following objects to the Tool Area:
•previously created custom sets of Tool Areas — are added to the list of sets of the current Tool Area,
•system toolbars and previously created custom toolbars — are added to the current set of toolbars,
•commands are added to the selected toolbar.
In addition, the buttons on the Constructor toolbar are used to perform the following actions:
•undoing  and redoing
  actions during the setup process,
•expansion/collapse  of toolbars and control panels,
•completion of work in interface customization mode with saving changes  and without
  .
.
The Constructor window contains two tabs — Commands and Sets and Panels. For detailed description of the tabs, see below.
The Commands tab contains a list of system commands for KOMPAS-3D. For each of the commands a name, a brief description and an icon are shown (if there is no icon, the first two letters of the first two words of the command name are displayed instead).
If the commands form a group (for example, in the figure these are the commands Cut in Sheet Solid and Hole in Sheet Solid), they are shown in the list not only individually but also as part of their group, i.e. the list contains a separate row for each command and a row for the group that combines them. The group row lists all the commands in that group.
|
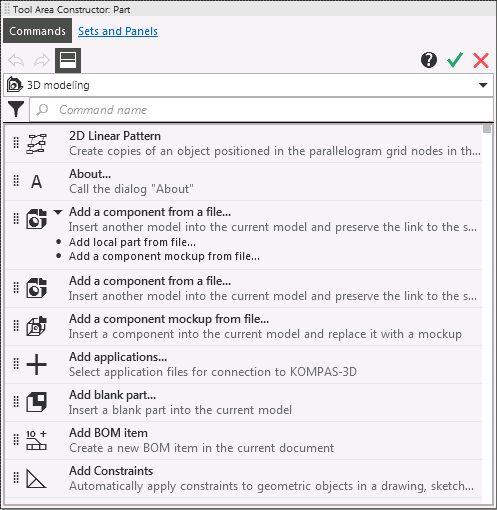
Tool Area Constructor, Commands tab
At the top of the tab there is a list of commands areas of application. It allows you to limit the set of commands displayed on the tab.
By default, an option is selected in the list which corresponds to the type of the current document. For example, if you configure in a model, the active scope is Three-dimensional modeling. The tab shows the commands that are used to build the model. You can select a different application area. The set of commands on the tab will change. For example, selecting the option Drawing will display the commands to construct a graphic image.
Some commands, such as Print Filters, Fit Scale, and others, are not included in any of the sets. To get these commands available on the tab, select the Show all commands.
There is a search toolbar below the list of application area options.
•To find the desired command by its name, enter the characters that are contained in the command name in the search box.
•To search not only by names, but also by command descriptions, click Filters  button, and then Command Description button.
|

Application of the filter Command Description
The list of commands includes both commands themselves and groups of commands, i.e. if a command is included in a group, it is shown twice — the command itself (a separate row) and as part of the group. Therefore, the list of found commands includes both the individual commands containing the characters you are looking for and the groups which include these commands.
|
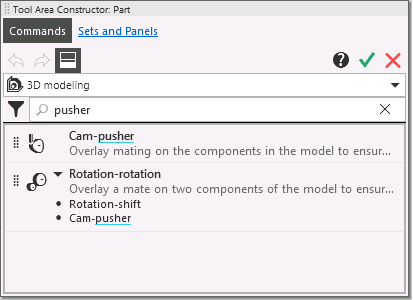
Search results for the group command
To limit the search area, in the filtering options group, press the button corresponding to the desired option — Commands or Team groups. In the first case, the search will be performed only among individual commands, and in the second case — only among groups. Accordingly, the list of found commands will contain either individual commands or groups of commands. If you select both options, the search area will include both commands and groups.
|
The search is performed in the list of commands limited to the selected application area. |

Sets and Panels tab is divided into two parts: the left part contains the list of all sets and toolbars available in the system, and the controls for that list, while the right part contains the preview window of the structure of the set/toolbar selected in the list.
|
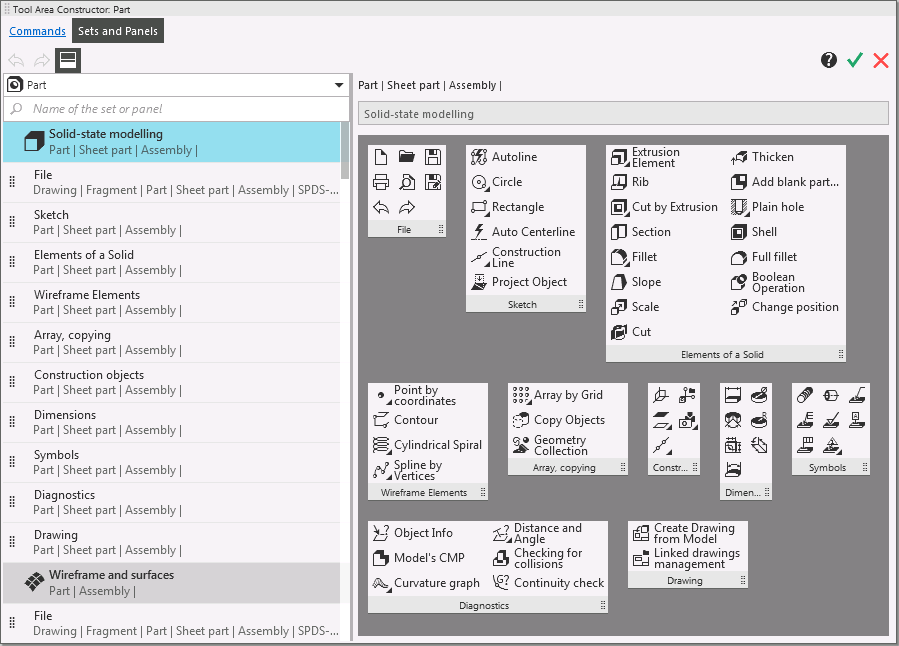
Tool Area Constructor, tab Sets and Panels
The list of sets and toolbars. List controls
The list of sets and toolbars is located on the left side of the tab Sets and Panels. It contains all available sets of toolbars — System and user menu. The row of the set is displayed in dark gray. It shows the name of the set, the icon, and the list of types of the Tool Area that include the set.
For custom sets, a movement marker is shown on the left side of the row  . This means that the set can be added to the toolbar list of the Tool Area. More details on adding the set...
A list with toolbars is shown for each set. If the toolbar is included in more than one set, it is shown in each set. The toolbar row contains the name of the toolbar and a list of Tool Areas in which it is included. A movement marker is shown on the left side of the row . This means that the toolbar can be added to the toolbar set of the Tool Area. More about adding toolbars...
|
Panels containing input fields, such as Scale, Section, Page, cannot be added to the Tool Area. The rows of such toolbars do not have the movement marker. |
At the top of the tab there is a list of types of the Tool Area. It allows you to limit the list of sets and toolbars displayed on the tab.
By default, a type of the Tool Area that is used in the current document (document mode) is selected in the list. The tab shows the sets and toolbars that are included in the Tool Area of that type. More details on configuring the Tool Area of various types...
If you want to display the structure of sets and toolbars included in the Tool Area of another type, select that type in the list. To show all sets and toolbars, select the option All toolbars from the list.
For quick search of the desired set or toolbar on the Constructor tab, use the search toolbar. Enter characters included in the name of the set/toolbar in the search toolbar. Only sets and toolbars the names of which contain these characters will remain on the tab.
|
The search is performed among the sets and toolbars that are included in the Tool Area of the selected type. |
You can view the structure of the set or toolbar. To do this, use the preview window on the right side of the tab Sets and Panels.
Set/Toolbar structure preview window
On the right side of the tab Sets and Panels is the preview window. It displays the structure of the object selected on the left side of the tab — a toolbar or a set of toolbars.
If you select a set, the preview window shows all toolbars included in that set, and if you select a toolbar, only the toolbar itself will be shown.
The toolbar is shown in the preview window in the same way as it is shown on the Tool Area. In this case, all the settings made for the toolbar such as the structure of commands, the number of columns with commands, etc. will be taken into account.
The toolbar header contains a movement marker , which is used for adding the toolbar to the set.
The name of the object (of the set or the toolbar)selected for viewing is shown in the field above the preview window. If the field is gray, you cannot change the name, but if it is white, you can. You can change the names of the custom sets and toolbars.
The types of Tool Areas that include the selected object to be viewed are listed above the field.