|
Radial dimension on the branched landing |
Scroll |
According to GOST, dimensions for equal radii can be specified on the single landing. In this case, branched landings are used for dimensioning, i.e. landings with dimension lines to multiple circles or circle arcs.
|
|
a) |
b) |
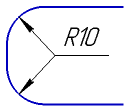
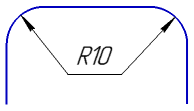
Radial dimension on a branched landing
a) from landing start, b) from landing end.
You can set dimension on a single landing only for non-concentric circles (or circle arcs) of equal radii.
To set the dimension for two or more circles, follow these steps.
1.Run the Radial Dimension command  .
.

2.Specify the first circle to be dimensioned. Its name will be displayed in the Objects field, and the graphic area will display a phantom of the dimension.
3.Select dimension line type using the Type group of buttons:
From center,
 Not from center.
4.Edit the dimension text, if required. To start working with the dimension text, press any alphanumeric key. Details on editing the dimension label...
5.Set the number of decimal places in the dimension text. Details...
6.Set a dimension tolerance. Details...
7.Select the method for constructing the branch: from the start of  the landing or from its end
  . To do this, open the Additional parameters section and click the required button in the Branches group.
8.Specify the second circle. Its name will be added to the Objects field. The dimension phantom will change – it will include the dimension line, landings and branches.
|
Landing position is system-defined. You can select a different landing position using the Text Location group of buttons. |

9.Specify the other circles to be dimensioned.
You can create any number of branches by specifying circles and arcs of the same radius. The variant for constructing each branch (from the beginning of the landing or from its end ) depends on which button from the Branches group is pressed. Please, note that these buttons only apply to newly created branches. You cannot change the construction method for the existing branch.
After you specify circles, the appropriate number of branches is added to the dimension phantom.
If you want to cancel branch creation, remove the name of the relevant circle from the Objects field.
10.Set up additional dimension parameters, if required: arrow display parameters, location, etc. Details...
11.Select the starting point of the landing. The dimension will be created automatically.
12.To complete operation of the command, click Finish  .
.
Later, you can change parameters of the created dimension, edit its defining points (see section Editing Dimensions), adding and deletion of branches. A branch is added automatically if you specify a circle of the same radius as the circle with the edited dimension; it is deleted if the circle name is removed from the Objects field. You can also delete a branch by selecting the defining point on its end and pressing <Delete>.
See Also