|
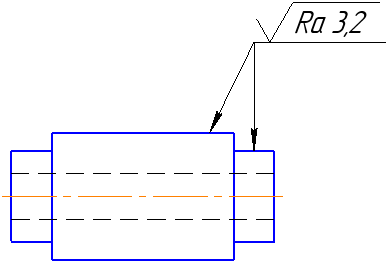
Designation of surface finish on the landing with branches |
Scroll |
To label a designation of surface finish for two or more surfaces, do the following actions.
1.Run the Roughness  command.
A phantom of the surface finish signage will appear in the graphic area.

2.Set up the Parameters of surface finish designation. While setting up the parameters, enable the placement of signage on the landing.
3.Select the object for applying a designation (the outline of a part, the leader line of dimension, etc.). The name of the selected object will appear in the Objects field on the Parameter Panel.
4.Specify the final point of the leader line on the selected object. If the point is specified outside the object, then the position of final point of the leader line is determined by the projection of a set point onto the object or its continuation. In this case, the object (except for splines, conic curves, and Bezier curves) is automatically extended to the required distance as a thin line.
5.Specify the second object for labeling a designation. On aiming the cursor at the object, the object will be highlighted, and the cursor will take the shape of square "trap".
The name of selected object will be added to the field Objects. The second branch of the leader line will appear in the phantom of designation.
6.Indicate the position of final point of the created branch at the selected object.
7.Create the required number of branches, repeating items 5 and 6.
8.Specify the starting point for the landing.
9.After indication of the point of origin of the landing, the Add Text subprocess will be started automatically. Generate a caption of designation.
At the end of the Add Text subprocess, creation of the designation of surface finish ends automatically.
10.To complete operation of the command, click Finish  button.
Subsequently, while editing designation, you can add or delete branches of the leader line, create kinks on the branches. Details...
|
Designation of surface finish on the landing with branches