|
Setting the fillet radius at the specified points |
Scroll |
When selecting the By Points method, the fillet radius values are specified at the indicated points on the edge being filleted. To use this method for defining a fillet radius, click the By Points  button in the Tracing mode group. The Create/Edit toggle switch and the table of point parameters will appear on the Parameter Panel. The switch is in the Creation position. The point parameters table is empty.
Perform the following to set the points and to configure the fillet parameters.
1.Specify the default fillet radius in the field Radius.
2.Specify points to set the radius on the filleted edges.
You can specify arbitrary points of the edges and the point objects located on them. In the latter case an associative link is formed between the point where the radius is set, and the specified point object (if this object is moved later, then the point where a fillet is constructed with the given radius will also be moved).
Points are numbered in the order they are specified. Point numbers and their correspondent parameters are displayed in the point parameters table.
3.Go to the points editing mode, by setting the Create/Edit toggle switch to the Edit position. You can also start editing points by activating any of the rows in the point parameters table, this will automatically set the toggle switch to the Edit position.
4.By default the fillet radius in the specified points is equal to the one specified in the Radius field. Specify the desired radius value for each point. To do this, select table rows and enter the values in the column cells Radius. The changes made will be reflected in the phantom.
The radius value can also be set using the characteristic point in the graphics area. Details about the Use of Handles...
5.When specifying a point, the system automatically determined the distance to it from the starting point of the edge. It is shown in % of the curve length and in length units in the corresponding columns of the table — % and Length. If necessary, refine the position of points using any of these columns.
You can also change the position of the point on the edge using the characteristic point in the graphic area. Details about the Use of Handles...
6.If a point object is specified to set the point, the name of this object is displayed in the table, in the Object column. In the editing mode you can change the object, by selecting the row of the desired point and specifying another point object in the graphic area. If you need to delete the associative link of a point with an object, click the  icon in the cell with the name of the point object.
7.If necessary, you can change what points are included in the set.
•To delete a point, select its row in the table and click the Delete  button above the table. The numbering of the set points will be rebuilt.
•To add a new point, set the Create/Edit toggle switch to the Creation position and specify the desired point. It will be added in the end of the set point list.
The figures demonstrate a table of point parameters, where the filleting parameters are defined and the filleting method with variable radius using the By points method.
|
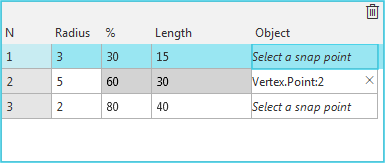
Point parameters table
|
|
a) |
b) |
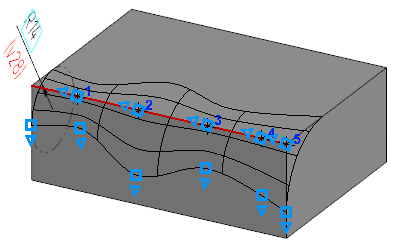
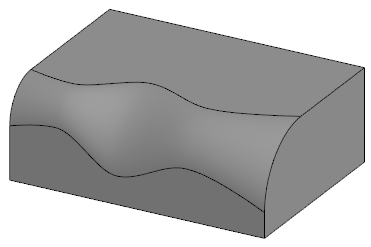
Example of variable radius fillet: By points:
a) constructing a fillet, b) the final result
When constructing using the method By vertices , you can specify the fillet parameters using defining points.
Changing fillet parameters using defining points
The radius and the position of a point on an edge being filleted can be set in the graphic area using characteristic points.
There are two defining points corresponding to each specified point: one of them changes the fillet radius, another changes the position of the point on the filleted edge. If the point is associated with a point object, then the point position cannot be changed. Thus the graphic area displays only one characteristic point for it which controls the fillet radius.
You can use characteristic points both in the point parameters editing mode and in the mode of adding new points (the current working mode is determined by the Create/Edit toggle switch position). For example, you can add a new point and immediately change the fillet radius for it, by moving the corresponding characteristic point in the graphic area. This will leave the Create/Edit toggle switch in the Creation position.
In some cases, to find the desired point, it is convenient to select it before in the point parameters table. The point number will be highlighted in the graphic area, and the toggle switch will be set to the Edit position.
To change the desired parameter value, move the corresponding characteristic point. This will automatically change the value displayed next to the point in the graphic area, and the value in the point parameters table.
Notes on Setting Fillet Parameters
•By default the fillet radius in the edge border points (the start point and the end point) is equal to the one specified in the Radius field. These points correspond to 0% and 100% of the edge length. If the fillet radius in a border point should differ from the default one, specify that point in the graphic area and set the desired radius value in the point parameters table. For a closed edge, the start point and the end point are the same, so you should specify either the start point (0%) or the end point (100%).
|
If two edges are selected to construct a fillet, where the end point of one of them coincides with the start point of the other, then you may specify only one of them when setting the fillet. |

•Zero fillet radius can be set only at border points. If it is difficult to set a border point of the edge in the graphic area precisely, you can first set it approximately, and then enter the desired value, 0% or 100%, in the corresponding cell of the point parameters table. Note that for a point which is not a border one, you cannot set zero radius value, and for a border point with zero radius you cannot change the distance from the vertex (to do this, you need to change the radius first).
•For filleting edges without specified points, the default value is used. For example, if the option Tangential Edges was enabled when creating a fillet, these tangential edges will be automatically detected by the system. As you cannot specify points on them, they are filleted with the default radius.