|
Arc construction |
Scroll |
In KOMPAS-3D you can construct:
•Arc by Center and Two points,
You can use snaps and a geometrical calculator.
|
The arc plotting commands are combined in a group. While executing a group command, you can switch to execution of another one using buttons of the Parameter Toolbar header. You can also transfer any parameters you’ve specified between the commands of a group. More information about parameters transfer... |

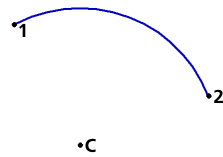
An arc with a given center and endpoints is constructed by the Arc  command.

Step-by-step instructions
1.Set the center of the arc.
2.Set the starting point of the arc in one of the following ways:
•indicate the point with the mouse,
•Enter the initial angle and diameter/radius of the arc into the respective fields on the Parameter Panel (to set the diameter/radius, in the Arc Parameter group, press the required button — Diameter  or Radius
  ).
).
3.Set the end point of the arc. This can be done in two ways:
•indicate the point with the mouse,
•enter the end angle of the arc in the appropriate field.
After setting the end point, the arc will be automatically created.
4.To complete operation of the command, click Finish  .
.
|
Building in the center of the arc and the two points
Additional features when building...
An arc passing through three set points is plotted using the Arc by Three Points  command.
Step-by-step instructions
1.Set the starting point of the arc.
2.Set the end point of the arc.
3.Determine the position of the point through which the arc should pass, in one of the following ways:
•set the point with the mouse,
•Enter the height of the segment into the respective field on the Parameter Panel, then select the position of the arc by clicking on either side of the line connecting its start and end points.
After determining the position of the third point, the arc is automatically created.
4.To complete operation of the command, click Finish .
|
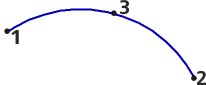
Building an arc by three points
Additional features when building...
An arc tangential to the specified object is constructed using the Tangent to curve Arc  command.
Step-by-step instructions
1.Specify the object that the arc should touch.
2.Specify the point through which the arc should pass.
•If the specified point lies on the selected object, then it is the starting point of the arc.
•If the specified point is located outside the selected object, then the starting point of the arc is the point of tangency defined by the system.
3.Set the end point of the arc in one of the following ways.
•Specify the necessary point. The radius/diameter of the arc will be determined automatically.
•Set the radius/diameter of the arc, and then specify the point that determines its position.
To set the radius/diameter, press the Arc Parameter button in the Diameter or Radius group and enter the value into the respective field.
Phantoms of all variants of arcs that meet the specified parameters will appear in the graphics area.
|
The construction of a tangent arc is not possible with all combinations of the point through which the arc should pass, and the radius values. The impossibility of building is indicated by the disappearance of the arc phantom after entering the radius value. |
4.Fix the required phantom with a mouse click. To fix several phantoms use <Ctrl> key. Details...
After fixing the phantom, an arc is automatically created.
|
If it is possible to build only one arc that satisfies the specified parameters, then after specifying its end point, the arc is automatically created. |
5.To complete operation of the command, click Finish .
|
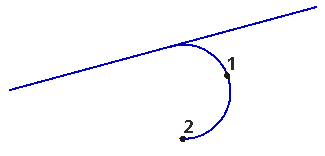
Arc tangential to a segment
Additional features when building...
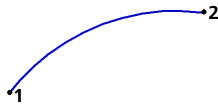
The arc with given end points is built using the Arc by Two Points  command.
There are two ways to build an arc.
Method 1. By two points
Arcs with a angle of 180° are built using this method.
1.Set the starting point of the arc.
2.Set the end point of the arc. The angle of the arc will be equal to 180°, and its radius/diameter will be determined automatically.
After setting the end point, the arc is automatically created.
3.To complete operation of the command, click Finish .
Method 2. By two points and radius/diameter
In this way arcs are built with any angle.
1.Set the starting point of the arc.
2.Specify the diameter/radius of the arc. For this, in the Arc Parameter group on the Parameter Panel, press the Diameter or Radius button and enter the value into the respective field.
The phantoms of the arcs that can be created appear in the graphics area.
3.Set the end point of the arc. The aperture angle of the arc will be determined automatically. Phantoms will take the required position.
4.Fix the required phantom with a mouse click. To fix both phantoms, use the <Ctrl> key. Details...
After fixing the phantom, an arc is automatically created.
|
If only one phantom is displayed on the screen, the arc is automatically created after setting its end point. |
5.To complete operation of the command, click the Finish .
|
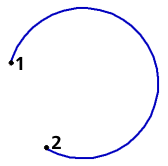
Arc by Two Points
Additional features when building...
An arc with specified final points and the defined aperture angle is constructed using the Arc by Two Points and Angle  command.
Step-by-step instructions
1.Set the starting point of the arc.
2.By default the aperture angle is 90°. If necessary, change the angle value. To do this, enter the desired value in the field Aperture Angle in the Parameter Panel.
3.Set the end point of the arc. An arc will be automatically created.
4.To complete operation of the command, click Finish .
|
Arc on two points and an aperture angle of 60°