|
Dimension label |
Scroll |
Generated Size label is displayed in the Text field on the Parameter Panel. In addition to the dimension value, it can also include tolerance grade designation, maximum deviations or limits, sign, and text elements.
By default, the dimension value is defined automatically by the system. When the Auto  button located next to the Text field is pressed.
If you need to enter the dimension value manually and/or configure the size label (add/remove its items), go to the mode of working with the text using one of the following methods:
•click in the Text field,
•press any alphanumeric key,
•run the Text — Edit context menu command in the graphic area.
Will start subprocess of text input, and in the graphic area there will appear Table for input of the label and additional Parameter Panel.
Perform the necessary actions in the subprocess and press the Create Object  button or the mouse wheel. The system will return to the dimensioning process.
|
If you change dimension value manually while setting up size label, the Auto button is deselected. To go back to calculating this value automatically, select this button. |

When working in the text entry subprocess, you can not only form size label but also configure its appearance, for example, select the font, set the character height, etc. Certain size label parameters can be configured without starting the text entry subprocess, e.g., display of the framed size label, placement of dimension limits on the same line, etc. Elements used to configure these parameters can be found on the Parameter Toolbar. Details...
|
When editing the projection dimension, some capabilities for altering the size label are unavailable. |
This table lists fields used to set size label elements. For a detailed description of the fields, see the table. Fields of the size label table.
|
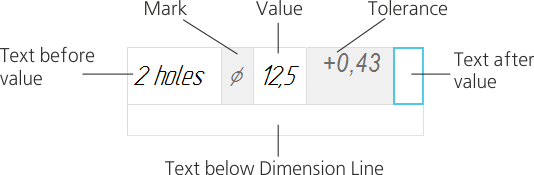
Size label entry table for setting linear dimension
Field color indicates how it is filled:
•white field – the text is entered manually or selected in the user menu (called by double-clicking the field),
•gray field – unavailable for manual entry; use buttons on the additional Panel.
Fields of the size label table
Field |
Description |
|
Text before value |
Use this field to enter text to be placed before the dimension value. In this field you can also add predefined text from the user menu or a symbol using the Symbol... button. |
|
|
||
Core |
The field for displaying the sign to be set before the dimension value (e. g. diameter sign, radius sign etc.). This field is included in the table for all dimensions, except for angular dimensions. The sign is set automatically using the buttons of the group Core Additional Parameter Panel. If the No symbol/Custom button is pressed in the group, the Core field is available for manual entry, and you can invoke the user menu in it. |
|
|
||
Value |
Use this field to set the dimension value. By default, the value is transferred automatically. You can also enter it manually. This cancels auto-determination of the value. If you want to re-enable automatic definition of value, click Auto determination of a value button. Additional Parameter Panel. You can select a value in the user menu for all dimensions, except for angular dimensions. By default, it contains standard linear dimensions according to GOST 6636-69. |
|
|
||
Tolerance |
This field displays tolerance specified on the additional parameter panel. |
|
Text after value |
Use this field to enter text to be placed after the dimension value. In addition to text entered manually, you can also add the following to this field: •x45° string, asterisk (*), symbol, using buttons on the Additional Parameter Panel, •predefined text from the user menu. |
|
|
||
Text below Dimension Line |
Use this field to enter text to be placed below size label. You can also add predefined text from the user menu into this field. |
|
|


You can use context menu to fill white spreadsheet cells. It includes the following commands:
 Standard text...,
 Special Character...,
 Symbol...,
 Reference....
These commands duplicate analogous buttons on the Parameters Panel. Elements to be added are placed in the cell with the cursor in it.
For angular dimensions, context menu also include the Display Format dropdown list. More about the display format of angular dimension value...
To configure the size label and to enter/edit the text, use elements on the additional Parameter Toolbar.
|
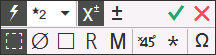
Additional Parameter Toolbar for setting a linear dimension
The additional bar includes both unique elements (e. g. sign selection buttons) and elements matching those on the Parameter Panel (e. g. Auto determination of a value, Create Object, Finish buttons). The description of elements is provided in the table.
Elements of the additional Parameter Toolbar
The element |
Description |
|
General elements |
||
|
Auto determination of a value |
This button controls how the dimension value is determined. When it is selected, the dimension value is determined automatically. After the value is entered manually (or selected from the user menu), the button is automatically deselected. To restore the auto-defined value, click Auto determination of a value button again. |
Precision |
The field displays the current number of decimal places in the size label. The drop-down list allows you to set the precision of displaying the dimension value. The list is available if the dimension value is calculated automatically (the Auto button is selected). |
|
|
Enable/disable work with tolerance |
These buttons control assignment of tolerance to dimension. Clicking the Set/modify tolerance opens the tolerance assignment dialog box. It includes the Tolerance toggle switch that controls whether dimension has tolerance, and tolerance assignment elements. More details on assigning tolerance... The Enable/disable work with tolerance button and Tolerance toggle switch in the dialog box serves the same purpose: if this button is selected, dimension has tolerance; otherwise, it has none. |
|
Set/modify tolerance |
|
|
Asterisk |
This button can be used to add the "*" character to the text following the dimension value. This character is placed in the field Text after value, regardless of on which field of table the cursor is set. |
|
Symbol... |
This button can be used to add a random symbol to any white field in the table. Clicking this button displays the symbol selection dialog. The selected symbol is added to the table field with the cursor in it. |
|
Create Object |
This button completes generation of size label and saves the changes. |
|
Finish |
This button completes generation of size label without saving the changes. |
For linear, radial and diameter dimensions the |
||
Core |
group of buttons can be used to select a sign to be set before the dimension value (e. g. diameter sign, radius sign, etc.). The desired sign automatically appears in the Core field of table for the size label after pressing the corresponding button. At the same time the field is not available for manual entry. If the dimension value should not be preceded by a mark, as well as if you need to enter an arbitrary symbol in the field, click No symbol/Custom button. The Core field will become available for manual entry. In this field you will also be able to invoke the context menu and the user menu allowing to set the thread designation (except metric). |
|
|
No symbol/Custom |
|
|
Diameter |
|
|
Square |
|
|
Radius |
|
|
Metric thread |
|
|
x45 degrees |
This button can be used to add the x45° line to the text following dimension. When this button is clicked, value in the Text after value field of the size label table is replaced by the string 45°. If you need this field to include other characters, add them after you click x45 degrees button. |
For angular dimensions |
||
|
Degrees |
These buttons can be used to add degree, minute and second designations to the dimension field of the size label table. |
|
Minutes |
|
|
Seconds |
|


Additional Elements for Configuring Text Detailing
You can configure additional settings for the size label text using elements on the Parameter Toolbar listed in the table. These settings are configured within the main process of dimension creation/editing instead of the text entry subprocess.
The element |
Description |
|
Detailing |
This group of buttons can be used to set up additional detailing of the part of size label containing mark, dimension value, tolerance grade and deviations (limits). The following options are available: •Underlined, •Round Brackets, •Square Brackets. Underlining and brackets can both be enabled. In this case, all text elements are enclosed in brackets and underlined. If the option is enabled Nominal (framed), the text elements are enclosed in brackets, including the frame. |
|
|
||
|
||
|
||
|
Alignment |
This group of buttons can be used to select how to position dimension deviations or limits relative to is nominal value. It can be found in the Additional parameters section. If size label includes neither deviations nor limits, these buttons do not affect its display. |
|
||
|
||
|


