|
Construction of auxiliary straight lines |
Scroll |
In KOMPAS-3D, it is possible to construct:
•Straight line through two points,
•Straight Line Tangent through Outside Point,
•Straight Line Tangent to curve at point,
•Straight line tangent to two curves,
•Bisector.
For precise cursor positioning and parameter setting during the construction process, you can use snaps and geometrical calculator.
|
Commands for constructing auxiliary lines are combined into a group. While executing a group command, you can switch to execution of another one using buttons of the Parameter Toolbar header. You can also transfer any parameters you’ve specified between the commands of a group. More information about parameter propagation... |

Straight line through two points
A straight line passing through two specified points is plotted using the Construction Line  command.

Step-by-step instructions
1.Set the points through which the straight line will pass in one of the following ways.
•Indicate two points through which the straight line should pass.
After specifying the second point, the straight line is automatically created.
•Indicate in any sequence the point and the slope angle of the straight line – the angle between the straight line and the x-axis of the current coordinate system. The angle is indicated in the corresponding field of the Parameter Toolbar.
After specifying the point, the straight line is automatically created.
|
If you want to build two mutually perpendicular straight lines at once, then before specifying the second point or angle, turn on the option Two Lines on the Parameters Panel. Then through the first specified point there will pass one more straight line, perpendicular to the created one. The enabled option remains in this state until the end of the session in KOMPAS-3D or until it is disabled. To temporarily enable the option (or disable it if it was enabled), press during construction. After you release the key, the option will return to its previous state. |
2.To complete operation of the command, click Finish  .
.
|
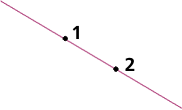
Construction of a straight line by two points
Additional features when building...
A horizontal line passing through a specified point is plotted using the Horizontal Line  command.
Step-by-step instructions
1.Specify the point through which the straight line should pass.
A straight line will be automatically created.
2.To complete operation of the command, click Finish .
|
Horizontal straight line is considered to be parallel to the abscissa axis of the current coordinate system. Therefore, if you build a horizontal straight line in a form whose coordinate system is rotated relative to the absolute coordinate system, this straight line will not be parallel to the horizontal sides of the sheet. |
Additional features when building...
A vertical line passing through a specified point is plotted using the Vertical Line  command.
Step-by-step instructions
1.Specify the point through which the straight line should pass.
A straight line will be automatically created.
2.To complete operation of the command, click Finish .
|
Vertical straight line is considered a straight line parallel to the y-axis of the current coordinate system. Therefore, if you build a vertical straight line in a form whose coordinate system is rotated relative to the absolute coordinate system, this straight line will not be parallel to the vertical sides of the sheet. |
Additional features when building...
A straight line parallel to a rectilinear object is constructed using the Parallel Line  command.
Step-by-step instructions
1.Specify a straight line object, parallel to which the straight line should pass.
The name of the selected object is displayed in the Object field on the Parameter Panel.
2.Set the distance from the specified object to the parallel straight line using one of these methods:
•Specify the point through which the created straight line should pass.
A straight line will be automatically created.
•Enter the distance value in the corresponding field on the Parameter Panel.
A phantom of the line being created will appear in the graphics area.
If you want to create a straight line on the other side of the selected object, move the cursor in that direction. Phantom position will change.
Lock phantom with a mouse click. A straight line will be created.
|
If you want to create two straight lines, one on each side of the selected object, enable the option On both sides before specifying the point or fixing the phantom (depending on the method of setting the distance). The phantoms of two parallel lines will be displayed in the graphics area. The enabled option remains in this state until the session in KOMPAS-3D is completed or until the option is disabled. To temporarily enable the option (or disable it if it was enabled), press the <Ctrl> key during the build process. After you release the key, the option will return to its previous state. |
3.To complete operation of the command, click Finish .
|
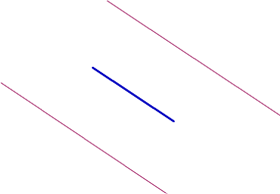
Straight lines parallel to the segment
Additional features when building...
A line perpendicular to the specified object is constructed by the Perpendicular Straight Line  command.
Step-by-step instructions
1.Specify the object, perpendicular to which the straight line should pass. The name is displayed in the Object field on the Parameter Panel.
2.Specify the point through which the created straight line should pass. Phantoms of all variants of lines, perpendicular to the selected object and passing through the specified point, will appear in the graphics area.
3.Fix the required phantom with a mouse click. To fix several phantoms use the <Ctrl> key. Details...
After fixing the phantom, a straight line is automatically created.
|
If through a given point you can build only one perpendicular line, then it is automatically created after specifying the point. |
4.To complete operation of the command, click Finish .
|
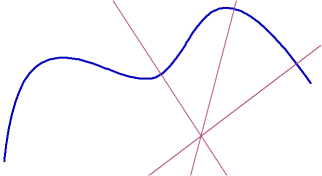
Straight lines, perpendicular to the spline
Additional features when building...
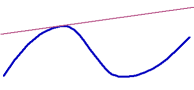
Straight Line Tangent through Outside Point
A straight line tangent to a curve and passing through a point outside of this curve is plotted using the Straight Line Tangent through Outside Point  command.
Step-by-step instructions
1.Specify the curve to which the straight line should go. The name of the curve appears in the Object field in the Parameter panel.
2.Specify a point outside the specified object through which the straight line should pass. Phantoms of all variants of lines, tangential to the selected object and passing through the specified point, will appear in the graphics area.
3.Fix the required phantom with a mouse click. To fix several phantoms use the <Ctrl> key. Details...
After fixing the phantom, a straight line is automatically created.
4.To complete operation of the command, click Finish .
|
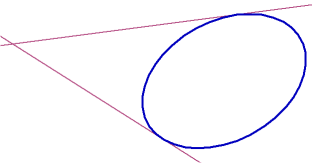
Straight lines, tangential to the ellipse
Additional features when building...
Straight Line Tangent to curve at point
A straight line tangent to a curve and passing through a specified point of this curve is plotted using the Straight Line Tangent to curve at point  command.
Step-by-step instructions
1.Specify the curve to which the straight line should go. The name is displayed in the Object field on the Parameter Panel.
After selecting an object, tangent phantoms appear in the graphics area.
2.Set the tangency point or the slope angle of the tangent (the angle between the straight line and the x-axis of the current coordinate system). The angle value is entered in the corresponding field of the Parameter Toolbar.
|
Point can be specified both on the curve and outside it. In the latter case, the position of the tangency point is determined by the projection of the specified point on the curve. |
Phantoms of all variants of lines, tangential to the selected object and passing through the specified point, will appear in the graphics area.
3.Fix the required phantom with a mouse click. To fix several phantoms use <Ctrl> key. Details...
After fixing the phantom, a straight line is automatically created.
4.To complete operation of the command, click Finish .
|
|
a) |
b) |
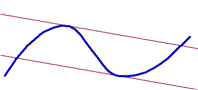
Spline tangent
a) passing through a given point, b) having a given slope angle
Additional features when building...
Straight line tangent to two curves
A straight line tangent to two curves is plotted using the Straight line tangent to two curves  command.
Step-by-step instructions
1.Specify the first curve to which the straight line should go. The name is displayed in the Objects field on the Parameter Panel.
2.Specify the second curve to which the straight line should go.
Its name will appear in the Objects field, and phantoms of all possible tangential variants will appear in the graphic area.
3.Fix the required phantom with a mouse click. To fix several phantoms use <Ctrl> key. Details...
After fixing the phantom, a straight line is automatically created.
4.To complete operation of the command, click Finish .
|
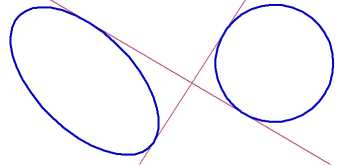
Straight lines tangential to ellipse and circle
Additional features when building...
A bisector of an angle formed by two specified straight-line objects is plotted using the Bisector  command.
Step-by-step instructions
1.Sequentially specify any two straight objects.
After selecting objects in the graphics area, the bisector phantoms of the corners formed by them appear.
|
If two parallel objects are specified, a straight line equidistant from these objects will be constructed. |
2.Fix the required phantom with a mouse click. To fix several phantoms use the <Ctrl> key. Details...
After fixing the phantom, a straight line is automatically created.
3.To complete operation of the command, click Finish .
|
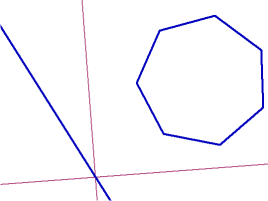
The bisectors of the angles formed by the segment and side of the polygon