|
Configuring the position of the toolbars |
Scroll |
Position toolbars In the window, it is configured. You can swap the toolbars on the Toolbar Panel of the window&Place them at the borders graphic area. These actions can be performed in the main system window and in the interface setting mode.
Changing the sequence of toolbars
You can change the sequence of toolbars on the toolbar Panel of the window by moving toolbars to the right or to the left.
To move a toolbar, follow these steps.
1.Set the cursor on the displacement marker  , which is located in the right part of the panel header.
2.When the cursor takes the shape of a four-side arrow  , click the left mouse button and, without releasing the button, move the toolbar to the required direction.
The toolbar that you move will swap places with the neighboring toolbars.
3.When you reach the required position, release the mouse button.
Moving toolbars to the graphic area
You can extract any toolbar from the Toolbar Panel and attach it to the left or right border of the graphic area. The appearance of the toolbar will change: the toolbar will consist of one column showing only icons of commands.
To place the toolbar in the graphic area, drag it to the required border using the movement marker and release the mouse button when the border is highlighted.
In the main window, borders can be located Control Panels. In this case, the toolbar is moved to the border of the control panel (Figure a) or the column with buttons that manage the state of the control panels (Figure b), if these panels are hidden.
|
|
a) |
b) |


Toolbar location in the main window:
a) the control panel is shown; b) the control panel is hidden
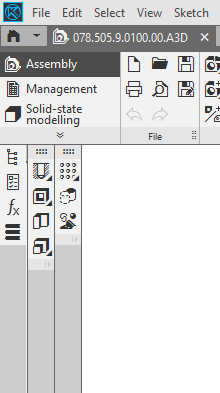
The control panels are not shown in the interface setting mode. To place the toolbar at the right border of the window, move it to this border, and to place it at the left border, move it to the border of the list of toolbar sets so that the part below the Toolbar Panel of the window is highlighted (see the Figure).
|

Placement of the toolbar in the interface setting mode
If necessary, you can move several toolbars to the graphic area and place them next to each other (Figure a).
You can also place toolbars under each other, attaching each subsequent toolbar to the bottom or top border of the previous toolbar (Figure b). If you want to change the position of the toolbar in the column, move it to a free field and then move it to the border where it should be placed.
|
|
a) |
b) |
Placement of toolbars in the graphic area:
a) side by side; b) under each other
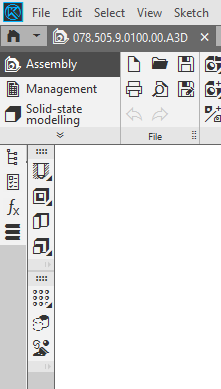
If the last (lowest) toolbars do not fit completely, they are automatically shortened. Command buttons get hidden, and an icon  appears on the toolbars. Clicking this icon opens a list of hidden commands on the toolbar that allows you to call the desired command (see the figure).
You can shorten the desired toolbar, if needed. To do this, place the cursor on the movement handle of the subsequent toolbar and move the toolbar upward. The buttons of the previous toolbar will be hidden in sequence. When you get the desired length of the toolbar, stop moving. You can leave any number of command buttons on the toolbar or hide all the buttons (the figure shows a toolbar shortened manually; all commands except for one are hidden).
|

Calling a command from the list of hidden commands of the toolbar
To return the toolbar to the Toolbar Panel, drag it with the mouse into this area by the header. Moving the cursor to the borders of toolbars already existing there, you can select where the toolbar that you move will be positioned.
|
Please note that the toolbar which is outside the Toolbar panel remains in its set: when you change the current set, the toolbar disappears. |
