|
Adding, removing and moving toolbar commands |
Scroll |
You can add commands to the toolbar and remove them from the toolbar, as well as change the position of commands in interface setting mode..
You can change the structure of commands of any toolbars, including toolbars with add-on commands.
|
When working with add-on panels, please note that if you disconnect an add-on, the settings made will be lost (you can manage the connection of add-ons in the Configurator). You can save the desired setting before disconnecting the add-on, and then apply it when reconnecting (see Saving, loading and resetting setting). Suspension of the add-on does not affect the setting. |

Changing the position of the command
To change the position of the command on the toolbar, place the cursor on it, click the left mouse button, hold it down and move the mouse in the desired direction. The cursor will take the shape of a quadrilateral arrow  , and the places where the command can be relocated will be highlighted on the toolbar. When you reach the required position, release the mouse button.
|
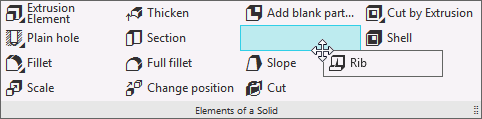
Changing the position of the command on the toolbar
Similarly, move the command from one toolbar to another.
To add commands to toolbars, use the commands of the Tool Area Constructorwindow.
You can add both individual commands (for example, the Point) command as well as groups of commands formed in the system (for example, a group consisting of commands for constructing points in various ways) to the toolbars. In the first case, use the command string, in the second case — the string of the group of commands (the way the commands and their groups are displayed in the Constructor window is shown in the figure).
Step-by-step instructions
1.On the Commands tab, find the command (or group of commands), which you need to add to a toolbar.
Please note that the set of commands displayed on the tab is limited to the selected application area.
For quick selection of the desired command you can use the search line and filters.
2.Place the cursor on the row of the command (group of commands).
3.Click the left mouse button, hold it down and move the command (group) to the toolbar. In the process of moving, the cursor appears as a four-sided arrow , and the places where the command (or group) can be placed are highlighted on the toolbar (see the figure above).
4.When you reach the required position, release the mouse button.
1.on the toolbar, move the cursor to the command you want to remove.
2.Press the left mouse button, hold it down and move the cursor to the free field of the system window. In the process of moving, the cursor takes the form of a four-headed arrow .
3.When the command gets outside the Tool area of the window, release the mouse button.
|
To delete a command from the toolbar, you can also use the Delete Command from the context menu. |

The same command may be located on different toolbars. Removing a command from one of the toolbars applies to that toolbar only. This command will remain on all other toolbars. It will also remain in the list of commands on the Commands tab in the Tool Area Constructorwindow. You can add a command to the toolbar.