|
Copy by curve |
Scroll |
To copy selected objects and place copies along a defined curve, use the Copy by curve  command.

Step-by-step instructions
1.Select the objects to copy. To do this, specify the required objects in the Object selection Select the required objects and click Create Object  .
.
In the Parameter Toolbar, the copying controls will appear. Names of the selected objects are displayed in the Objects field.
|
If the objects are specified before the Copy by curve command is invoked, then the subprocess of selecting objects is not launched. The system proceeds immediately to the copying command execution. If you need to select other objects for copying, click Objects link and specify the new objects in the subprocess of selecting objects. |

2.Set the base point for the objects being copied.
3.Specify the curve along which the copies should be positioned. Its name is displayed in the Curve field.
4.Specify the starting point of copying on the curve.
The graphic region will display a phantom of the copies to create. The starting point coincides with the base point of the first copy.
5.Specify the distance between copies. Use the following procedure.
•Select the treatment of the distance between copies by clicking the appropriate button in the Distance between group:
 By adjacent copies
 Last copies
•Set the distance value in the Value field. The distance is measured along the curve the copying is performed by.
|
|
a) |
b) |
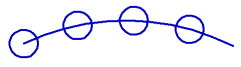
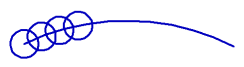
Copying circles along an arc
a) the value is interpreted as the distance between adjacent instances,
b) the value is interpreted as the distance between last copies
6.Set the number of copied in the Number of Copies field.
7.If necessary, set the rotation angle for the copies in the Rotation Angle field. The rotation center is the base point.
8.If necessary, set the scaling coefficient for the copies in the Scale field.
|
To set the operation parameters and position the cursor precisely, you can use snaps and geometrical calculator. |

9.Using the Follow Path option, specify if the copies should follow the path up to the normal line to the curve.
•if the option is enabled, each copy is rotated so that its position relative to the normal line to the curve plotted to the insertion point coincides with the position of the source objects relative to the Y axis of the absolute coordinate system,
•if the option is disabled, the copies are placed in the same way as the source objects.
|
Object copies are positioned in the described way, if the Rotation Angle field contains zero value. Otherwise each copy is rotated additionally to the given angle. |
|
|
a) |
b) |
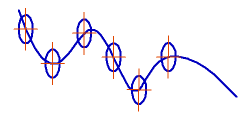

Copying an ellipse along a spline
a) without additional rotation of copies up to the normal line, b) with additional rotation of copies up to the normal line
10.Specify the direction to place copies by clicking on the appropriate side from the starting point where the copies should be placed. The copies along the curve will be created automatically.
11.After the copies are created, the selected objects stay selected. You can create a desired number of copies of these objects or select other objects and create their copies.
12.To complete operation of the command, click Finish  .
.
|
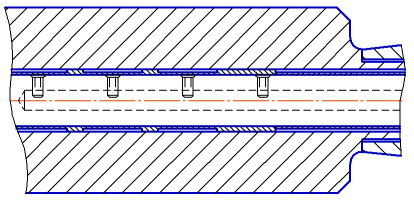
Example of copying by curve