|
Point construction |
Scroll |
In KOMPAS-3D it is possible to construct:
•intersection points of two curves,
•all intersection points of curve,
•a point at specified distance.
You can use snaps and a geometrical calculator.
|
Commands for constructing points are combined into a group. While executing a group command, you can switch to execution of another one using buttons of the Parameter Toolbar header. If in the current command a curve has been selected, then going to another command, that curve is selected. This rule is valid for all commands in the group that choose the curve. |

An arbitrary point is plotted in the graphic area using the Point  command.

Step-by-step instructions
1.Use one of the following methods to specify the point position:
•click in the graphics area,
•enter the coordinates in the Point position field on the Parameter Panel.
A point will be automatically created.
2.To complete operation of the command, click Finish  .
.
Additional features when building...
To plot several points positioned uniformly on an existing curve, use the Points on Curve  command.
Step-by-step instructions
1.Enter the number of sections into which you want to split the curve into the corresponding field in the Parameter Panel.
2.Specify the curve for setting points.
If the curve is not closed, points will be constructed immediately after its indication. The first point will coincide with the starting point of the curve, and the last – with the end.
If the curve is closed, after its indication it is required to set the position of the first point on it. Select this point. After that, all points will be built.
|
The specified point may not belong to the selected curve. In this case, the position of the first point will be determined by the projection of the specified point on the curve. |
3.To complete operation of the command, click Finish .
|
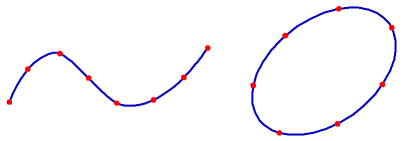
Examples of creating points on a closed and open curve
|
The Points on Curve command can be used to divide the curve into several equal parts. If you want to "cut" the curve without setting points, use the command Split curve into N Parts. |

Additional features when building...
Intersection Points of Two Curves
To plot points in the place of intersection of two curves, use the Intersection Points of tTwo Curves  command.
Step-by-step instructions
1.Select the first curve. The name is displayed in the Object field on the Parameter Panel.
2.Select the second curve.
Points will be automatically created at the intersection of the selected curves.
3.To complete operation of the command, click Finish .
|
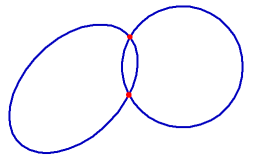
An example of setting the intersection points of an ellipse and a circle
Additional features when building...
All Intersection Points of Curve
To plot points in the place of intersection of the specified curve with other curves, use the All Intersection Points of Curve  command.
Step-by-step instructions
1.Specify the curve to search for intersections.
Points will be automatically created at the points of its intersection with other curves located in the current and active views and layers.
2.To complete operation of the command, click Finish .
|
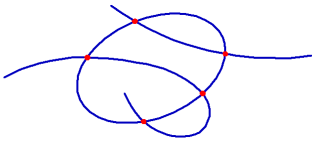
An example of setting all the intersection points of an ellipse with two curves
Additional features when building...
Create one or multiple points positioned on a curve the following way: the first point is located at a specified distance from the point specified on the same curve (base point), and the rest of points are located at the same distance from each other. The distance between points is measured along the curve.
For plotting, the Point at Specified Distance  command is used.
Step-by-step instructions
1.Specify the curve for setting points. The name is displayed in the Object field on the Parameter Panel.
2.In field Distance enter the distance between the base point and the first point to be created. If several points are created, then the specified value will also determine the distance between them.
3.Enter the number of points to create in the Number of points field.
4.Pick a point on the curve – the base point.
|
The specified point may not belong to the selected curve. In this case, the position of the base point will be determined by the projection of the specified point on the curve. |
5.Building can be performed from one or the other side of the base point. Move the cursor to the desired side. A phantom of the created points appears in the graphics area. Lock it with a mouse click. Points will be created.
6.To complete operation of the command, click Finish .
|
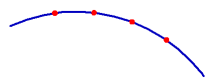
An example of setting three points on an arc with a distance of 5 mm