|
Placement element |
Scroll |
Placement element is used to change the position and orientation of some objects during their creation or editing.

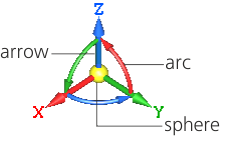
The placement element coincides with the current coordinate system of the object. The element consists of three 3D arrows of red, green and blue colors, showing the positive directions of the X, Y, Z axes of this coordinate system. Arcs of the corresponding colors are displayed in the planes perpendicular to the axes. For example, the X-axis is red. The arc lying in the plane perpendicular to this arrow is also red. Arrow on the arc shows the positive rotation direction. A sphere marks the center point of the element. The placement element is shown on the figure.
|
To activate the placement element select its axis or arc. Axis selection is possible when an axis icon is displayed next to the cursor. The rotation icon next to the cursor indicates that an arc can be selected.
The size of the placement element can be changed. To do this, place the cursor on the element, press the <Alt> + <Ctrl> + <Shift> keys and, without releasing it, rotate the mouse scroll wheel. The resulting size of the placement element is stored in the system.
To change the position of the object in the model move and/or rotate the placement element.
•Moving a base element
•Moving along the axis at an arbitrary distance.
Move the cursor to the required axis, click the left mouse button and, without releasing it, move the mouse along the selected axis in the required direction. When the required position of the placement element is reached release the button.
•Along the axis for given distance.
Click the desired axis. A field for entering the distance appears in the graphic range. Enter the desired value and press <Enter>. The placement element will move for a given distance along the selected axis.
•In any direction.
Move the cursor to the sphere at the center of the element, click the left mouse button and, while holding it down, move the mouse in the desired direction. When the required position of the placement element is reached release the button.
•Around the axis at an arbitrary angle.
Move the cursor to the arc lying in the plane perpendicular to the required axis. Click and hold the left button and rotate the coordinate system around the selected axis in the desired direction. When the required position of the placement element is reached release the button.
•Around the axis at a given angle.
Click the arc lying in the plane perpendicular to the desired axis. A field for entering the rotation angle appears in the graphic range. Enter the desired value and press <Enter>. The placement element will rotate at a given angle around the selected axis.
•Around the axis with a given step.
Click the <Ctrl> key and, without releasing it, click the mouse on the arc lying in the plane perpendicular to the required axis. The placement element will rotate according to the step specified.
If you want to rotate the placement element with a given step in the opposite direction, click on the arc, holding down the <Ctrl> + <Shift> keys.
|
The angular step is defined during setting up parameters. The default value is 15°. |

•180° rotation of axis.
Click on the required axis while holding the <Ctrl> key or the <Ctrl> + <Shift> combination. The axis rotates 180° around one of the two other axes of the locating element.
If the <Ctrl> key is pressed:
•X-axis rotates around Z-axis,
•Y-axis rotates around X-axis,
•Z-axis rotates around Y-axis.
With the pressed keys <Ctrl> + <Shift>:
•X-axis rotates around Y-axis,
•Y-axis rotates around Z-axis,
•Z-axis rotates around X-axis.