|
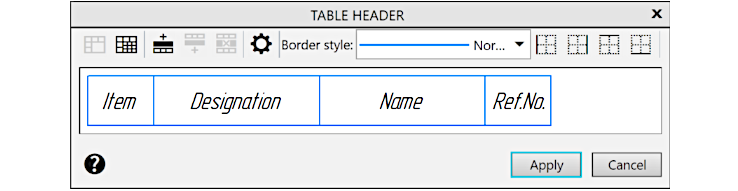
Table Header dialog |
Scroll |
The dialog allows you to create a "header" of the following tables:
•reports;


Description of Controls
Name |
Description |
|
|
Setup window |
The window allows you to set up the appearance of the table title block. In the window, a row with column headers specified when setting the table parameters is displayed. Using the toolbar panel buttons (see below), you can: •You can add rows above the row with column headers and delete added rows; •You can merge and split cells; •Change text parameters; •Set up the border line style of cells. The text is entered in the table cells in the usual way (see section Adding text into a table cell). You can not only enter text into the cells of the added rows, but also edit text of the column headers set during table parameters setup. You may change the size of the cells by dragging their borders with the cursor (see section Change of table cell sizes). |
|
Merge Cells |
Merge Cells button allows you to combine the selected cells (actions are analogous to those described in the section). Merging cells). |
|
Split cells |
Split cells button allows you to split the current cell or the range of selected cells in a table into several cells (the actions are similar to those described in the section). Splitting cells). |
|
Insert row above |
These buttons are used to add a row above or below the current one. |
|
Delete Row |
The button allows you to delete the current line. |
|
Working with the original row of column headers is limited: •The number of cells in a row must match the number of columns in the table, therefore such merging/splitting of cells that would change the number of cells in the original header row is not allowed. •There must be no other rows between the row and the table, so all new rows are added just above the original header row; •You can't delete this line. |
|
|
It is recommended to merge and split the header cells of the table after you finish configuring the number of its columns. This is because if one of the table columns is deleted, the header row containing merged cells and/or cells created by splitting may be incorrectly rearranged or deleted. |
|
|
Header Parameters |
The button allows you to adjust the text parameters of the table headings in the current document. Opens the setup dialog. |
|
Border style |
The dropdown list allows to select the line style of the borders of cells. This list contains system line styles that can be used for cell borders. The line There are no boundaries means that the cell borders will not be displayed. |
|
Left boundary |
The buttons allow you to edit the border line style of a cell or a selected range of cells. Click the button to apply the selected line style to the corresponding border of the current cell. If the Border Style entry There are no boundaries is selected in the list, the border display is turned off after pressing the button. |
|
The right border |
|
|
Upper boundary |
|
|
Lower bound |
|


After you perform all the required actions in the dialog, click Apply. The Cancel button allows you to close the dialog and discard the changes.
See Also