|
Coordination axes |
Scroll |
In KOMPAS-3D, you can create coordinate axes of the following types:
|
You can use snaps and geometrical calculator. |

To create a straight coordination axis designation, use the Straight coordination axis command  .
.

Step-by-step instructions
1.Indicate the starting point of coordination axis.
A phantom of axis will appear in the graphic area.
2.Generate a designation caption.
3.To automate assignment of a number to a mark, during input of text, enable the Auto Continueoption. Details...
4.Set up the Parameters of juts and marks. To that end, elements of the Juts and markssector are used.
5.Set up the Parameters of the coordination axis. For that, elements of the Additional parameterssector are used.
6.If it is required to create additional designations, set the Additional Symbols toggle switch to position I (enabled). Creation of additional designations is possible if rendering of the main mark is enabled.
7.Set the final point of the axis with one of the methods.
•Indicate the point with the mouse.
•Set the segment length between initial and final points and an angle of axis in the Length and Angle fields on the Parameter Panel.
If creation of additional designations is disabled, then after indication of final point creation of a direct coordination axis automatically ends.
8.If creation of additional designations is enabled, create them. Details...
9.Having completed creation of additional designations, press the Create Object button  .
.
10.To complete the operation of the command, click Finish  .
.
|
|
a) |
b) |

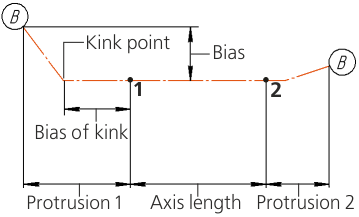
Straight coordinate axis
a) usage example, b) parameters of axis
Additional options when creating designations...
To create a designation of an arc coordination axis, use the Coordination Arc Axis  command.
Step-by-step instructions
1.Set the center of the arc.
The phantom of a coordination axis will appear in the graphic area.
2.Set the initial point of arc with one of the methods.
•Indicate the point with the mouse.
•Enter the values of an initial angle and diameter or radius of arc into the respective fields on the Parameter Panel. To set the diameter/radius, in the Arc Parameter group press the required button:
 Diameter,
 Radius.
3.The direction of creation of an arc can be changed to the opposite with the help of The direction of the arc  button.
4.Generate a caption of designation.
5.To automate assignment of a number to a mark, during input of text, enable the Auto Continueoption. Details...
6.Set up the parameters of juts and marks.. To that end, elements of the Juts and markssector are used. Juts are located on tangents to the axis arc.
7.Set up the parameters of coordinate axis. For that, elements of the Additional parameterssection are used.
8.If it is required to create additional designations, set the Additional Symbols toggle switch to position I (enabled). Creation of additional designations is possible if rendering of the main mark is enabled.
9.Set the final point of the axis with one of the methods.
•Indicate the point with the mouse.
•Enter the value of final angle into the End angle field.
If creation of additional designations is disabled, then after indication of final point creation of an arc coordination axis automatically ends.
10.If creation of additional designations is enabled, create them. Details...
11.When you complete construction of additional designations, click the Create Object button.
12.To complete the command, press the Finish .
|
|
a) |
b) |
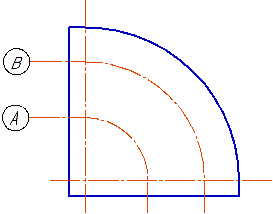
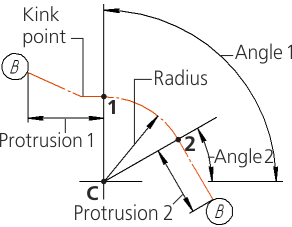
Coordination Arc Axis
a) usage example, b) parameters of axis
Additional options when creating designations...
To create a designation of a circular coordination axis, use the Circular coordination axis  .
.
Step-by-step instructions
1.Set the center of the circle.
In the graphic area, a phantom of coordination axis will appear.
2.Generate a designation caption.
3.To automate assignment of a number to a mark, during input of text, enable the Auto Continueoption. Details...
4.Set up the parameters of the mark.
5.Set up the parameters of the coordinate axis. For that, elements of the Additional parameterssector are used.
6.If it is required to create additional designations, set the Additional Symbols toggle switch to position I (enabled). Creation of additional designations is possible if rendering of the main mark is enabled.
7.Set the position of mark with one of the methods.
•Indicate the point with the mouse.
•Enter the value of diameter or radius of a circle into the respective field on the Parameter Panel. To set the diameter/radius, in the Circle Parameter group press the required button:
Diameter,
Radius.
If creation of additional designations is disabled, then after the indication of position of mark, creation of a circular coordination axis automatically ends.
8.If creation of additional designations is enabled, create them. Details...
9.Having completed creation of additional designations, press the Create Object button .
10.To complete the operation of the command, click the Finish .
|
|
a) |
b) |

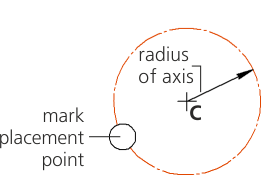
Circular Coordinate Axis
a) usage example, b) parameters of axis