|
3D modeling |
Scroll |
1.The new command has been added: — Rounding surface, creating a transition surface between two specified surfaces. The transition surface is mated with these two surfaces along its borders, which belong to these same surfaces. Various options are available for adjusting the shape of the transition surface and trimming its lateral sides.
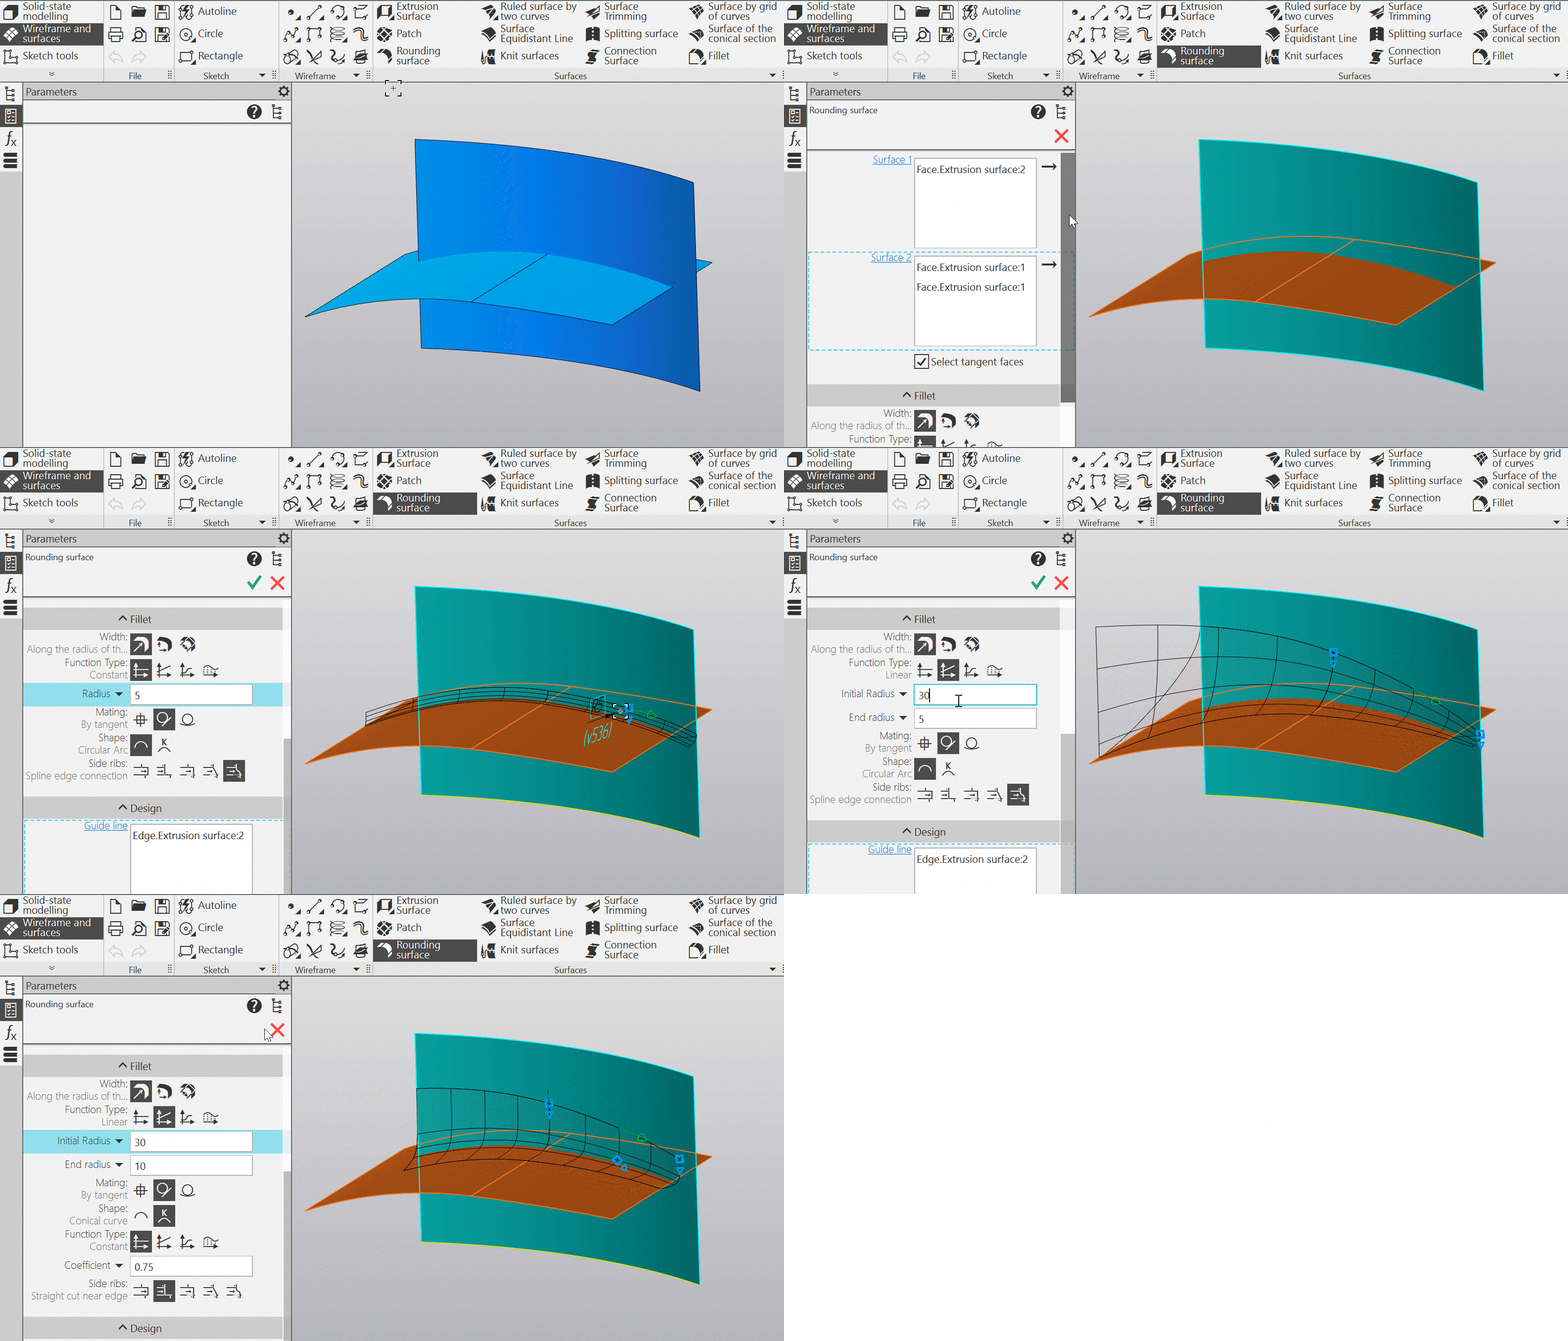
Building rounding surface
2.The new command has been added: — Delete body/surface. It deletes selected solids and/or surfaces from the model. Using this command, you can remove, for example, the results of intermediate buildings that are no longer needed. In addition, this command allows you to delete solids/surfaces that are not required for the operation from the imported component.
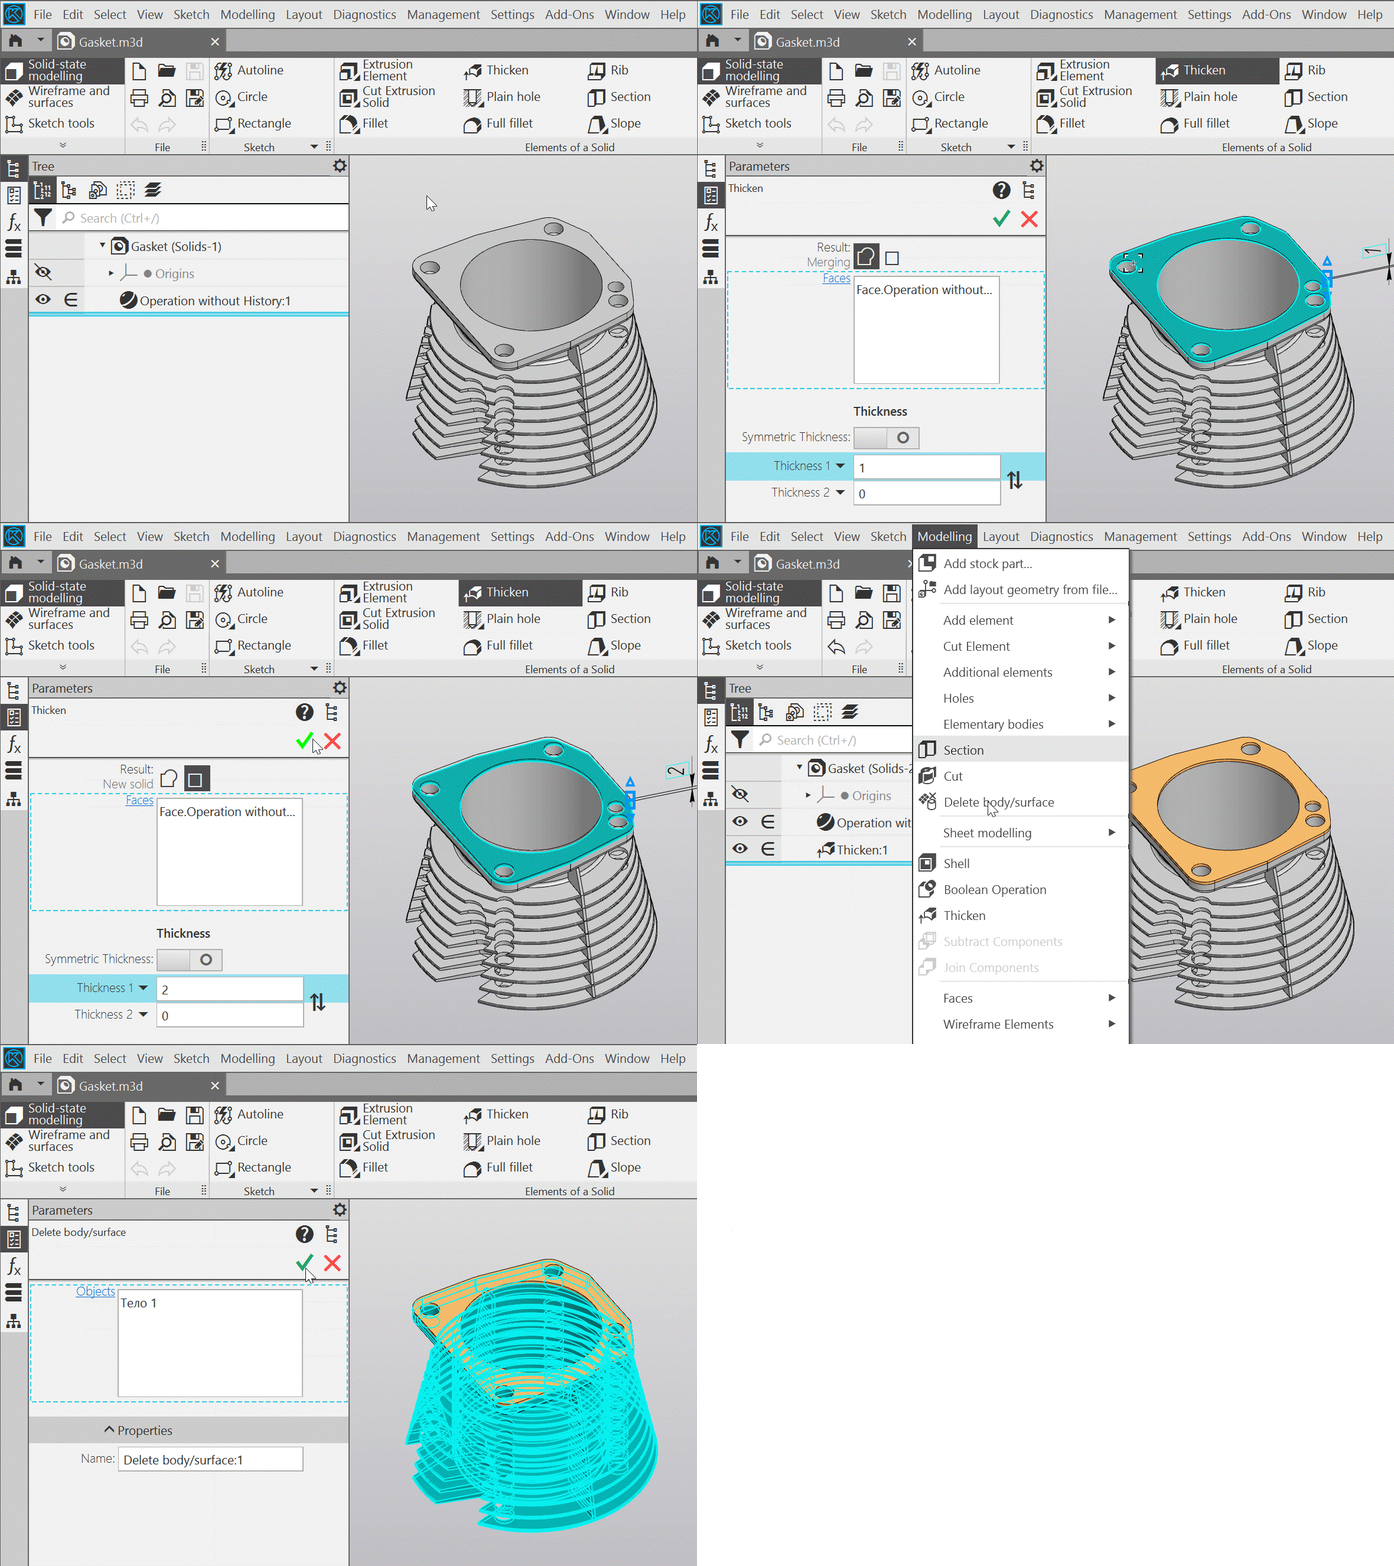
Deletion of the solid from the model
3.Commands for editing dimensions of body edges and surfaces have been added:
•Change fillet size, allowing you to edit the rounding with a constant radius by increasing or decreasing the radius value. Automatic selection and corresponding modification of other fillets, whose edges are tangentially connected with the edge of the edited fillet, are available. IS: check if they should draw a hot-point -- if they do, include it in the Tips + rounding with a constant chord
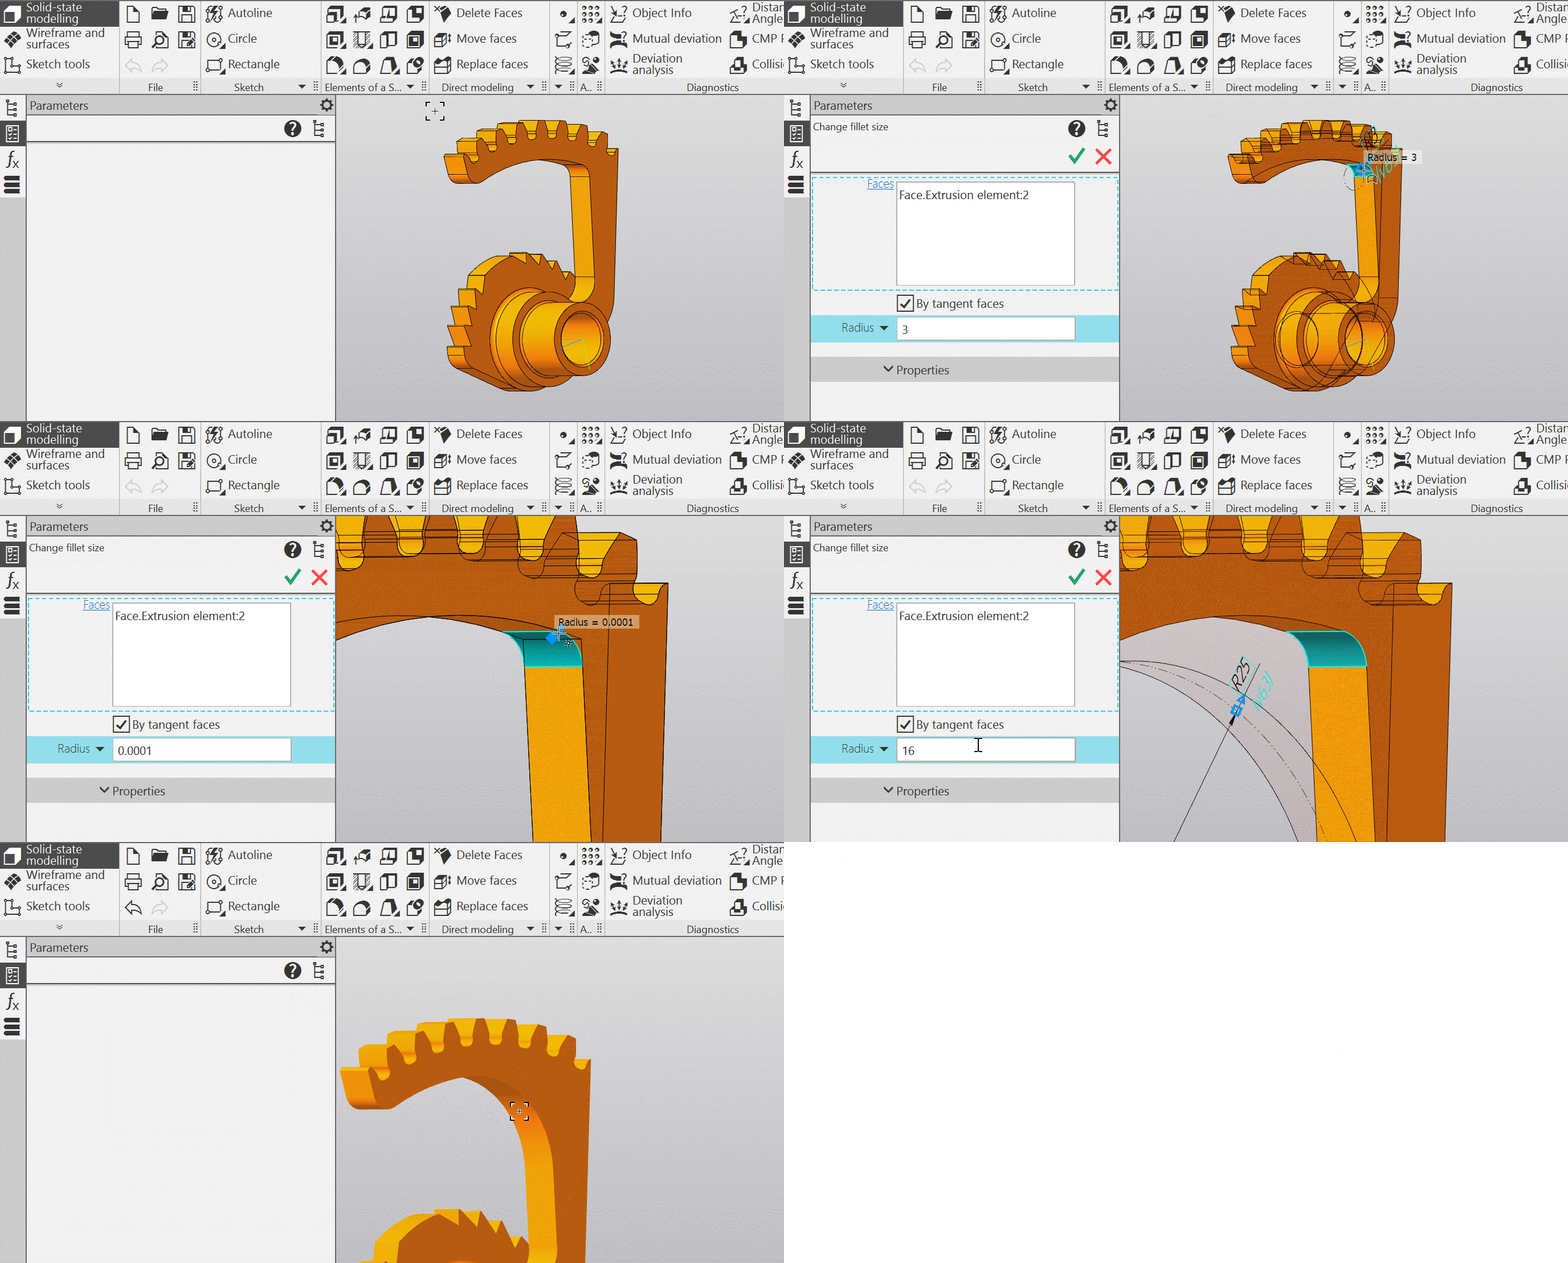
Change fillet size
• Modify face size, allowing to edit the diameter of a cylindrical or spherical face.
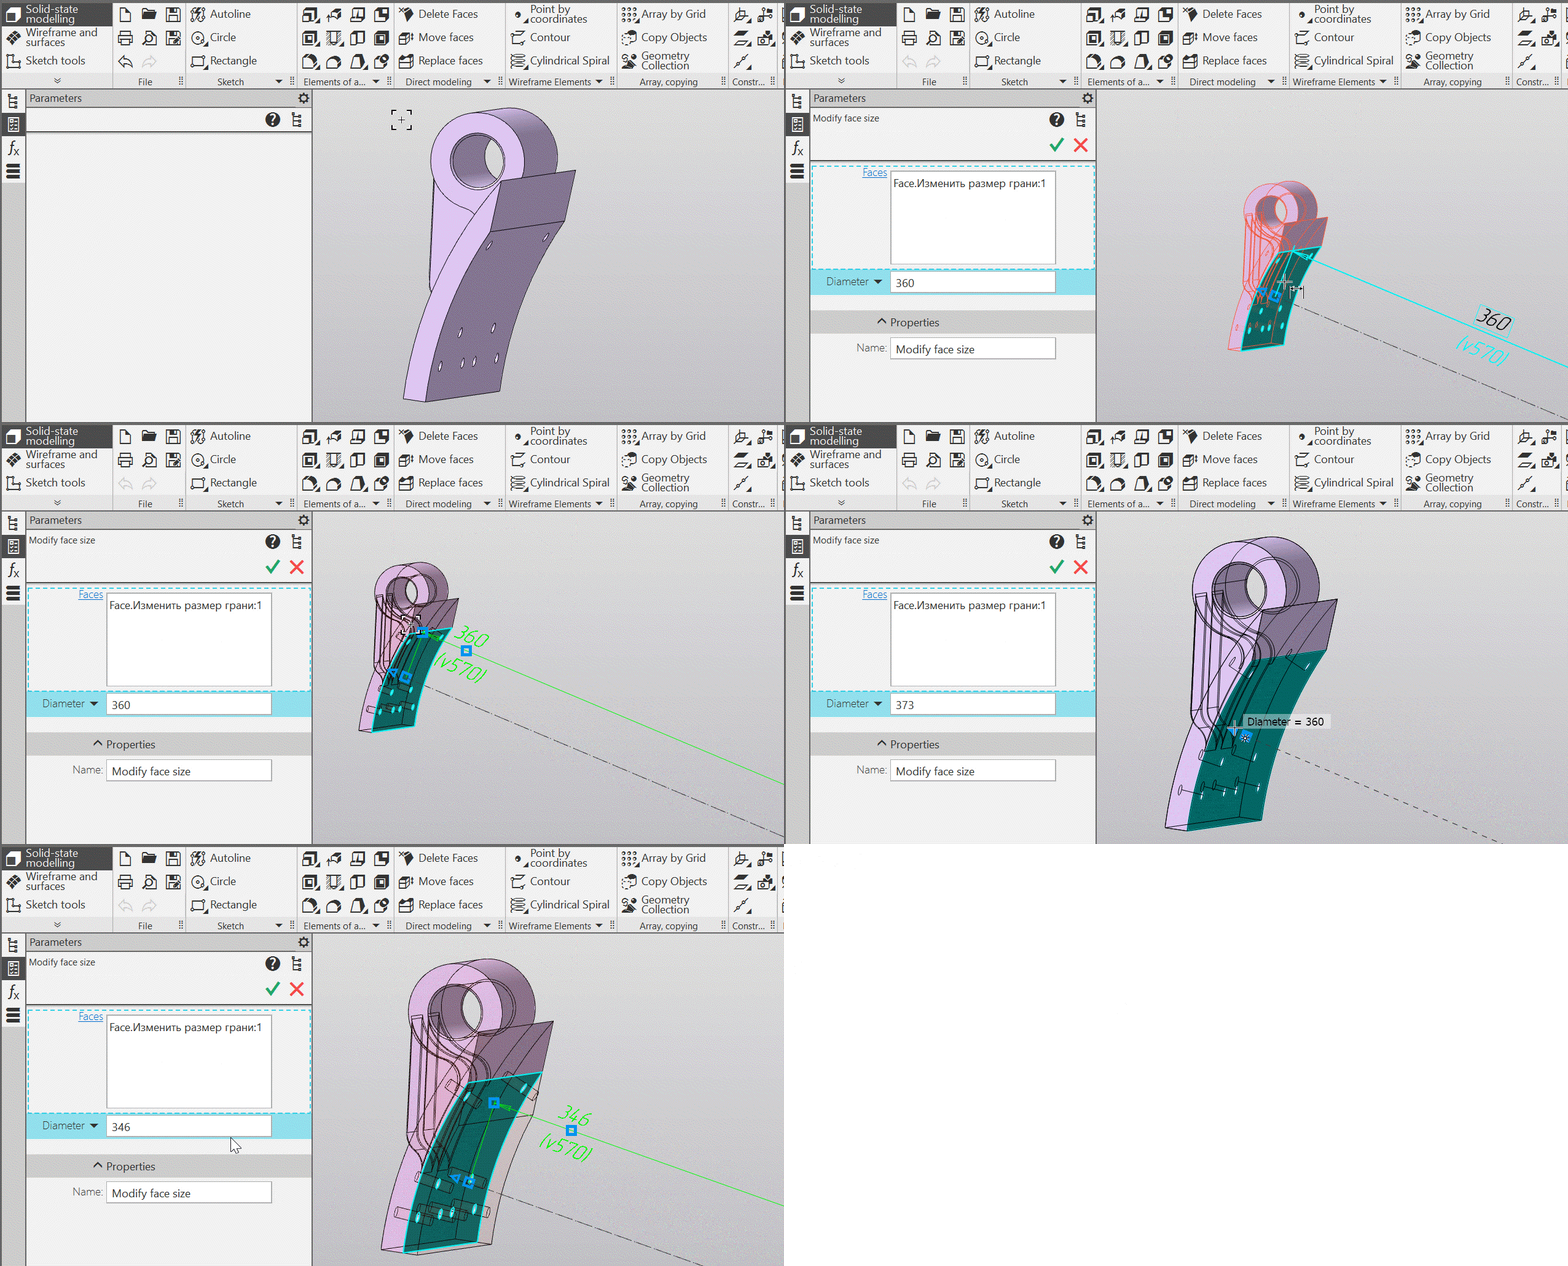
Changing of the dimension of a cylindrical face
These commands are mainly intended for modifying imported models, i.e., without a construction history, but can also be applied to models with a history.
The Change fillet size and Modify face size commands are located on the new Direct modeling panel under the Solid modeling set. Commands Delete faces and Move faces have also been moved to this toolbar.
4.The new command has been added: — Replace faces. It allows you to replace the selected face of the solid or closed surface with a new face. The new face represents a section of the surface of the object specified as the replacement. A replacement object can be a face or a plane; the new face can coincide with it or be set at a specified distance in the direction to/behind the object. The faces adjacent to the replaced face are extended or trimmed to keep the solid/surface consistent.
The Replace faces command is also located on the new Direct modeling panel.
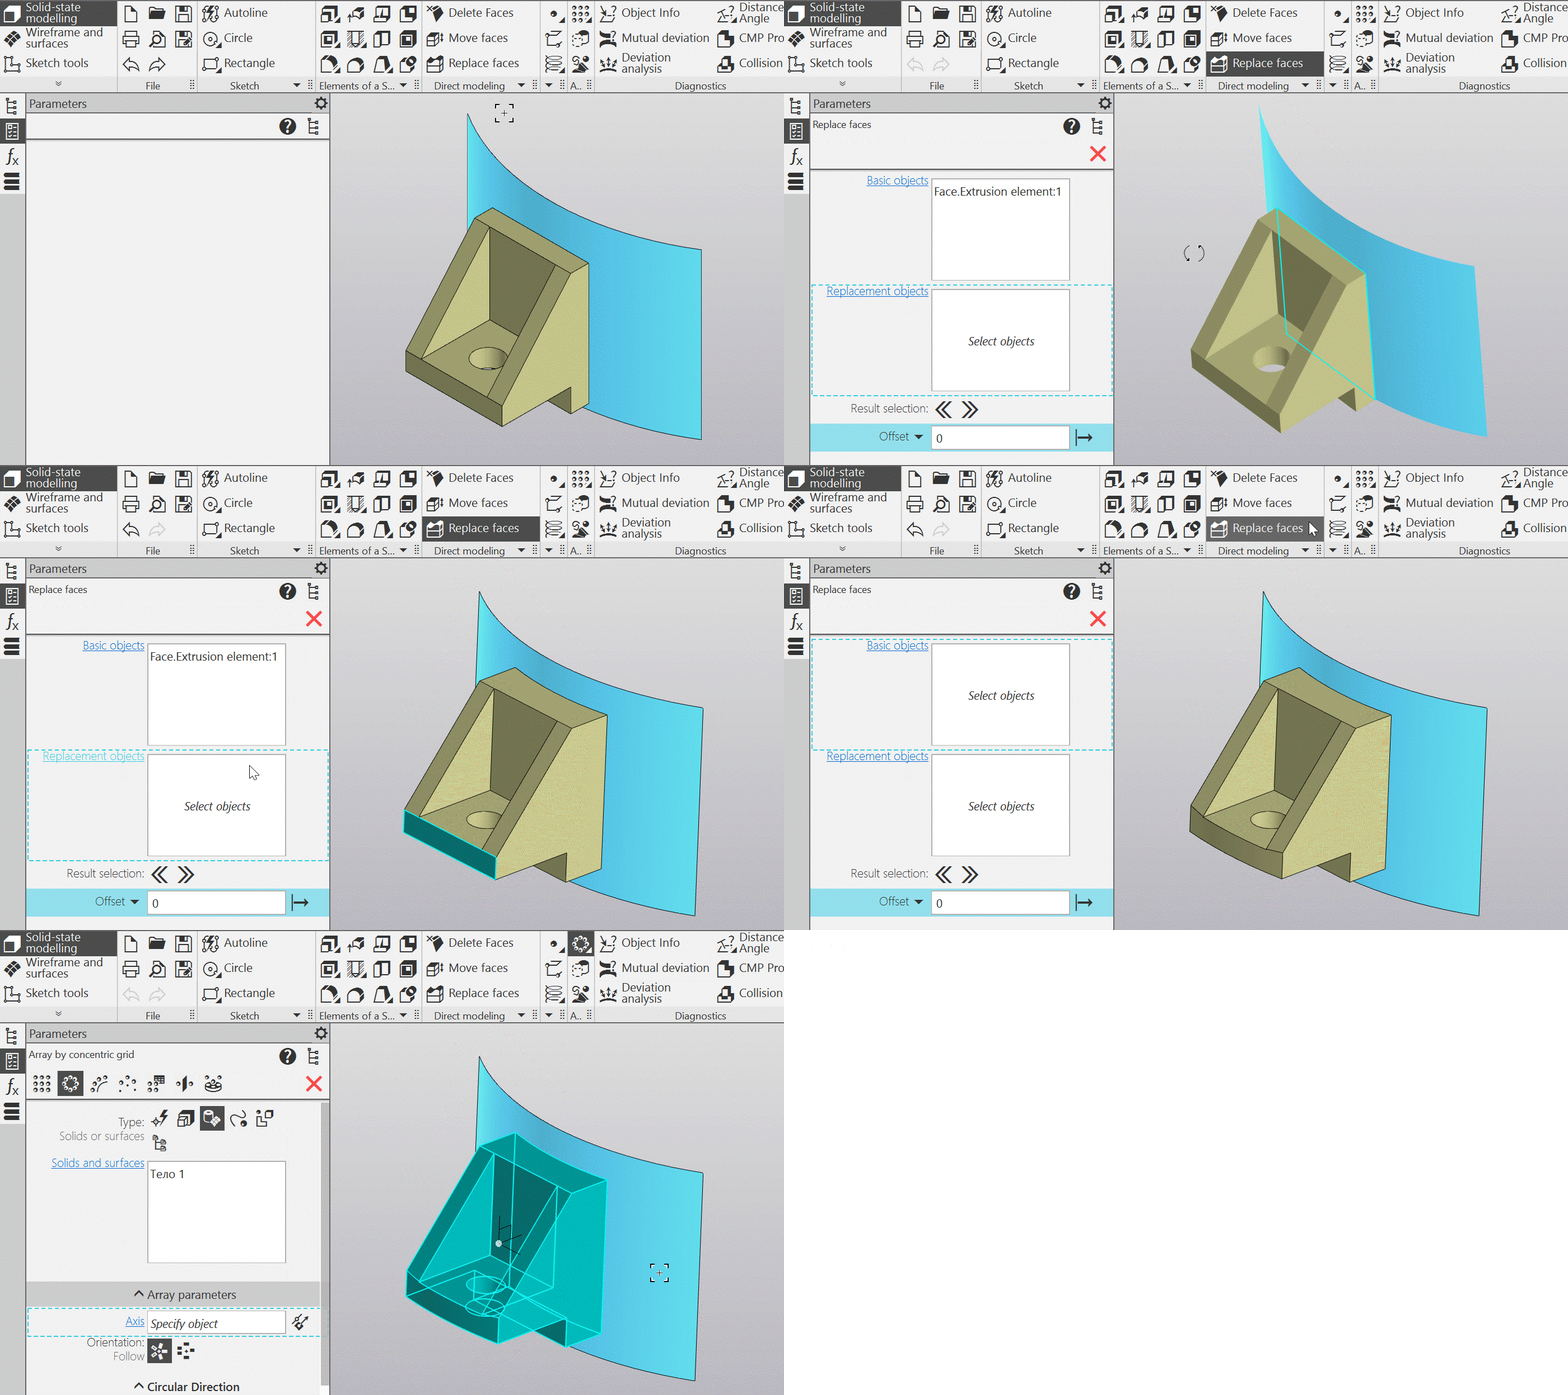
Replacing faces of the body
5.The new command has been added — Replace components. It allows you to specify a new source file for one or multiple (including different) BOM items. When specifying BOM items to be replaced, you can include a search in the assembly for BOM items with the same source as those already specified. It is possible to replace taking into account the model versions/variants: for this, the new source must have versions/variants with the same numbers as the previous one.
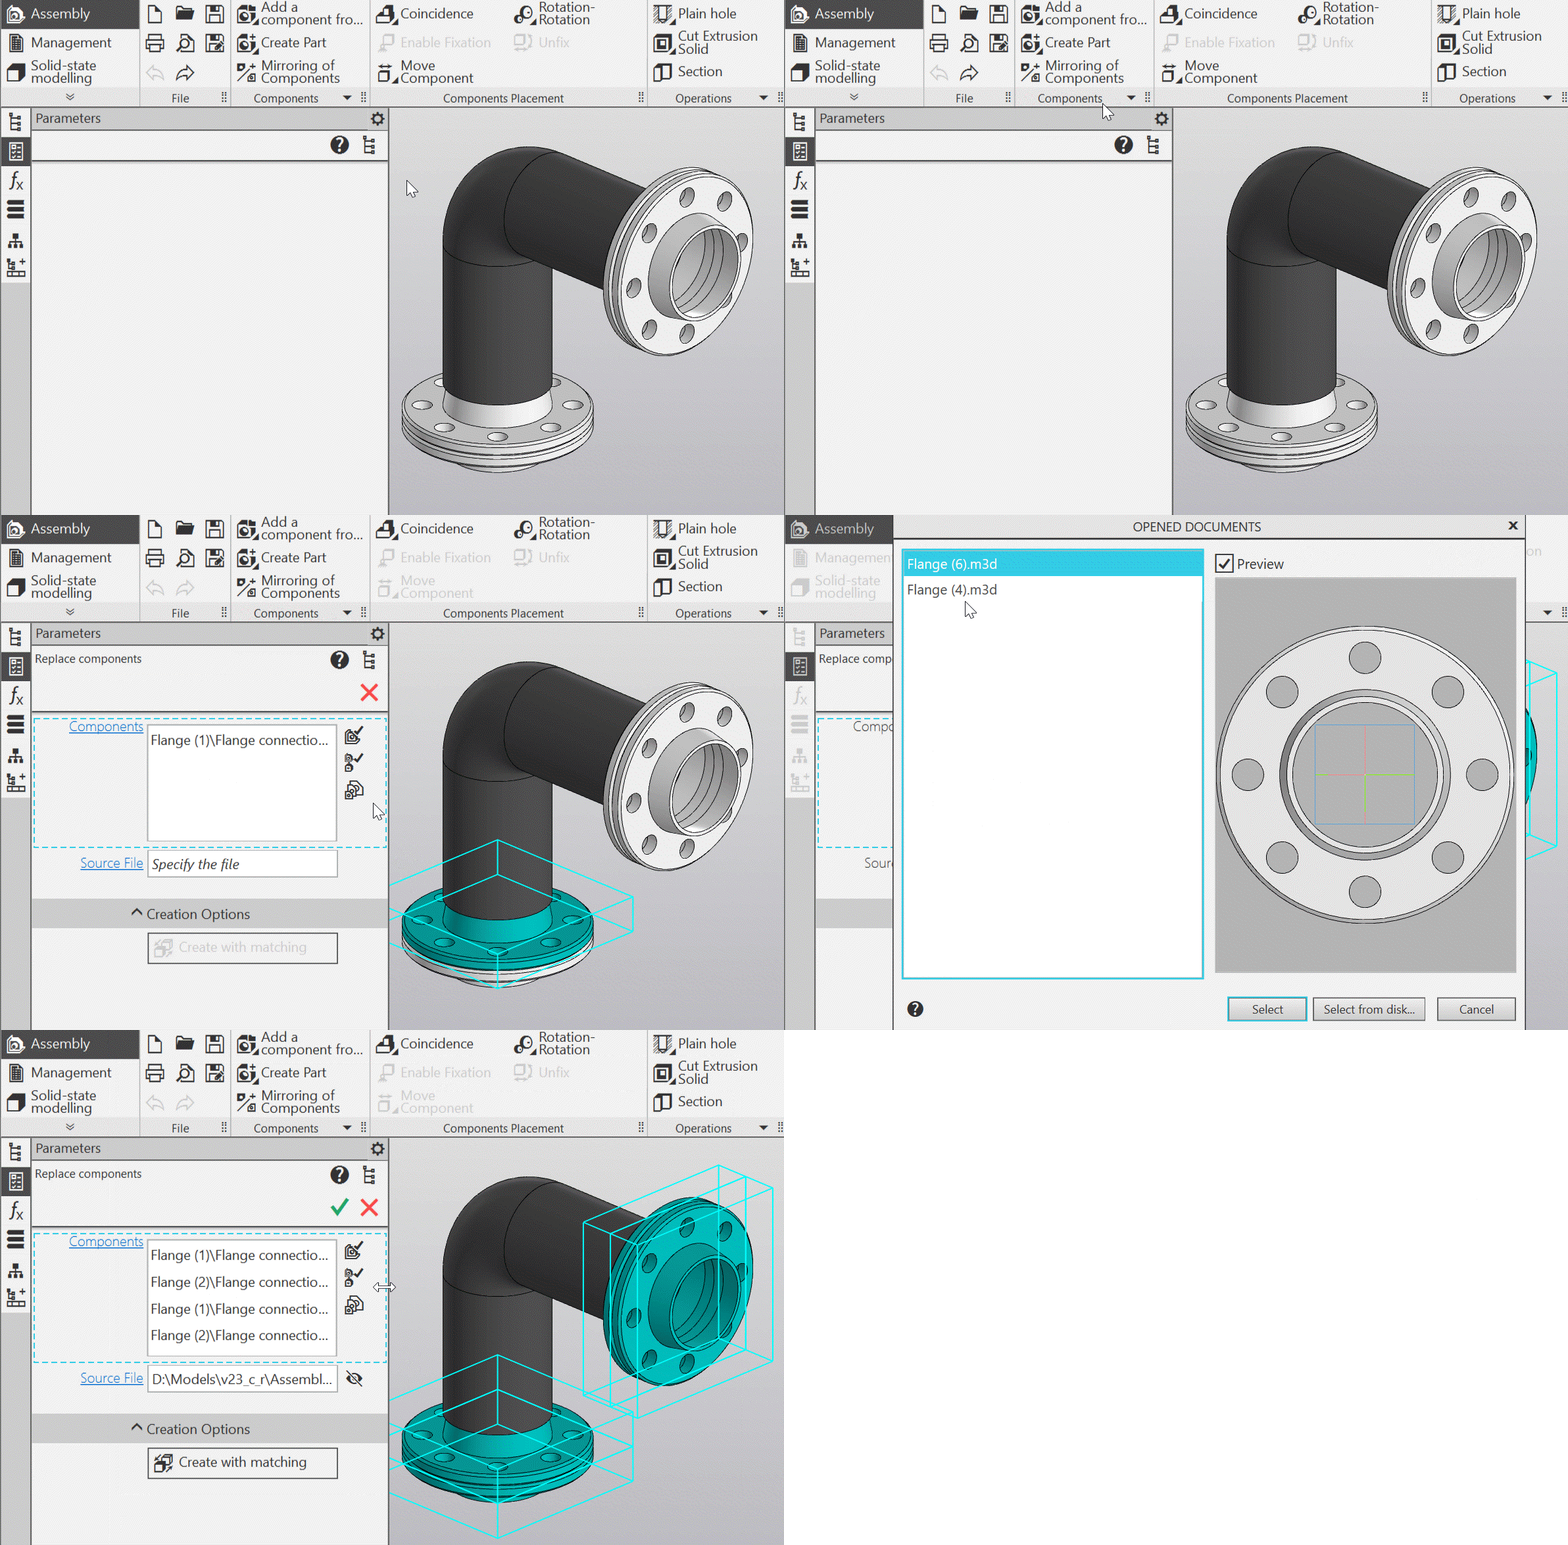
Replacing components in the assembly
During the replacement of identical components, it is possible to establish correspondences between the original and new elements. Due to this, after the replacement, the functioning of the existing assembly mates will not be disrupted, and the operations performed in the assembly will not lose the objects on which they were based.
6.The new command has been added: — Deviation analysis. It is used to assess the deviation of a polygonal object from a solid, surface, or face. The analysis result is displayed as a color map. The maximum and minimum deviations are also displayed.
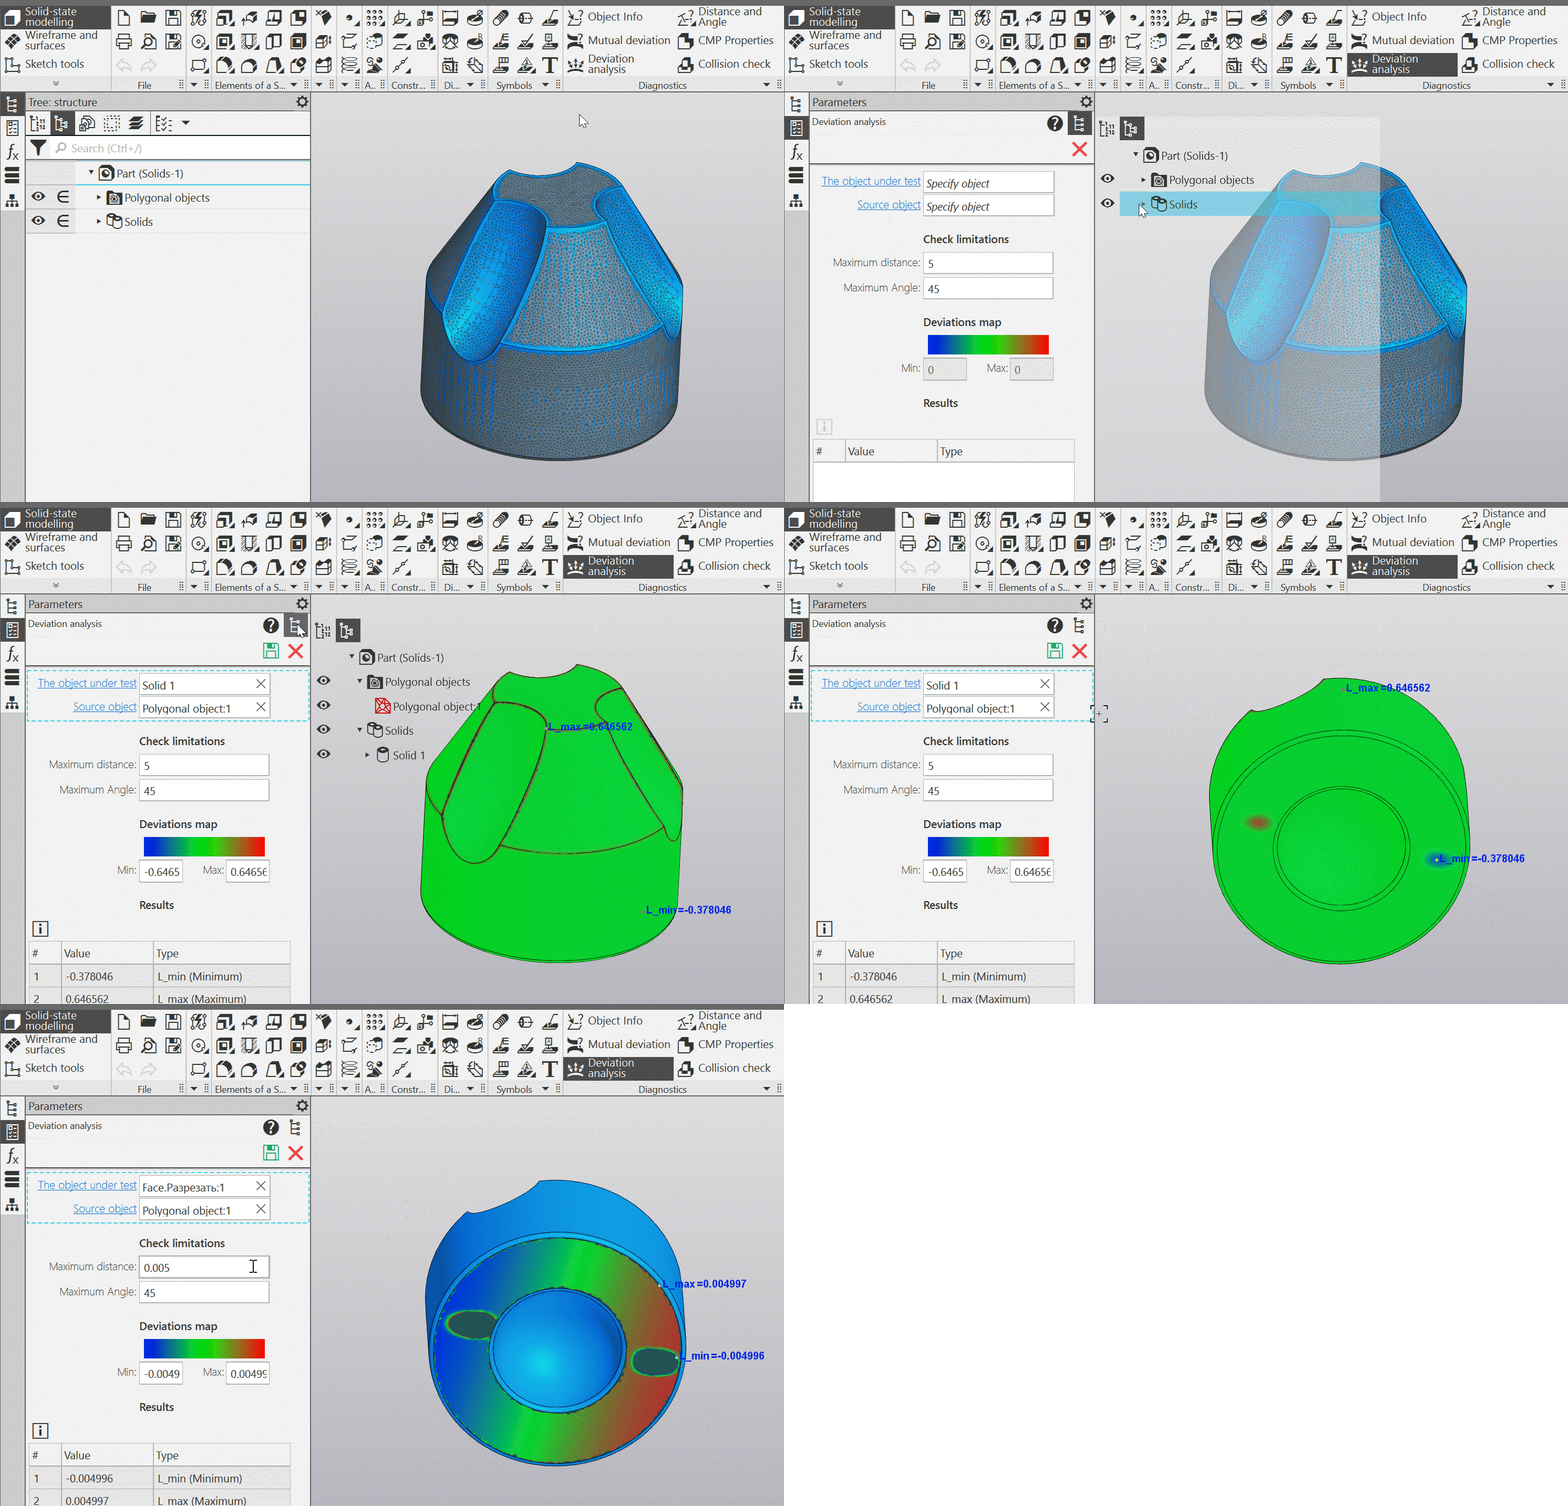
Deviation analysis of a solid and its individual face from the polygonal object
7.Implemented the possibility of automatic creation new models based on a template model by changing the values of variables and properties set in the template. Value sets can be extracted from *.ods expаnsions or *.xls expansions.
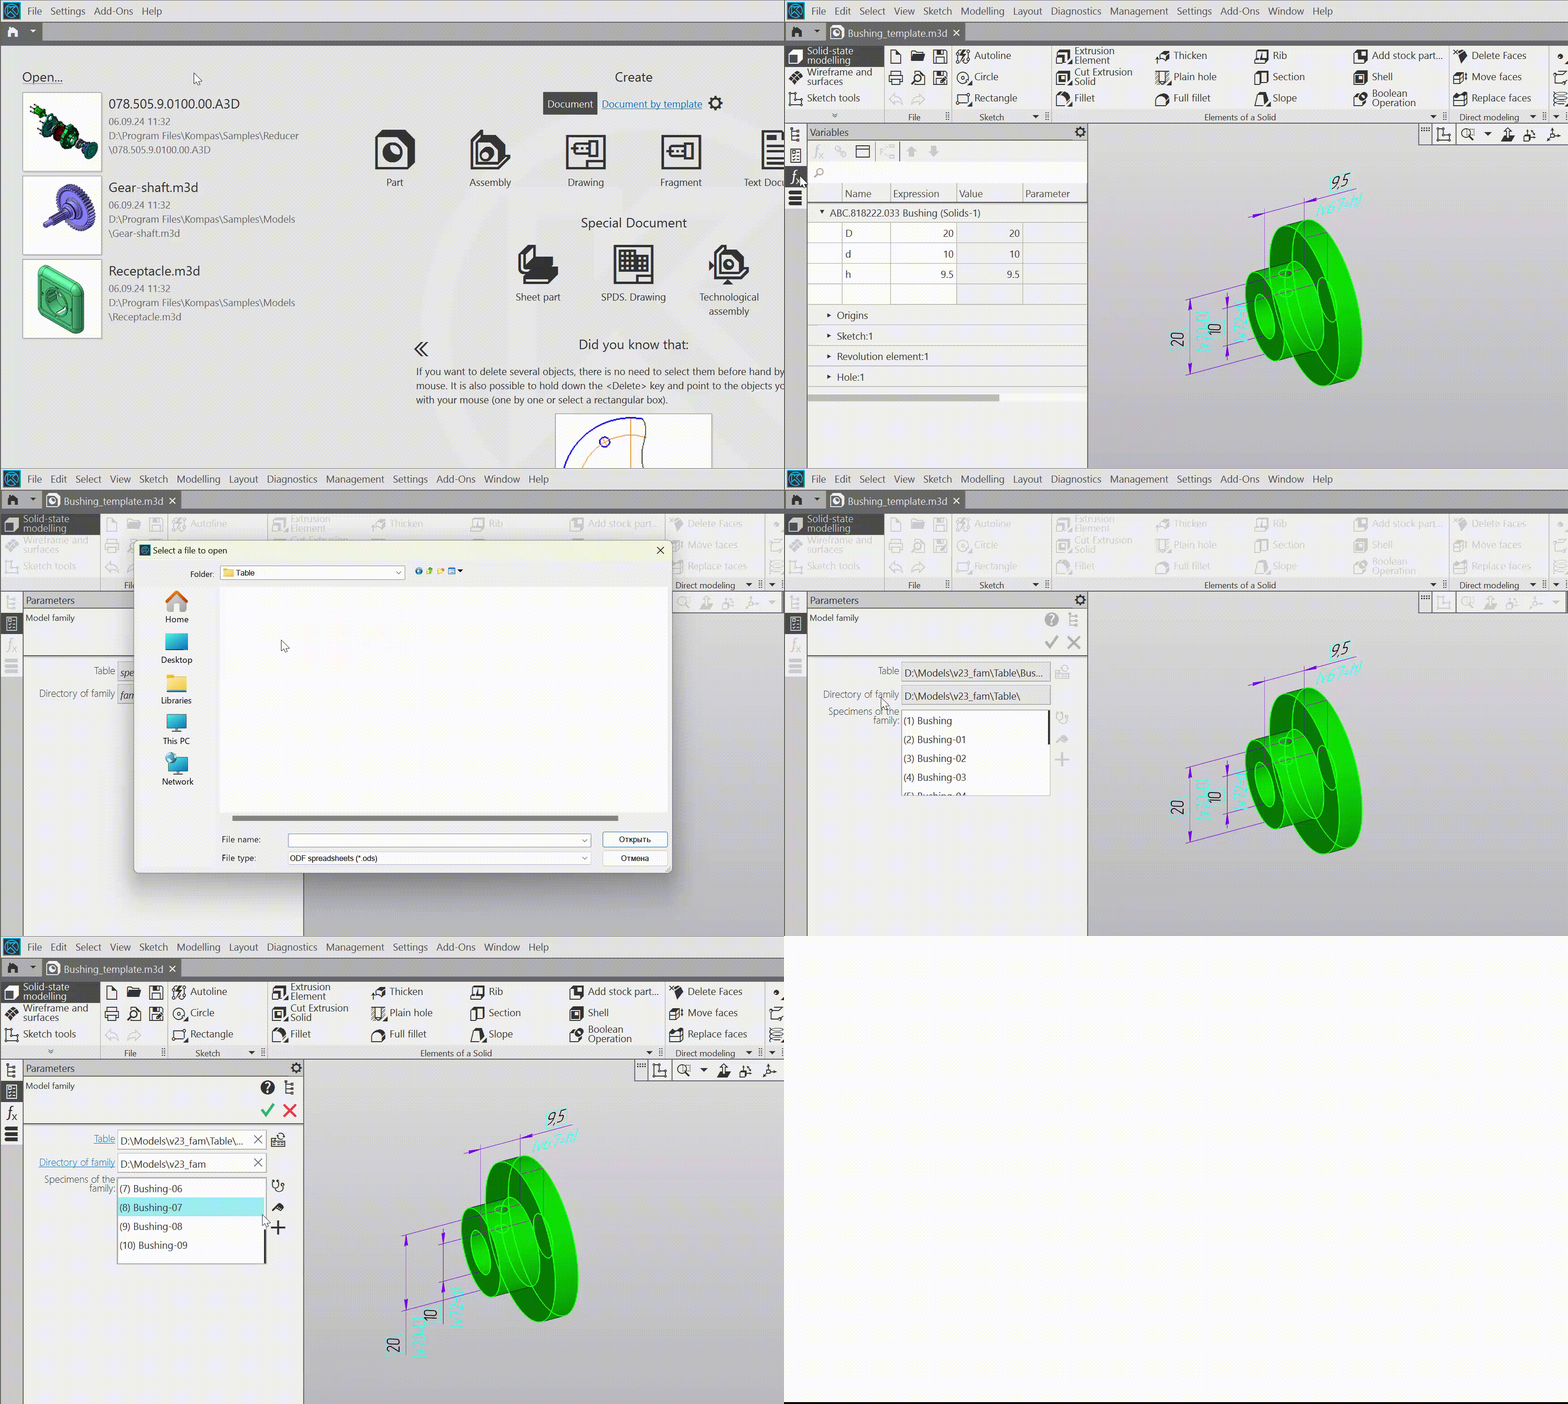
Creating Model family
8.There has appeared the option to build solids in the form of a parallelepiped,a cylinder or a sphere. By the specified parameters, i.e., without using source objects (sketches, axes, curves, etc.).
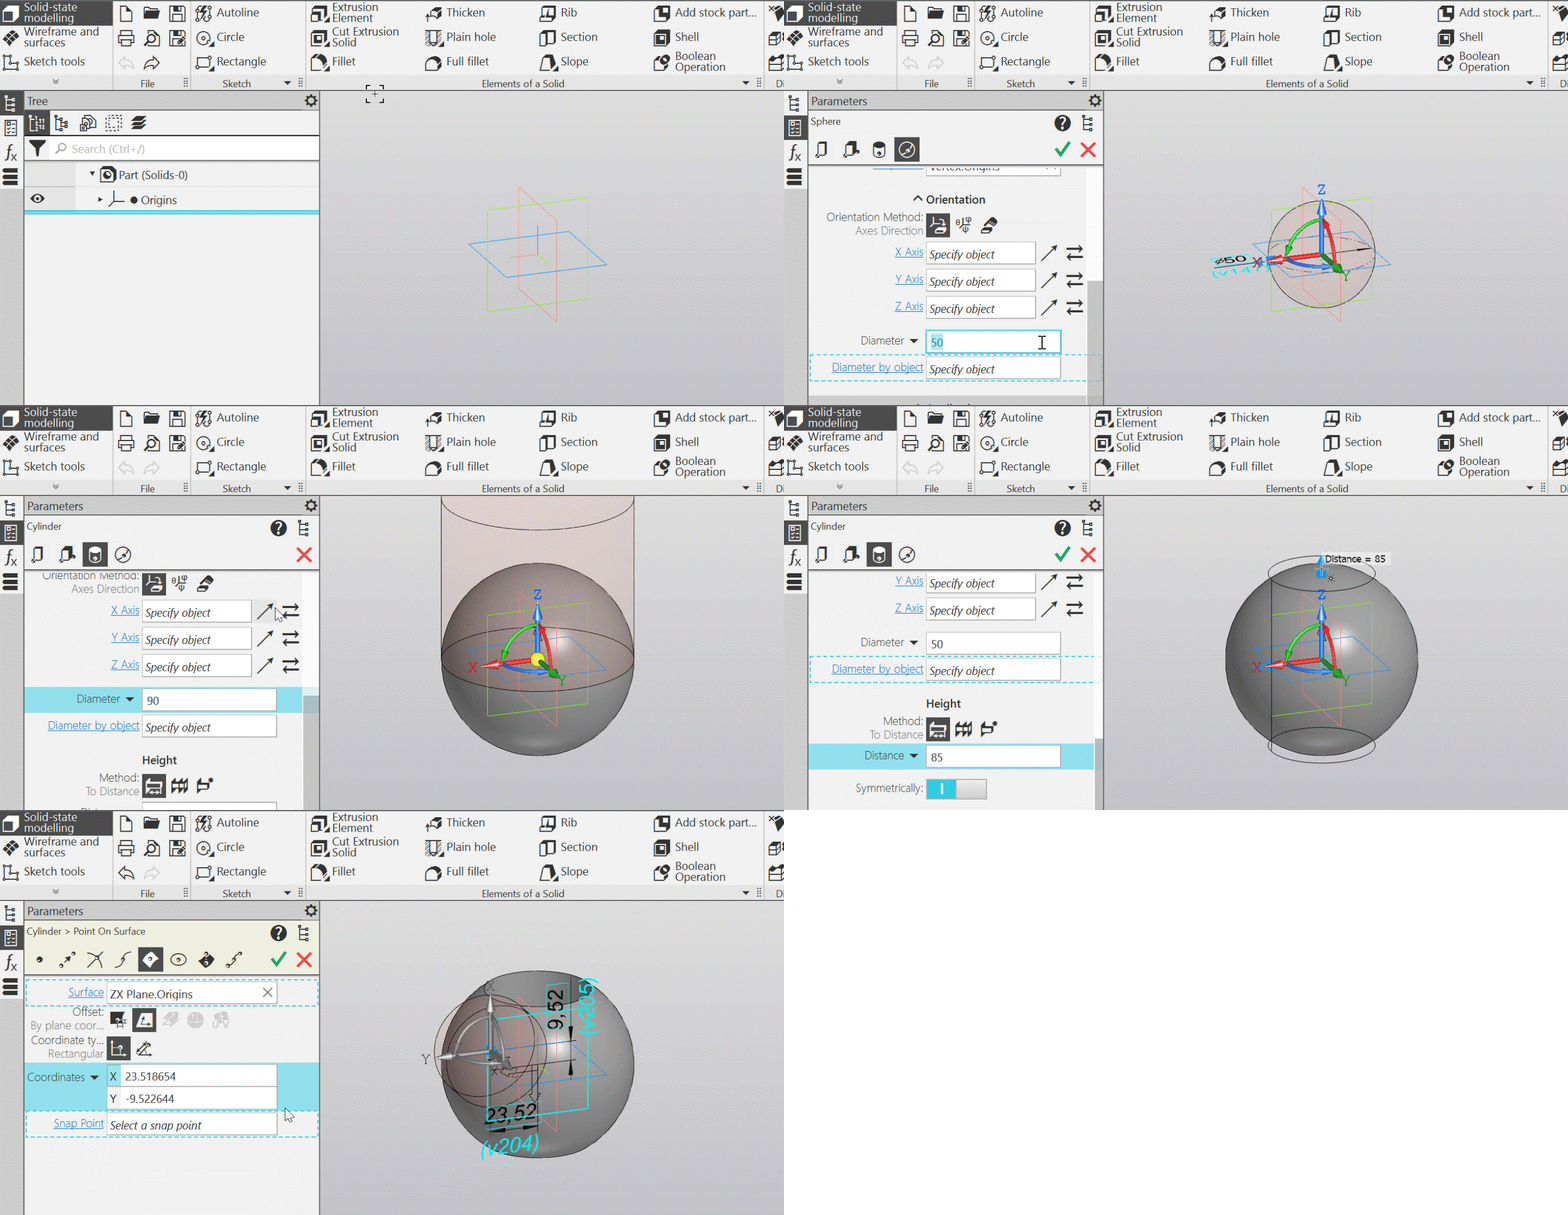
Using elementary bodies
9.The new command for changing the orientation of the model has been added. Normally with alignment — advanced variation of the Normal to... command. The Normally with alignment command sets the orientation in two steps: first, the model is brought to a position where the specified plane becomes parallel to the screen, and then it rotates around the normal to this plane so that a line lying in the same plane assumes a horizontal or vertical position. A plane containing a straight line can be specified by indicating a plane intersecting it or a line projected onto it.
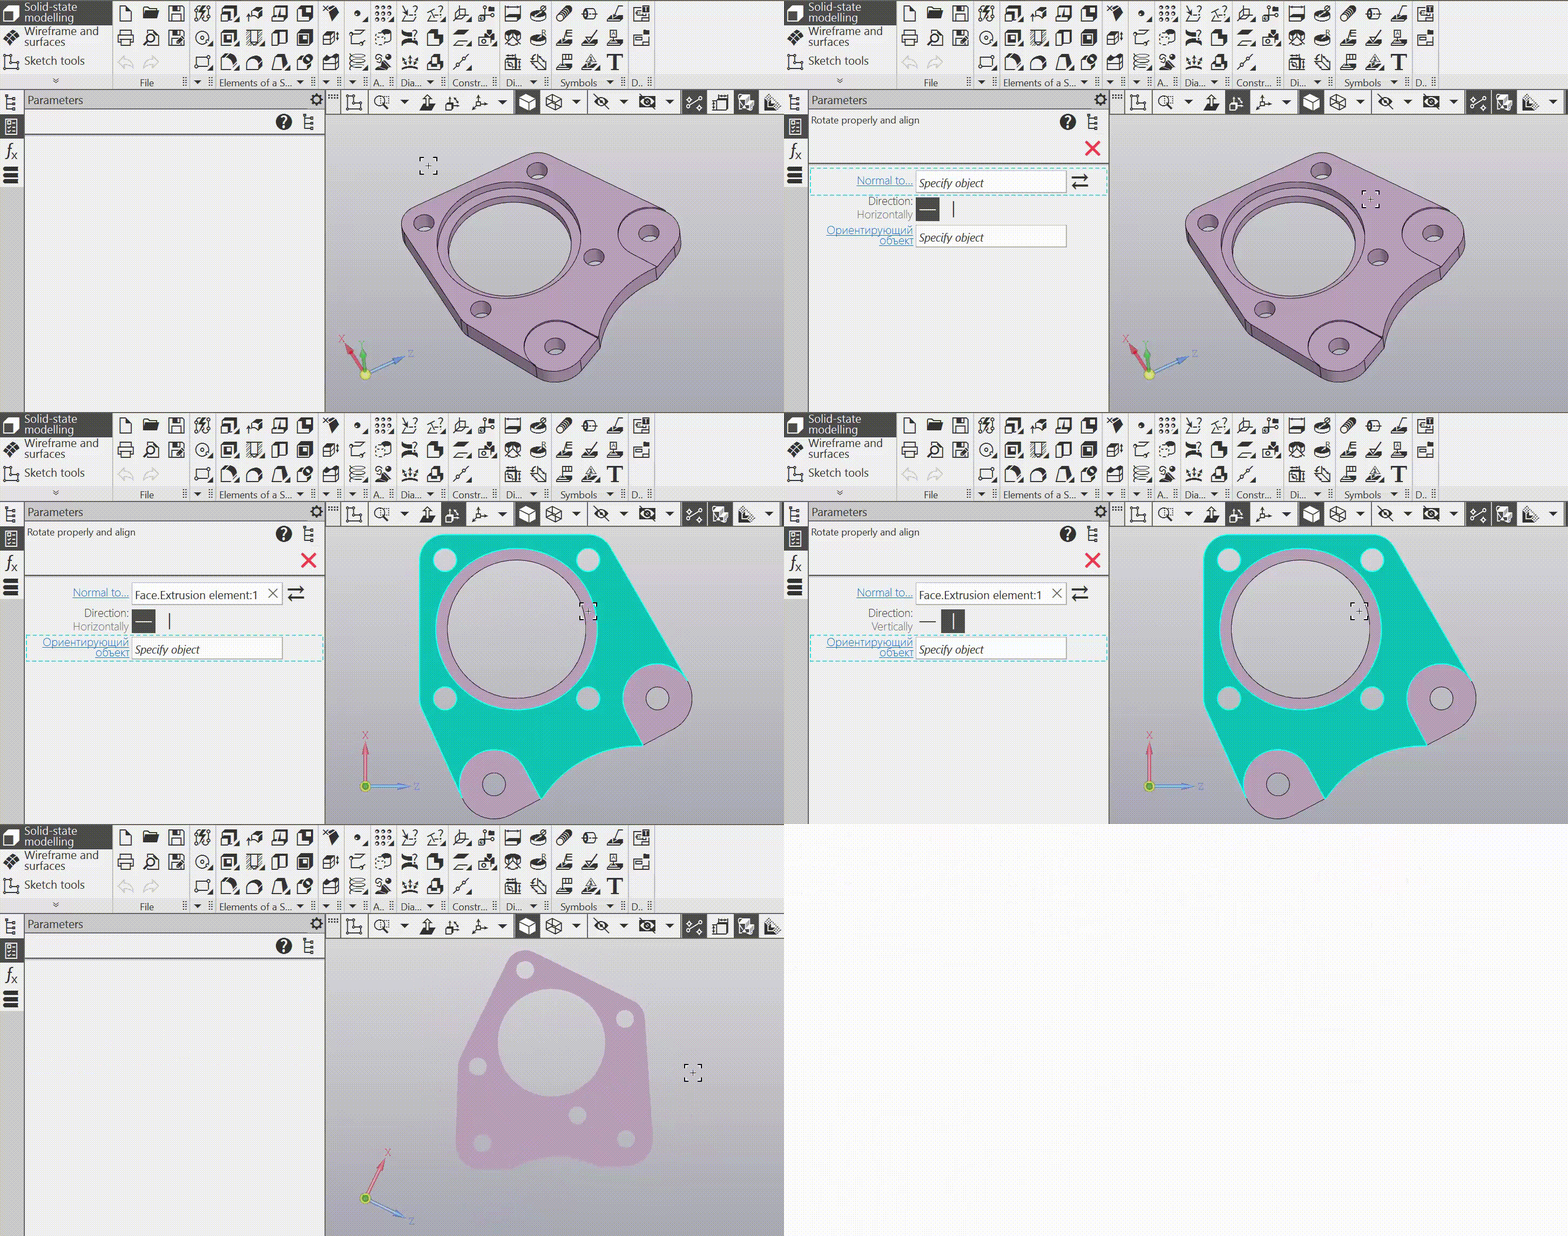
The operation of the command Normally with alignment
10. Improved the building processes of cylindrical and conical spiral 63063:
•To place a spiral, you should specify the point in space and the orientation. The orientation assignment of the spiral is essentially the orientation assignment of the coordinate system with its origin at the specified point; the methods of assignment are the same as when buildiing a Local Coordinate System (LCS). The direction of the spiral is determined by the Z axis, and the initial angle is counted from the X axis. Thus, specifying a flat object is no longer required, and a sketch with a spiral snap point is not formed either.
The following additional features are available when placing the spiral:
•the use of the locating element to set the position of an base point and the orientation of the spiral in the graphic area using the mouse,
•specify a plane or a flat face at an arbitrary point — then the base point of the spiral will become the specified point, and the Z axis will be directed along the normal to the face,
•specify a circle/arc — in this case, the center becomes the base point for the spiral, the Z axis is directed along the normal to the plane of the circle/arc, and the diameter of the spiral becomes equal to the diameter of the circle/arc.
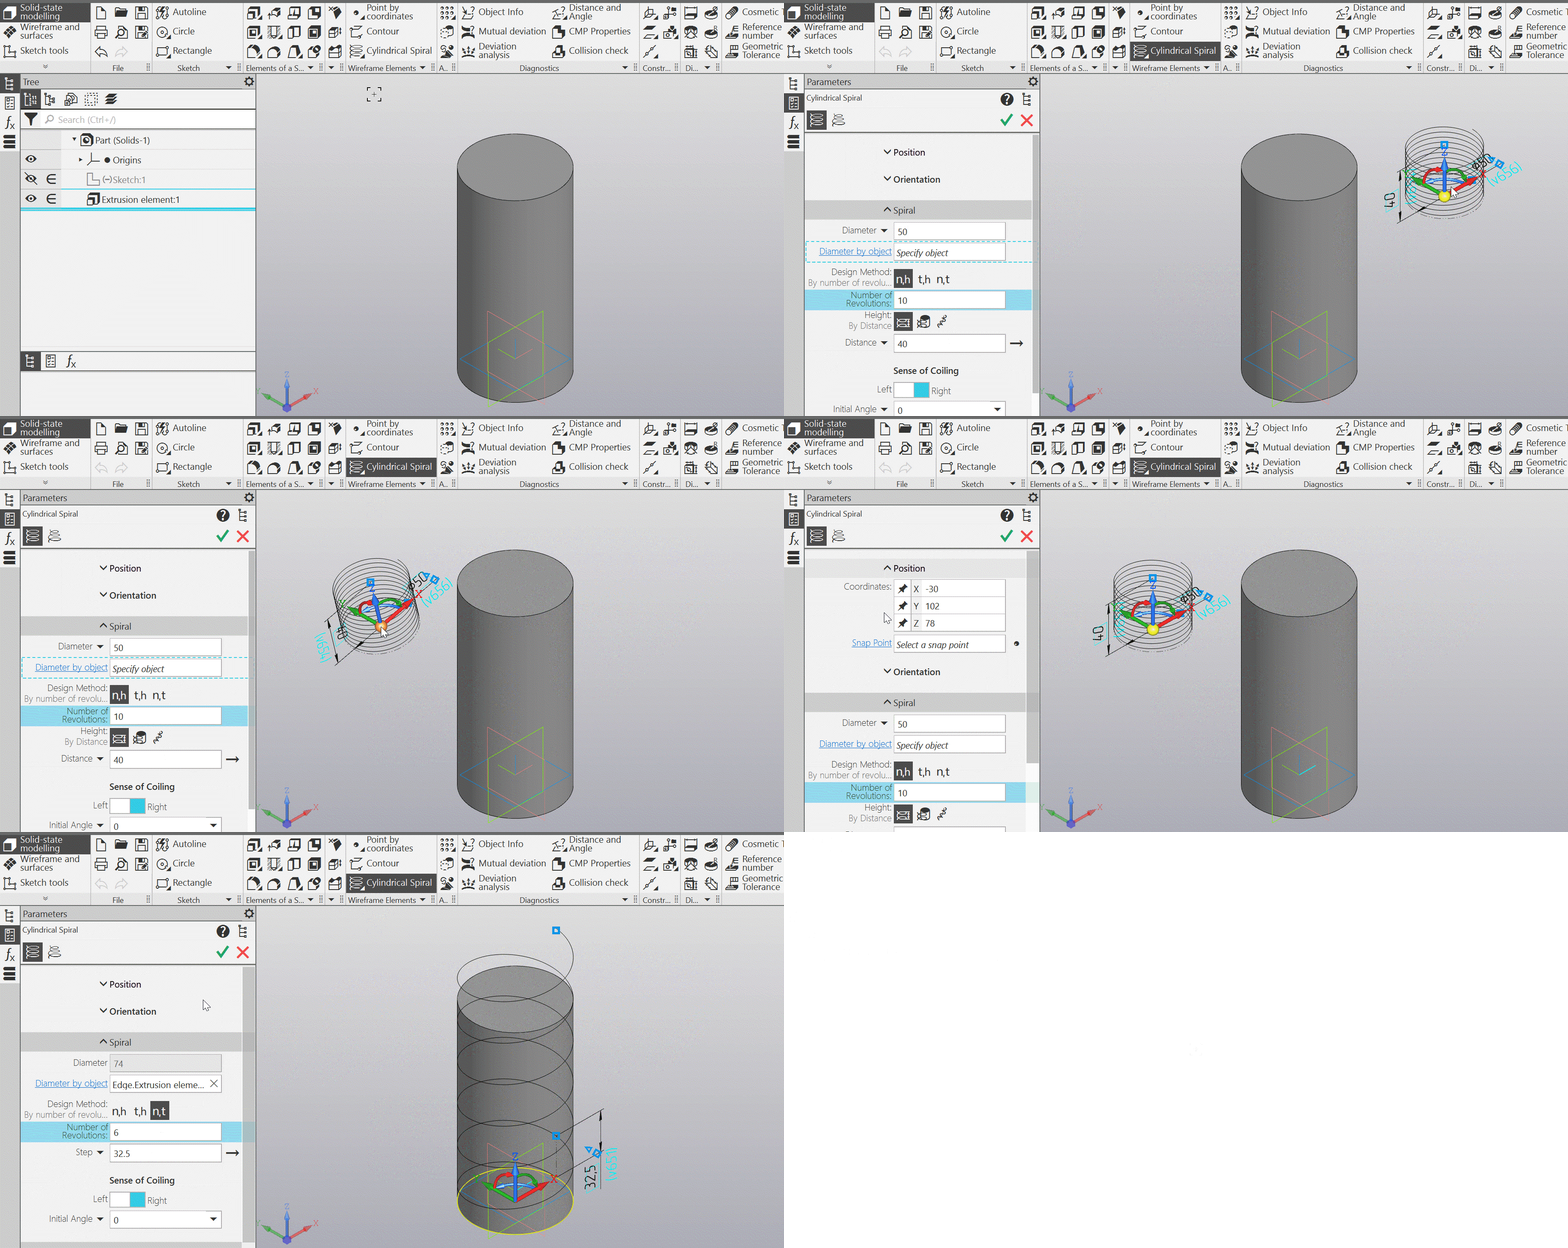
Building of a cylindrical spiral
•Added the ability to build a spiral axis under the condition that the height of the spiral is explicitly specified, i.e., by distance. The axis is created as an object with Centerline; in the model's Design Tree, the spiral axis is displayed as its subordinate object.
•Added the ability to select the coordinate system relative to which the placement parameters of the spiral are assigned (coordinates of the base point and Euler angles in case of selecting this orientation definition method).
•Variables controlling the coordinates of the base point of the spiral and Euler angles are added if the orientation is set in this way.
When opening documents created in previous versions of KOMPAS-3D, the existing spirals are automatically converted to the format of the new version, i.e., the early-mentioned options become available for editing.
11.49644Command Spline by objects It now allows you to create a spline associatively linked to the source objects, so it will be rebuilt when these objects are changed. If needed, you can obtain a spline without linkage (as before) — to do this, you need to enable the option Scatter during its construction or invoke the command Explode for an already constructed spline along the objects.
Besides the associative link, the command Spline by objects now includes the automatic selection of curves that are tangentially connected to the curves already specified for building.
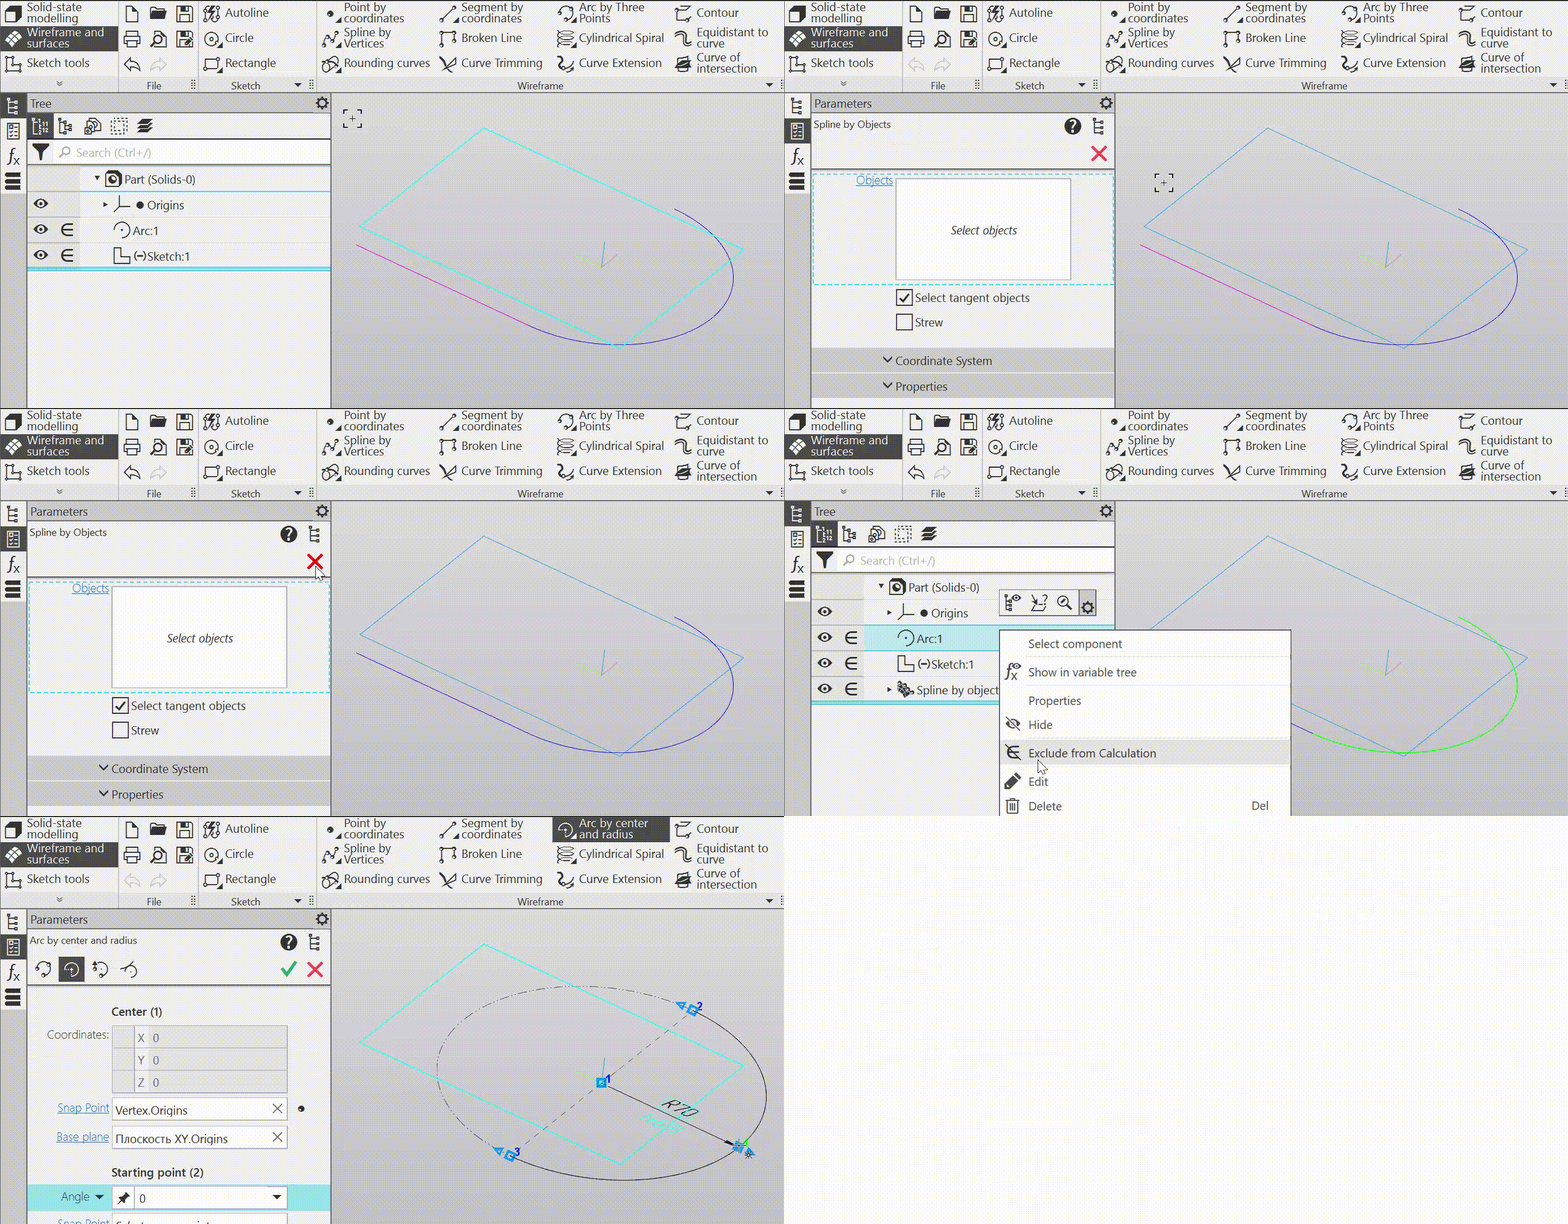
Spline, associatively linked with objects
12. Updated the Curve of intersection — solid or surface in its entirety can be the object in it. Due to this, the intersection curve correctly rebuilds when the number of faces of the solid/surface changes (previously, when selecting the solid/surface, faces were added to the object list, which caused new faces to be disregarded, and the disappearance of faces could result in an error in the intersection curve).
Similarly, updated the command Intersection objects, creating a line of intersection between the sketch plane and the model objects.
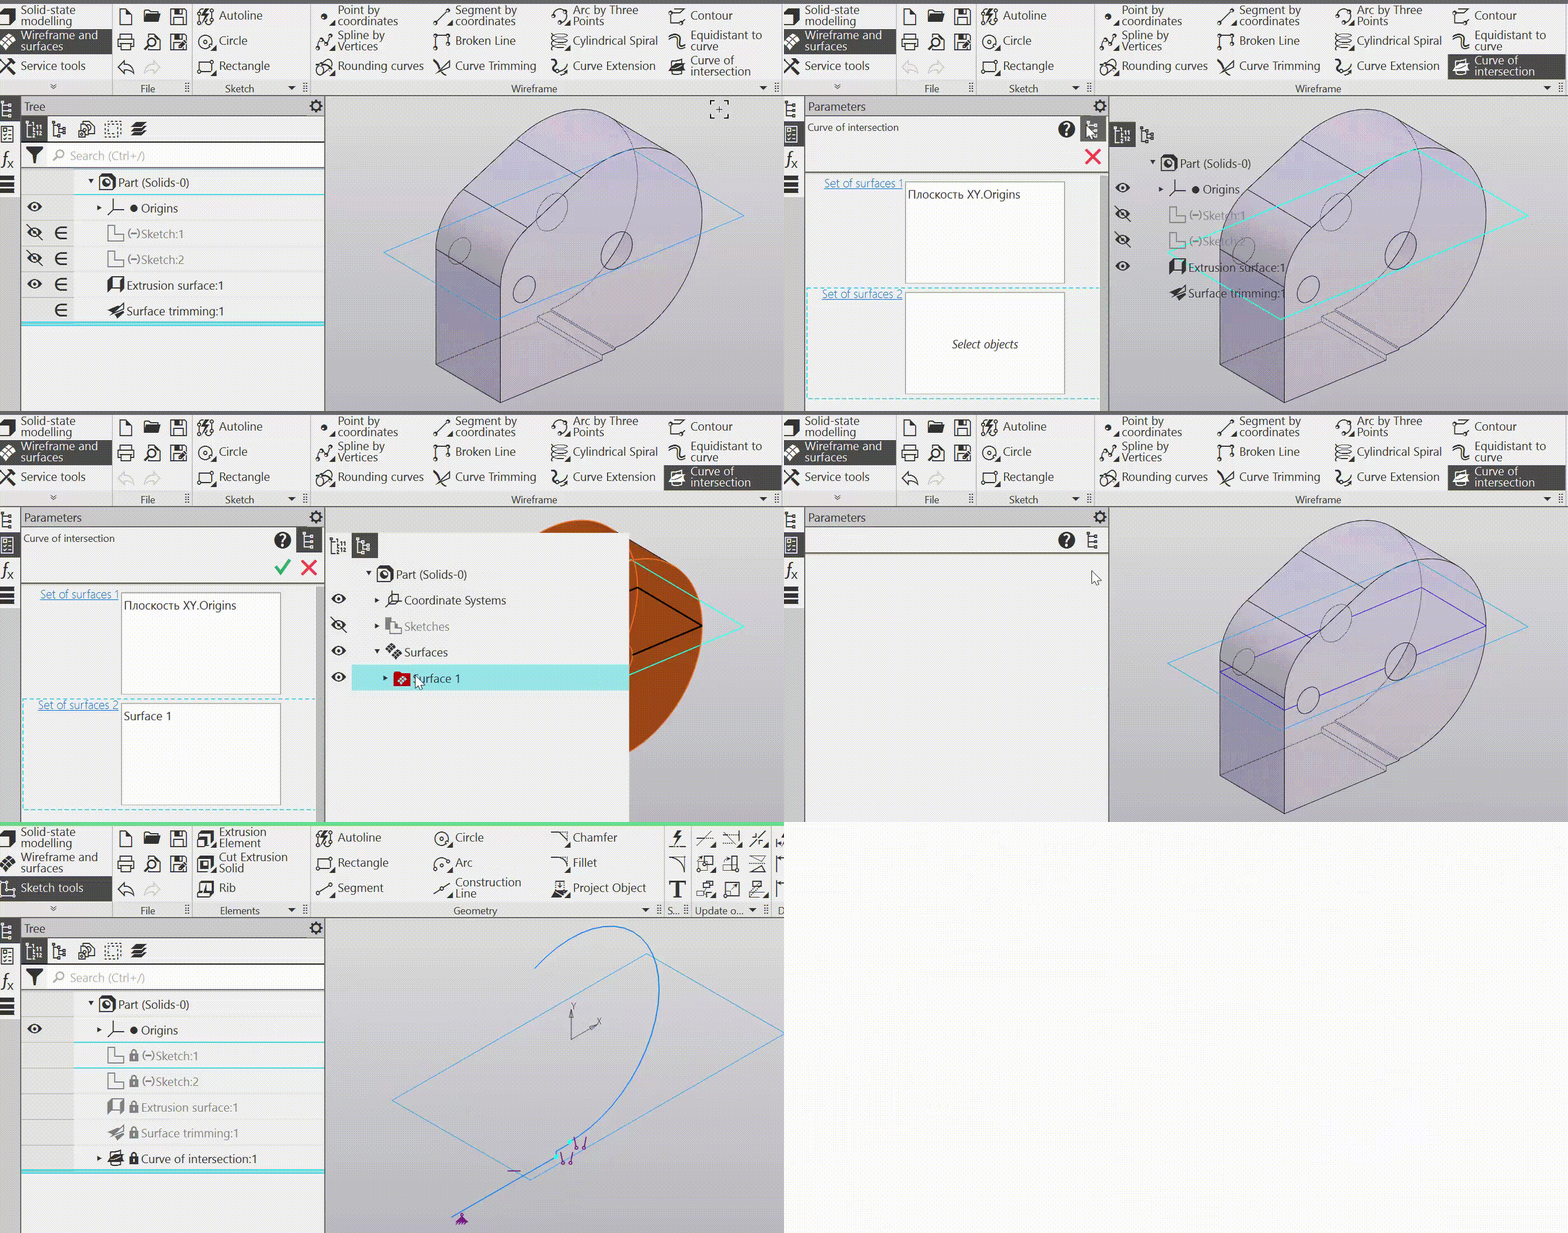
Intersection of surface and plane
13.New features when using the object copying operation:
•62482Upon editing a previously executed copying operation in the model, the possibility of establishing correspondences between elements of the original and new operation results has appeared . The initial result is the set of objects that was present in the model at the start of the operation's editing, and the new ones are those that appear as a result of the editing. Due to the establishment of correspondences, other model objects that were based on the original result do not lose their anchor objects.
For example, a sketch was created on the copy of the auxiliary plane, but subsequently, the source file of the copy had to be replaced. While editing the copy operation, you can establish a correspondence between the plane copied from the previous source and the plane copied from the new source. As a result, the sketch will not lose its plane but will 'transition' to a new one.
In the process of establishing correspondences, you can view the current result, i.e., rebuild the model based on the correspondences already established. This allows for visually controlling model changes, as well as obtaining information about any remaining errors in it.
Thus, by establishing correspondences, it is possible to reduce the number of errors that appear in the model after editing the copy operation (and in simple cases,to avoid them altogether), and, consequently, reduce the time spent on refining the model after such editing.
Note. The ability to establish correspondences is also available when editing cut extrusion solid, cut rotation, cut by path, cut loft solid operations. add about component replacement?
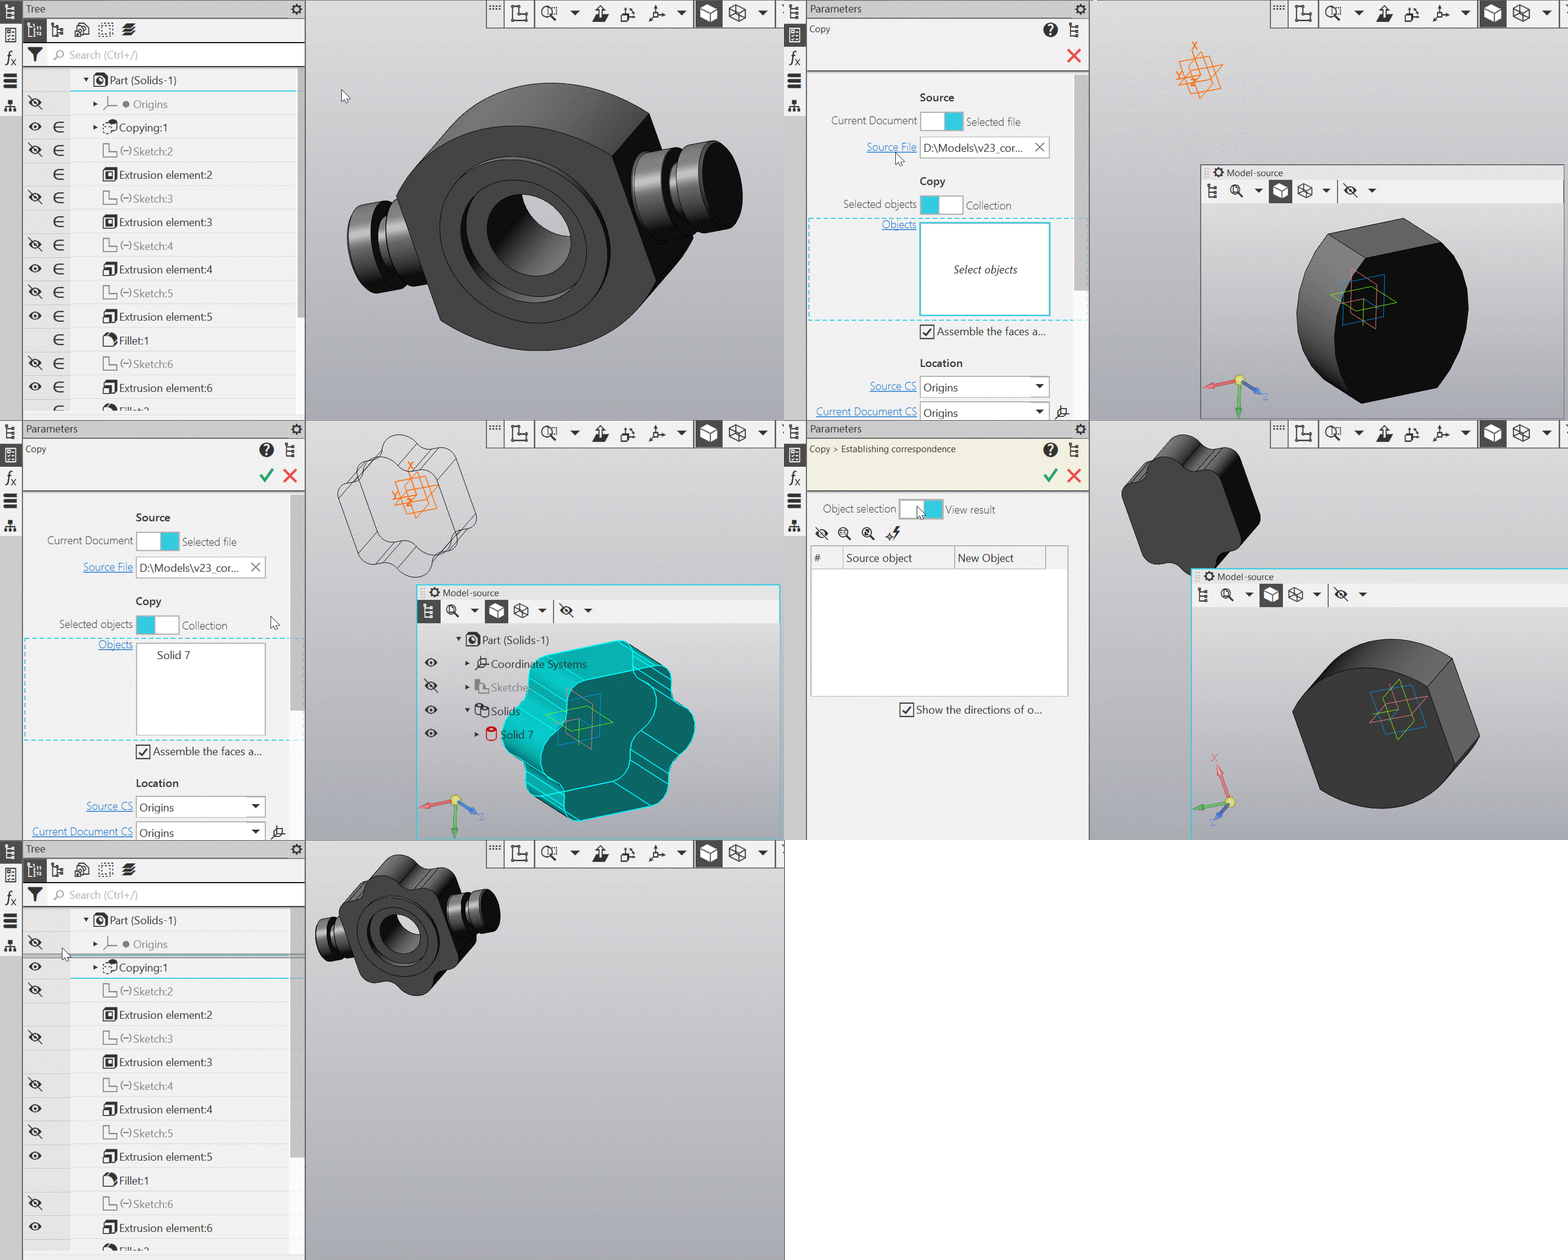
Establishing the correspondence of faces when changing the source in the copying operation
•65919 Exclusion/removal of source objects from the calculation of the copying operation does not lead to the removal/exclusion of the operation itself. Instead, the copying operation is marked as erroneous in the Design tree. The result of copying remains in the model and is available for use by dependent objects. Previously, deletion/exclusion from the calculation of copying sources resulted in the deletion/exclusion of the copy operation.
•When copying curves, axes, surfaces, and planes, there has appeared the possibility to change the direction of the resulting copy to be opposite to the original's direction (in the case of surfaces/planes – the direction of the normal).
•Copying entire objects, such as control/attachment points and sketches, has become available. As the result, the copy is an object of the same type that can be used accordingly. For example, if you copy one or several curves of a sketch, the copies will be curves, however you copy the entire sketch, the copy will be a sketch.
14. Updated the Surface adjustment. If a surface approximating a section of a polygonal object is being built, it is now possible to specify a guiding object and adjust numerical parameters (if they are available). For example, when creating a cylindrical surface, you can specify a plane that the cylinder's axis should be perpendicular to, and input the cylinder's radius value.
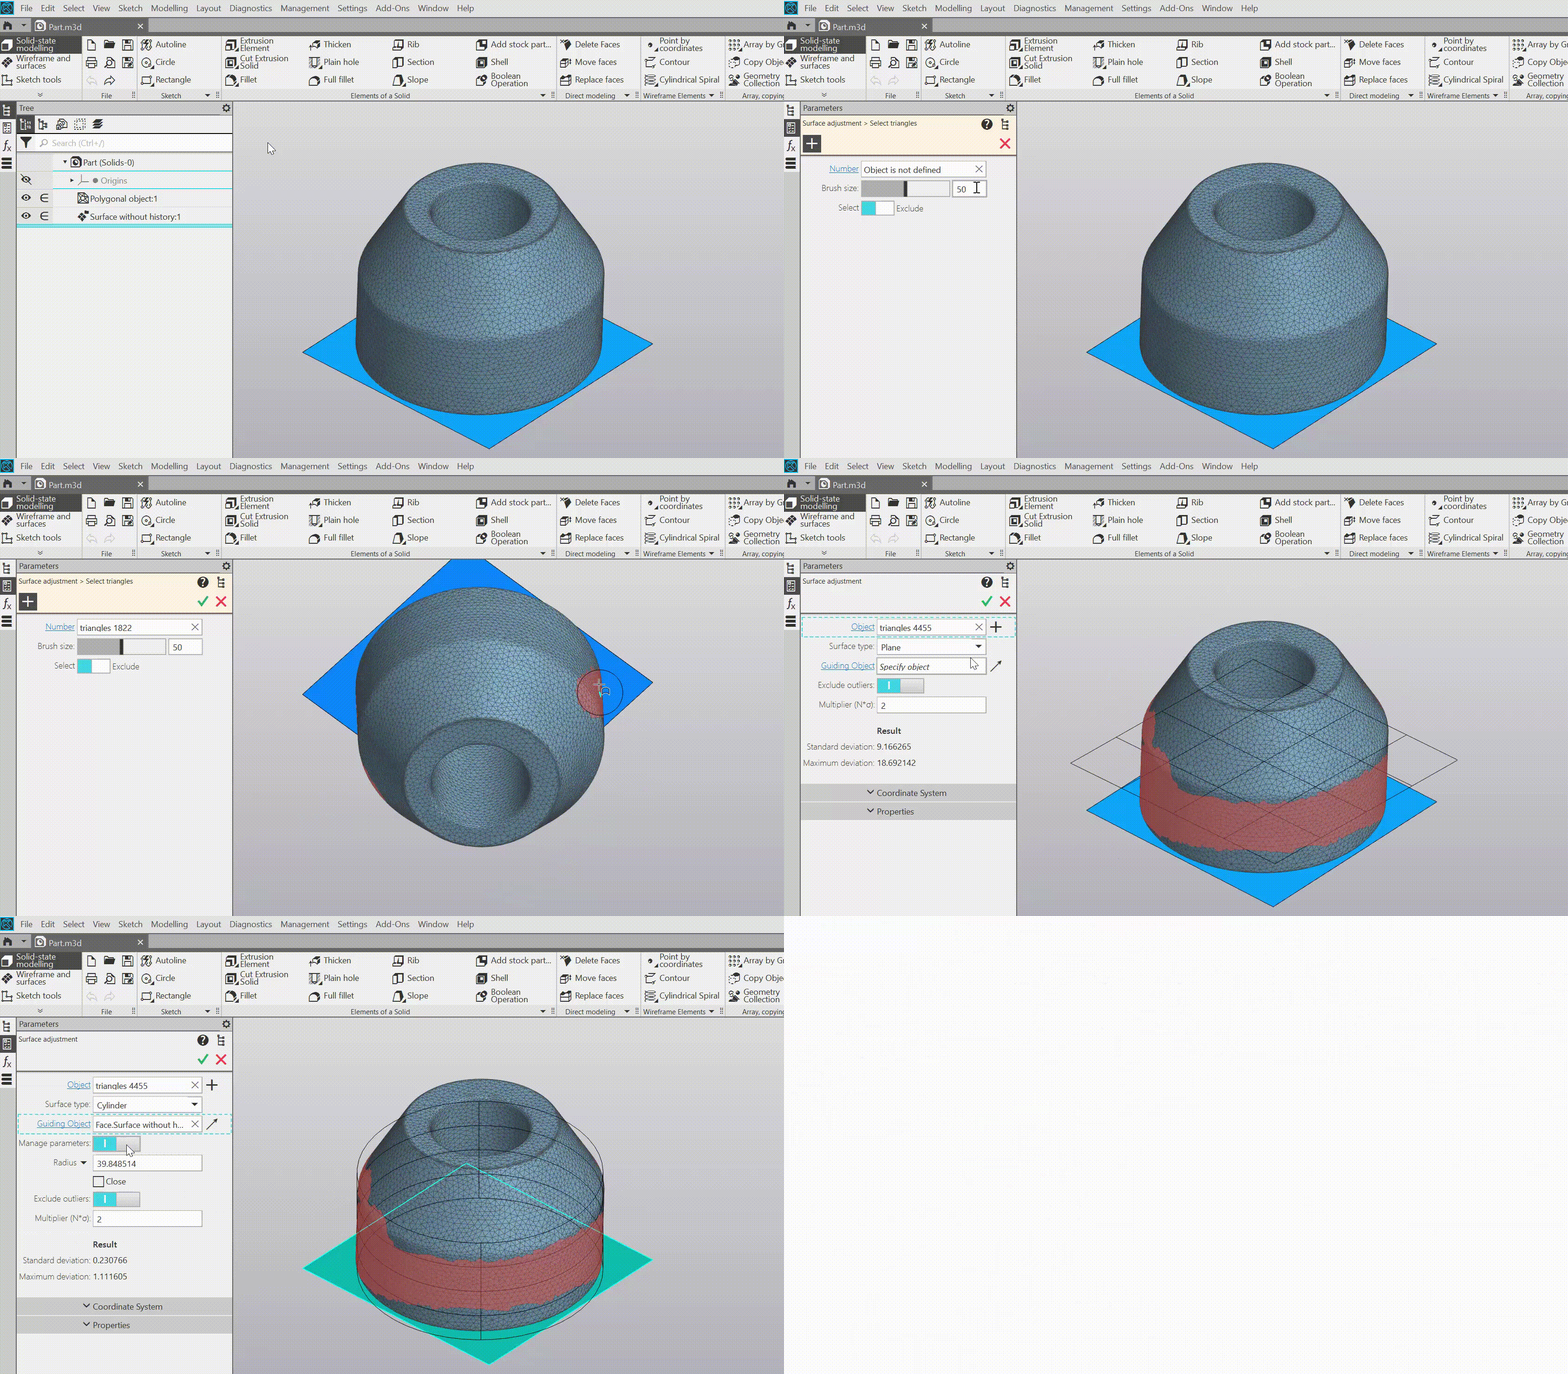
Establishing the guiding object and parameters for Surface adjustment
15.Component settings are now available for placement of its objects in the assembly layers: either the component as a whole (i.e. all its objects regardless of level) is placed on one layer, or the component's objects are placed on the same layers as in their source files. At the same time, if there are no corresponding layers in the assembly, they will be automatically created. Placement on source layers can be useful for managing the visibility of objects or their color using the corresponding layer properties they belong to.
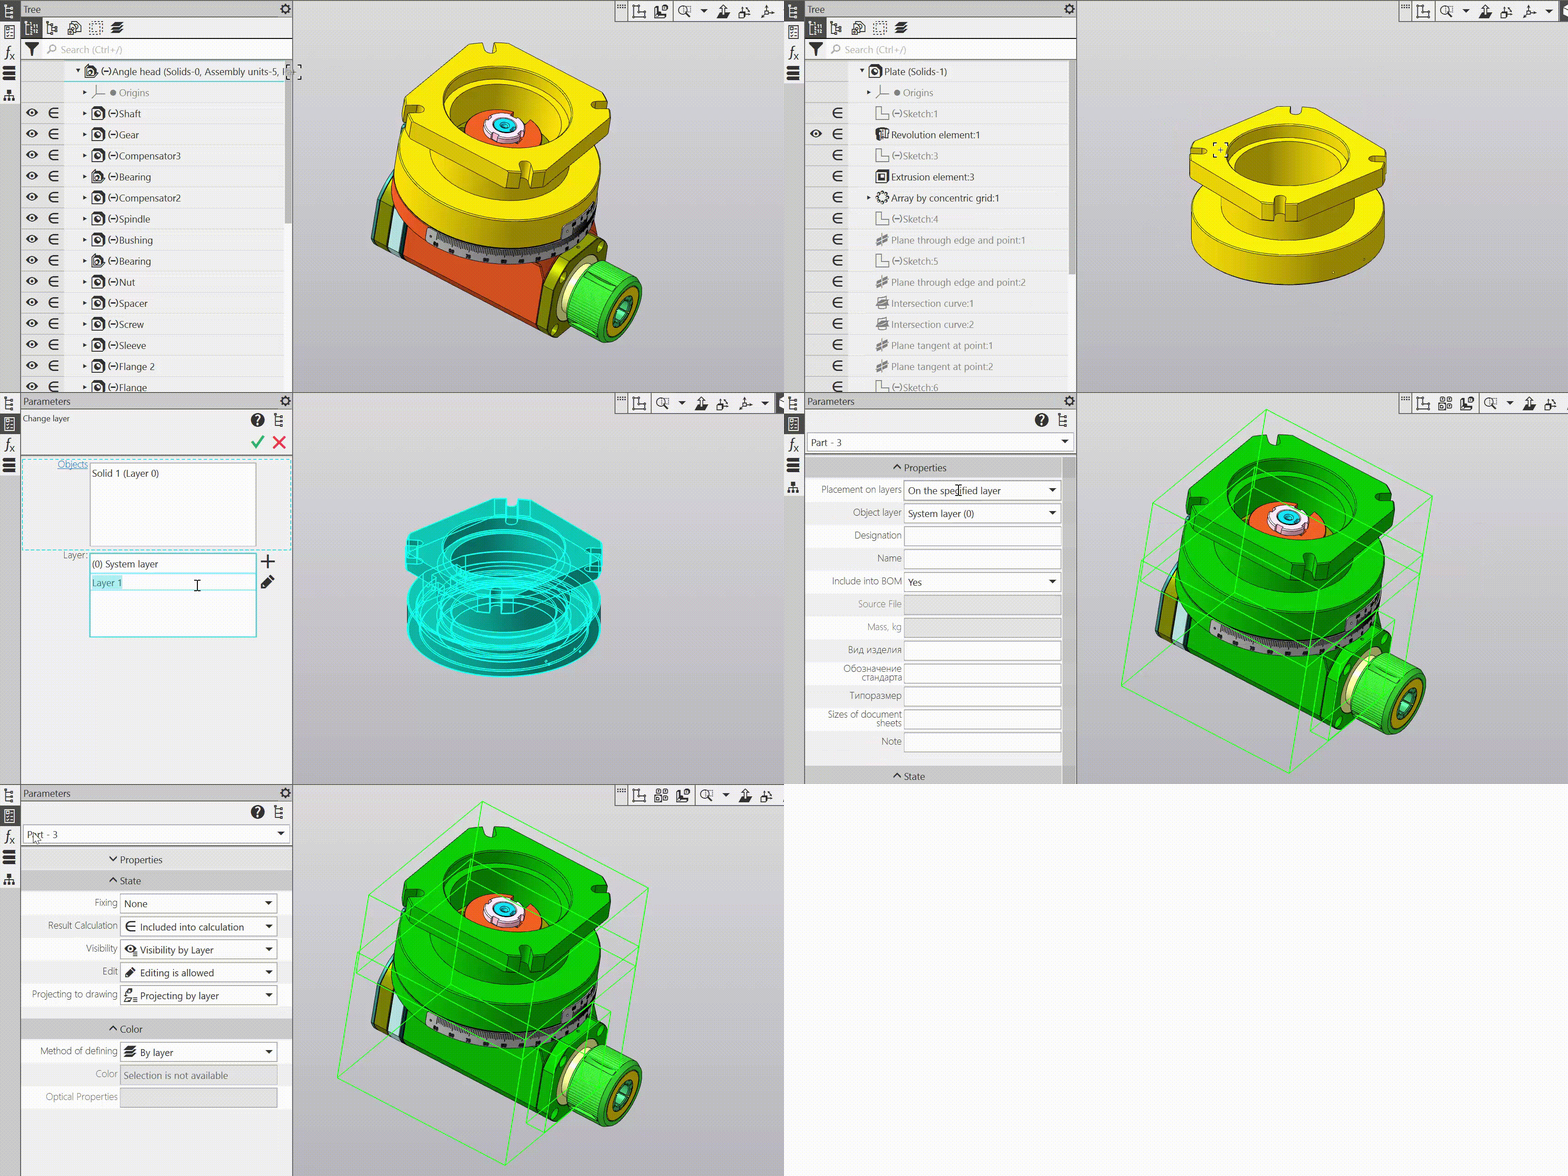
Placing assembly components on source layers
16.Improved working with layers:
•Implemented Layer tree. The button Layers on the Tree panel is used for its display. In the Layer tree, all the functionalities for working with model layers that were previously provided in the Document manager are available.
In the sketch Layers tree displays sketch layers and allows working with them.
•New features have been added:
•The property of the layer Activity has appeared, which has two values: active and background. A feature of the background layer is that objects lying on it are not available for selection in the model window. The exceptions are measurements and diagnostics operations. Objects on active layers can be operated on in the usual way.
•It became possible to disable a display of empty layers.
•The layer number can now be changed by user.
17.Expanded the capabilities of the command Mutual deviation:
• the capability to measure distances between points of two curves and between points of a curve and a surface has been added, therefore the command has been renamed to Mutual deviation; the use of a plane as a measurement object has been excluded,
•measurements in method By the normal to the object are now produced by the normal to the second of the indicated objects, and not to the first one,
•added measurement of the absolute minimum,
•the ability to change the order of objects during calculation has appeared,
•measurement results are displayed in the table on the Parameter panel and in the graphic area.
•saving measurement parameters (list of objects and settings) in the document has become available; the corresponding object is placed in the Model Tree under the Diagnostics — Deviation analysis section.
•the command has been removed from the group of measurement commands (Distance and angle, Edge length, Area) and placed separately on the Diagnostics toolbar.
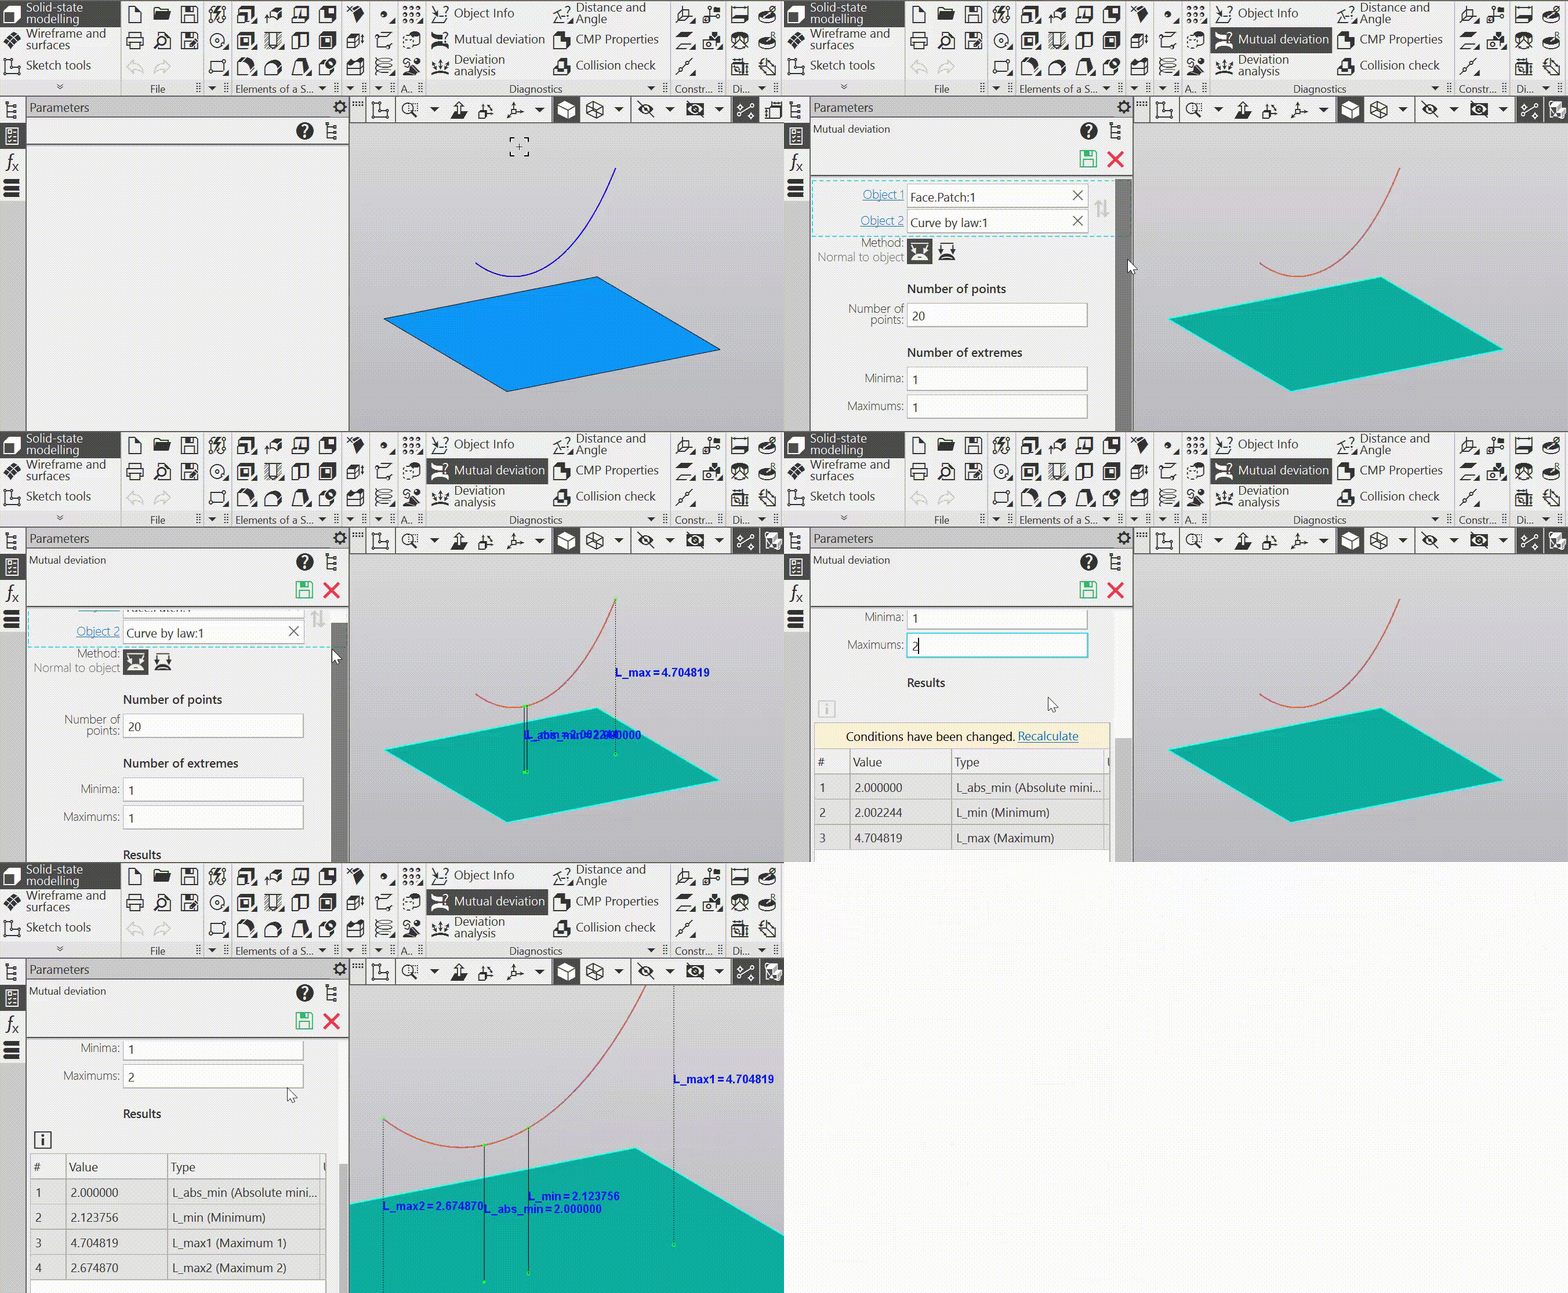
Analysis of mutual deviation of curve and plane
18.The following methods are available for placing in command Locate a sketch:
•On the plane — corresponds to the primary method of allocating a sketch used previously, i.e., allocating a sketch on the specified plane or flat face.
•On the trajectory – a new method, involves placing a sketch on a plane perpendicular to the specified curve at the selected point. This point is the origin of the sketch coordinates.
•Fixed — corresponds to the fixed state of the sketch in previous versions, i.e. it cancels the association of the sketch with the anchor objects and fixes its current position in space.
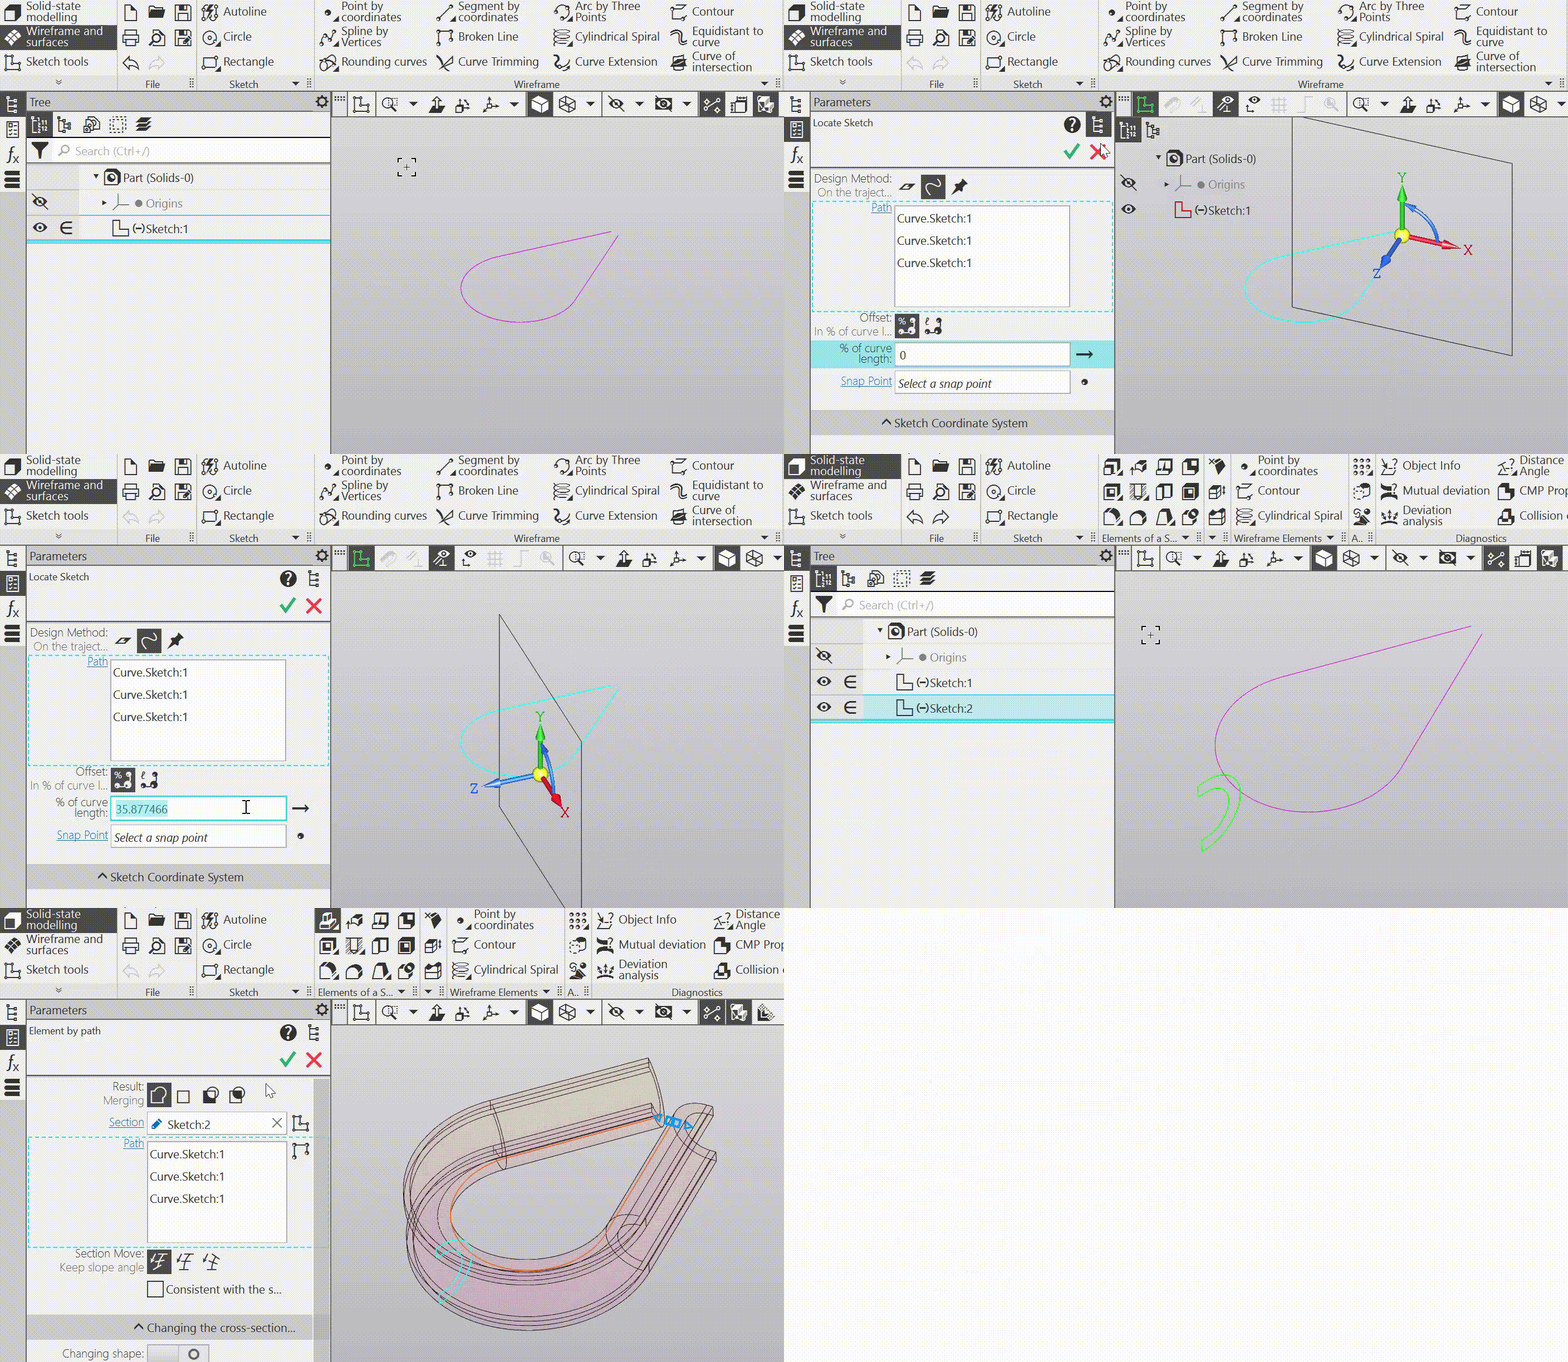
Creating and using a sketch on a path
19.Updated the process of building an element by path:
•It became possible to сhange cross-section shape when moving along the path. The section shape can be altered through the geometric links of the sketch with other curves or surfaces (via the objects of their intersection with the sketch plane), as well as by changing the sketch variables selected by the user according to specified laws.
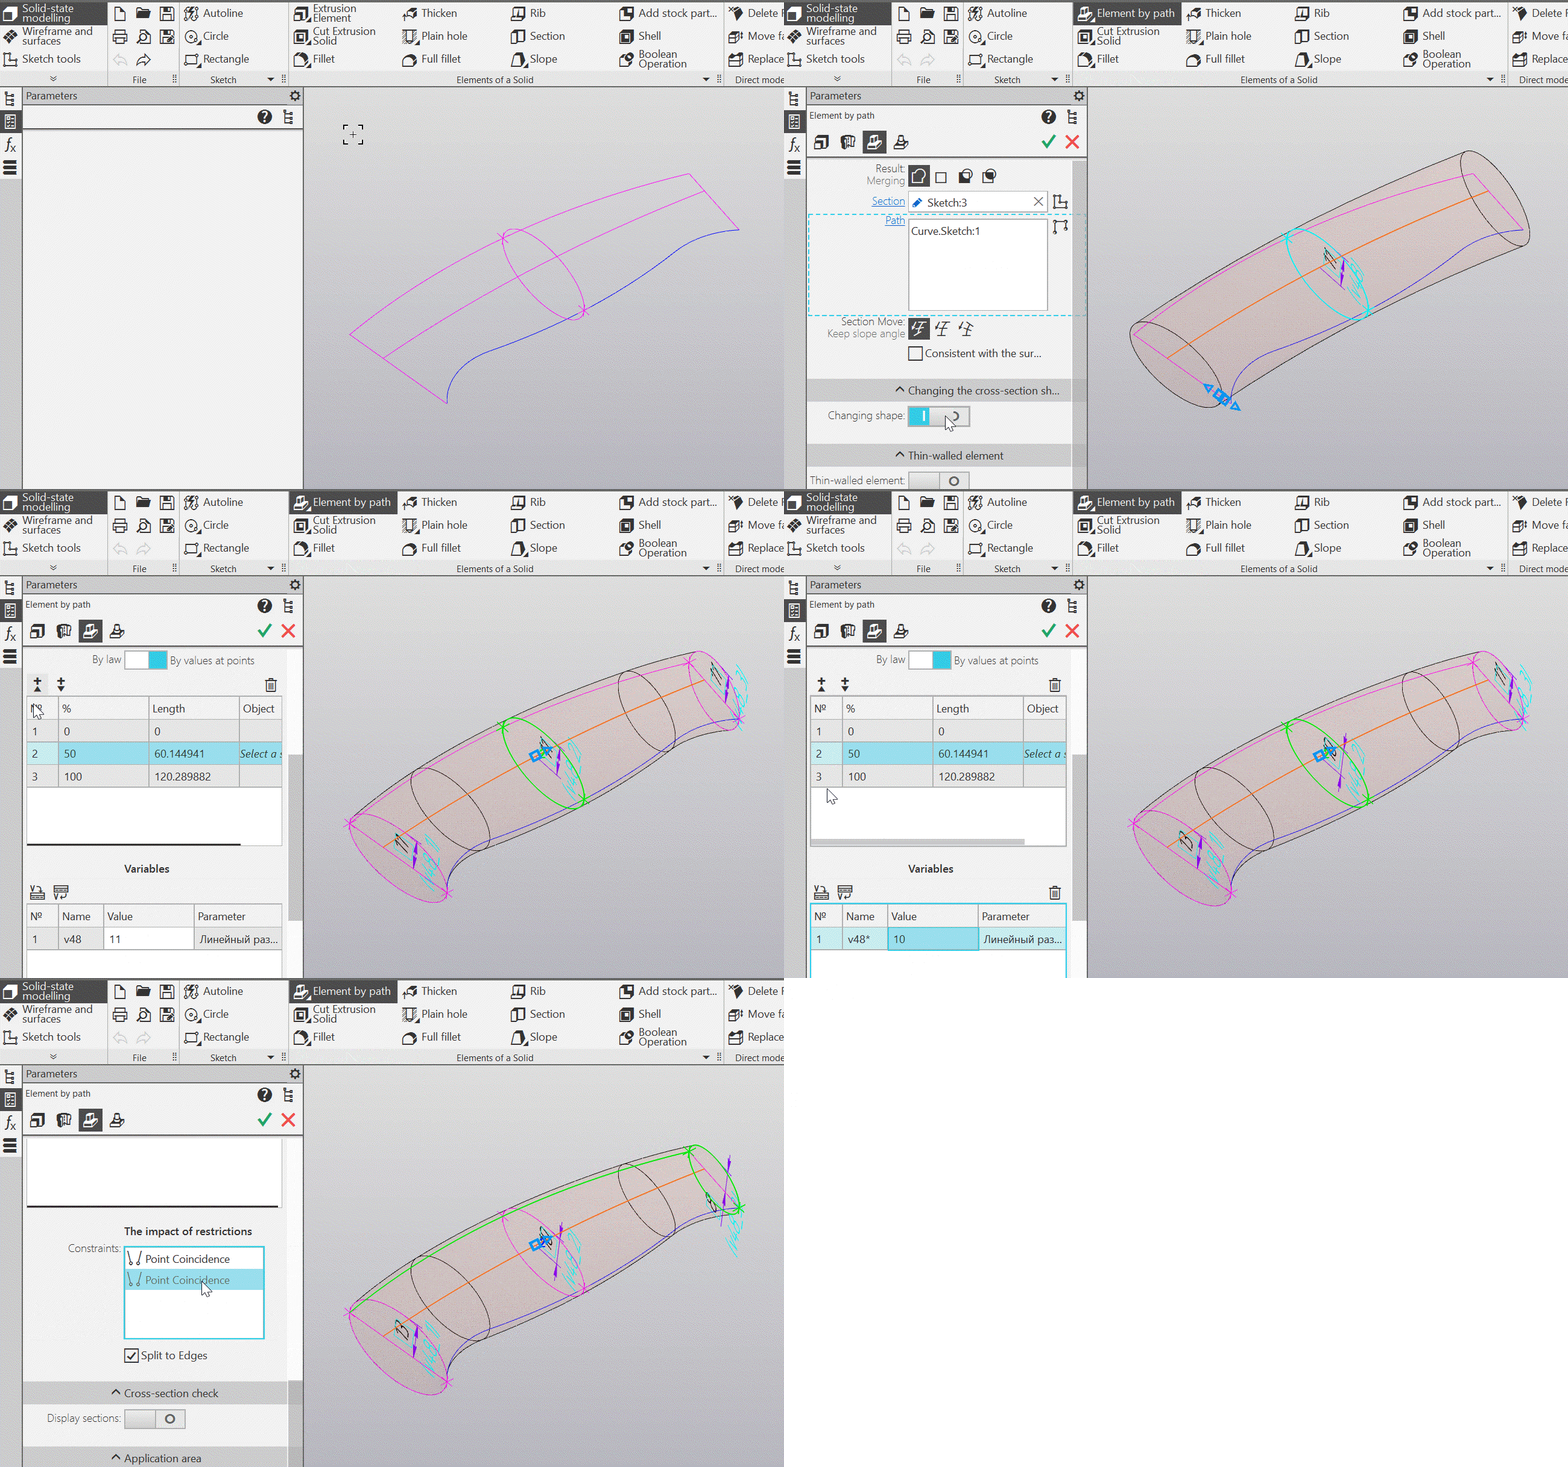
Establishing of section shape's change along the trajectory
•In the sub-process of creating a sketch, launched from the process of constructing an element along the path, the method of creation is automatically selected On the trajectory and as the path, a curve is selected, which is used in the same capacity in the process of constructing the element. This approach simplifies and accelerates work as it does not require creating a separate plane for the sketch.
•The capability to launch directly from the process of building an element by path has been added — using the command Broken line to create the trajectory of the element.
•The requirement that an open curve must start in the sketch plane is excluded — it's sufficient for it to intersect this plane.
20.Updated the Distance and angle:
•The display of the measured angle between objects has been added to the graphic area.
•Results of measurements are now displayed in the table on the Parameter panel. The selected measurement in the table is displayed in the graphic area as a segment (or an angle) and a numerical value.
•The informativeness of the result presentation is improved when a direction is specified for the measurement: in the graphic area, except the measurement result itself, additional objects are displayed explaining how this result was obtained.
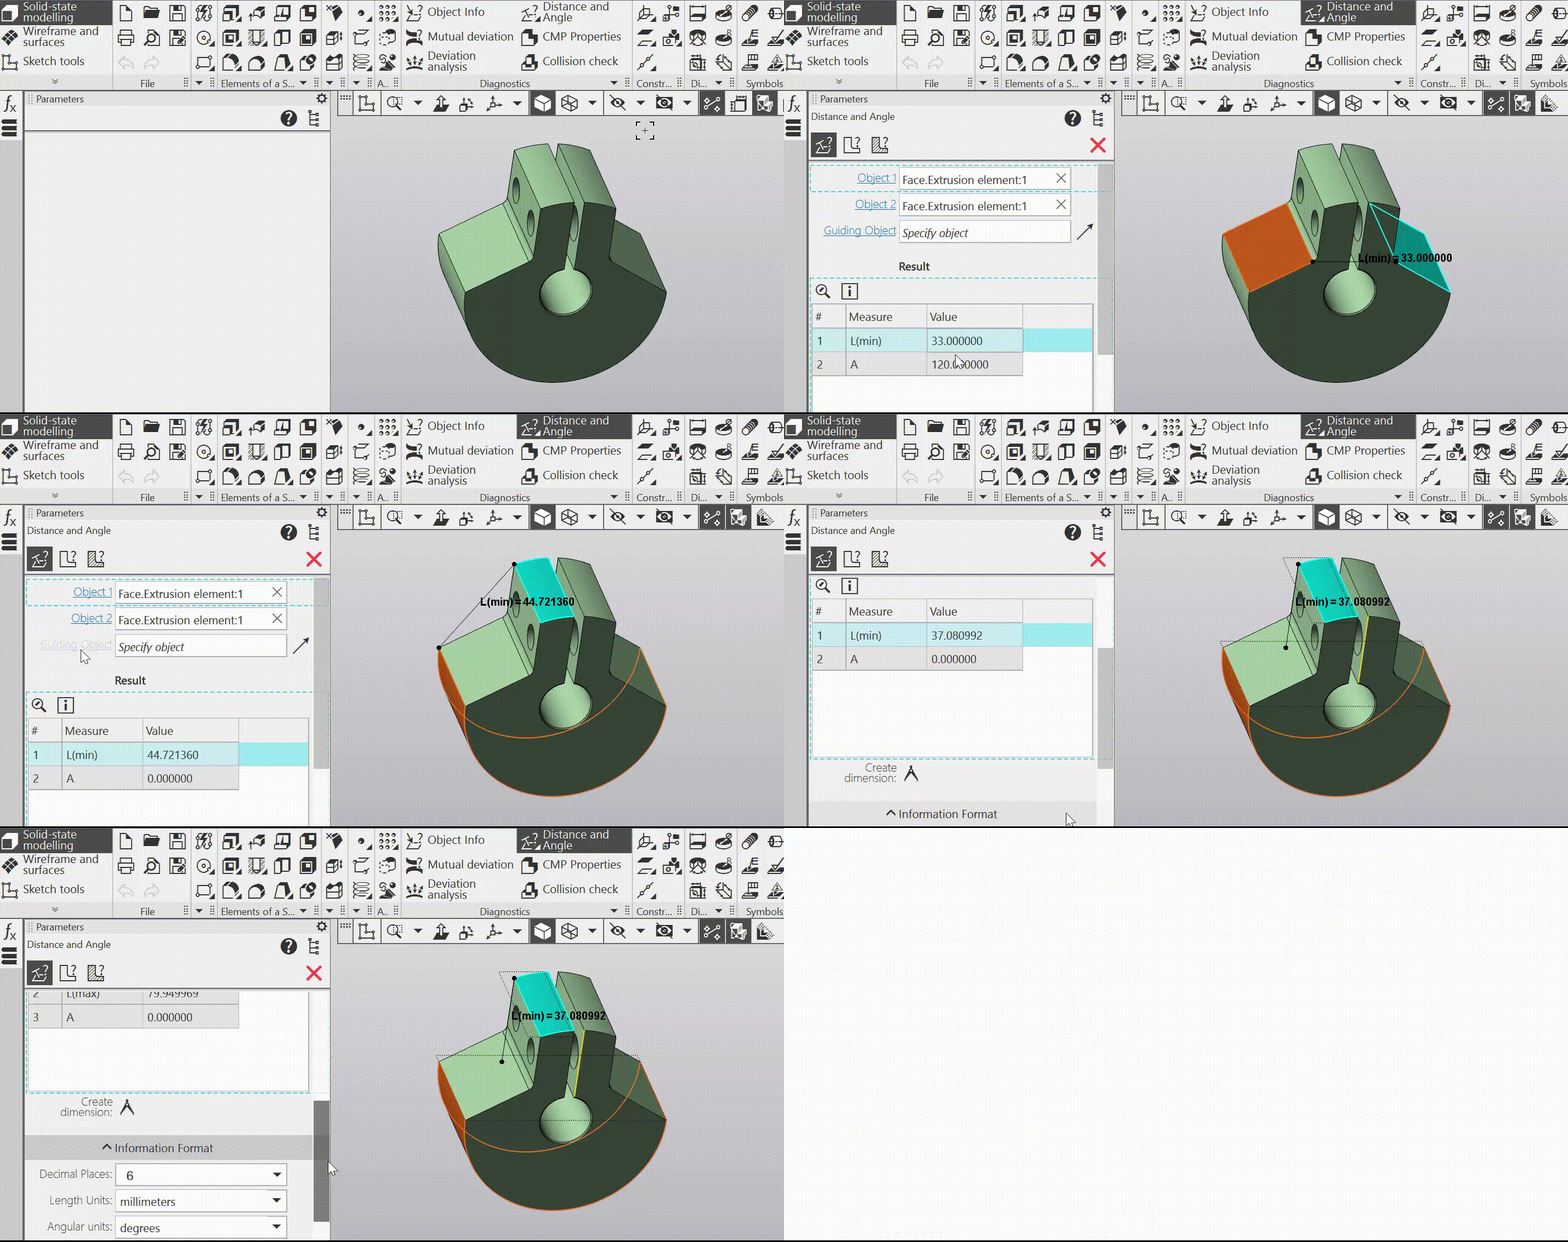
Measurement: angle; measurement: distance in a given direction
21.Refined commands Unfolded curve and Collapsed curve:
•in the command Unfolded curve not only curves can be specified, but also points belonging to the surface — as a result of unfolding, the points will be transferred to the plane,
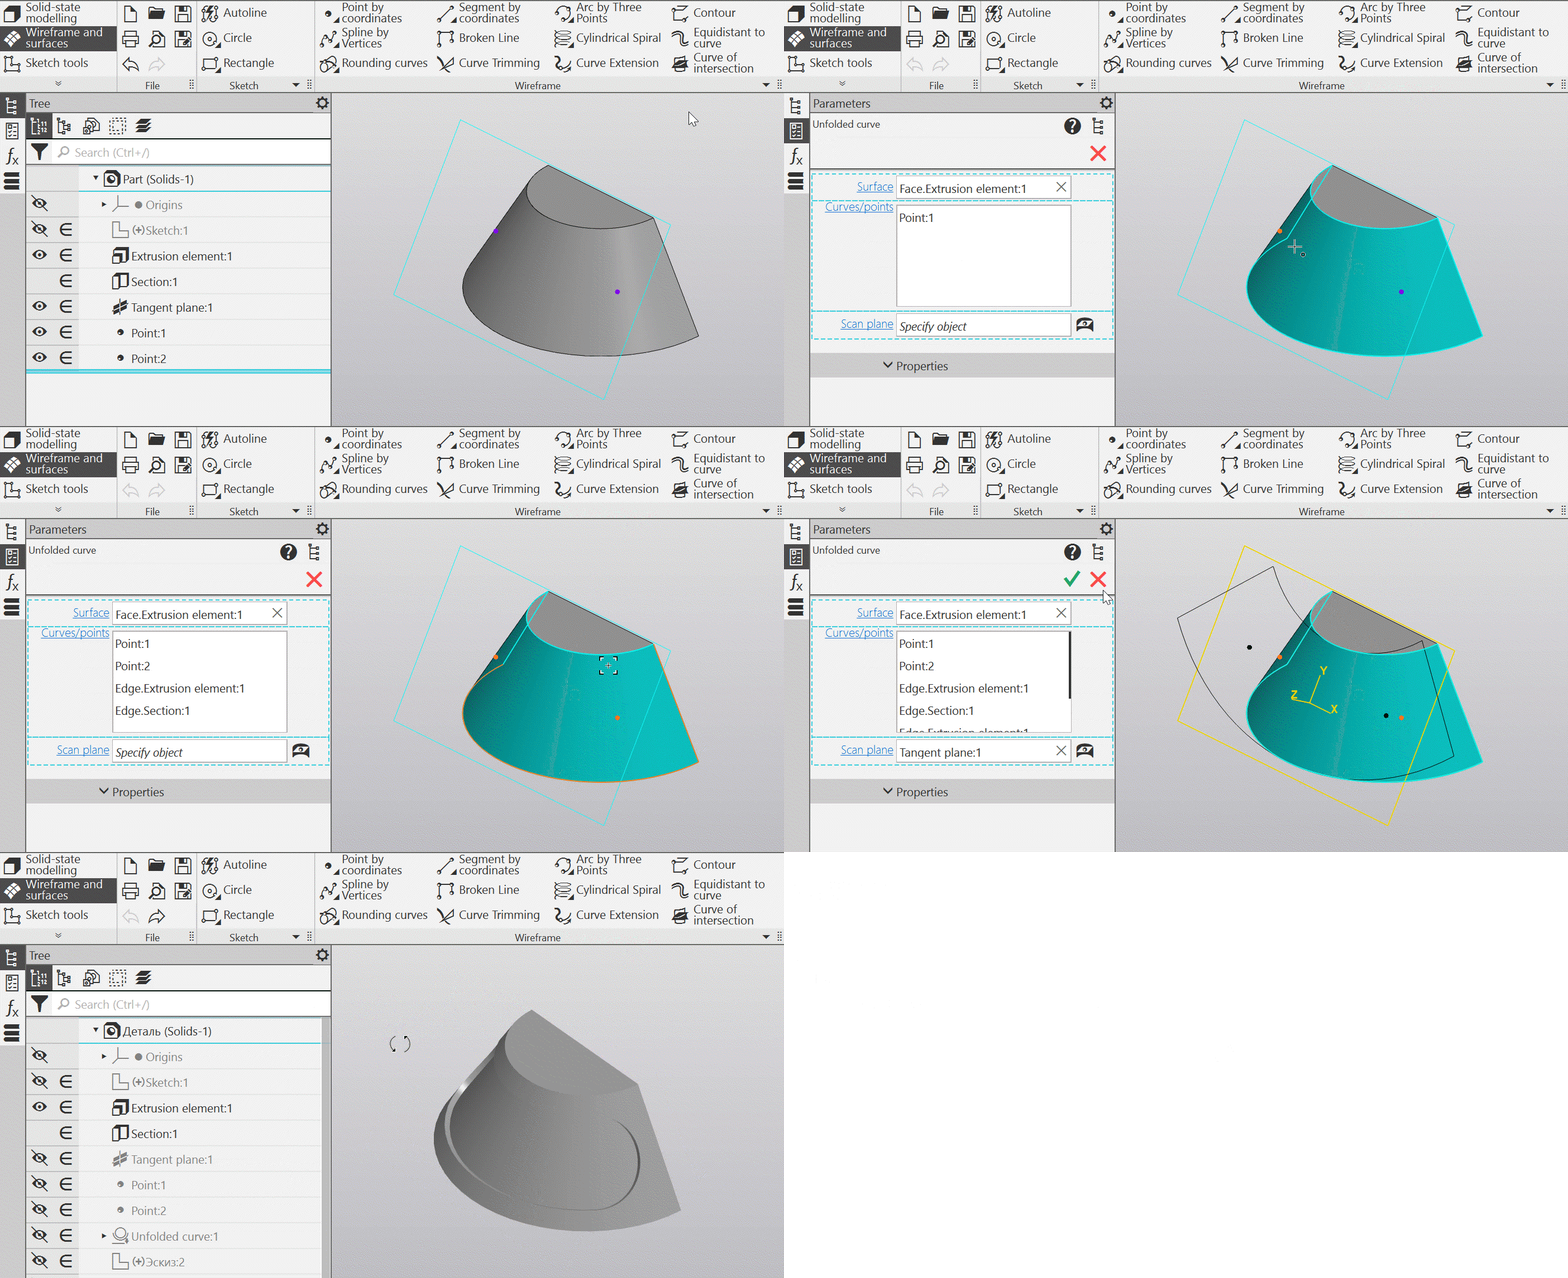
Transferring points from cone to plane
•in the command Collapsed curve the possibility of specifying/building a plane tangent to the surface has been added, which allows segments, points, and also non-planar curves to be collapsed onto the surface: first, these objects are projected onto the specified plane, and then they are collapsed from it onto the surface.
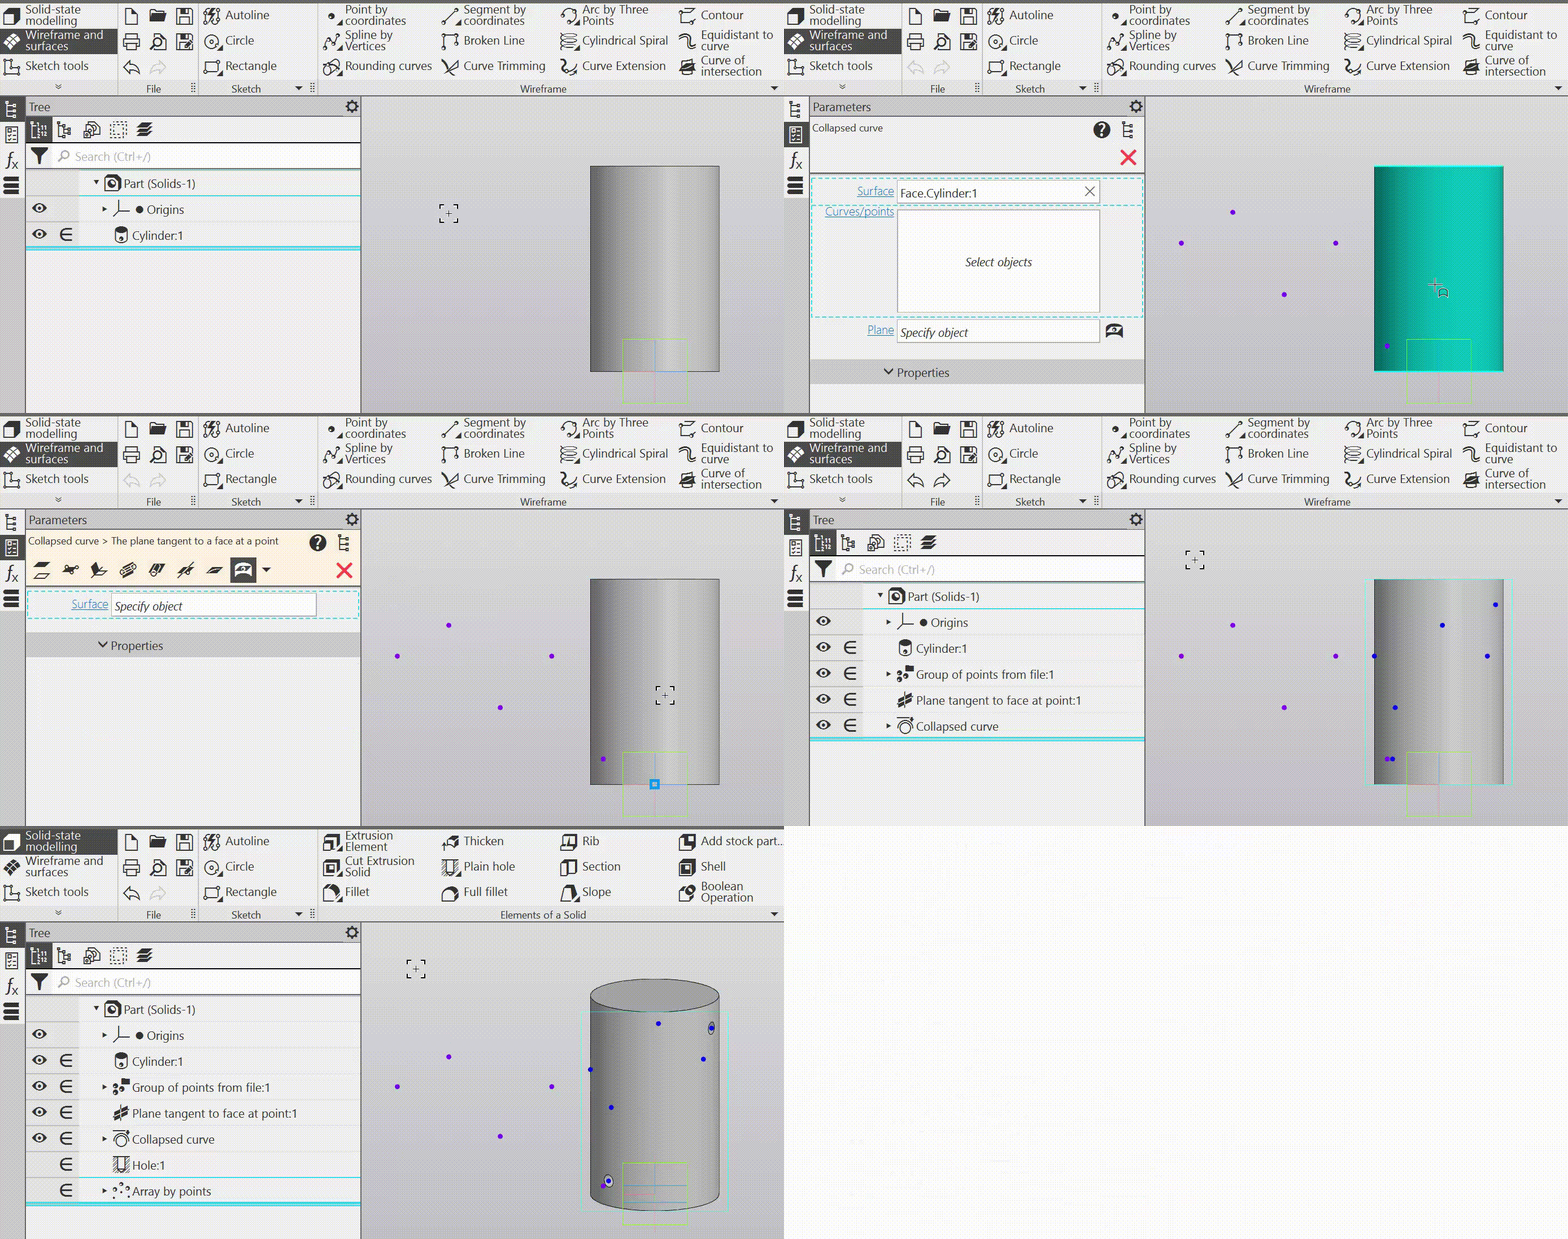
Transferring points from plane to cylinder
22.Improved Model tree:
•You can press Structural representation, managing the display of sections of the Model tree in its structural representation, became an indicator of the presence of disabled sections: if they exist, the button is displayed as unpressed (with a light background). Clicking the button in this state enables all the disabled sections and the button becomes pressed (with a dark background). Besides, in the Button menu, commands have been added63060:
• Flat patterns,
• Technical notes,
• Collections,
• Copies,
• Operations outside sections,
• Excluded from calculation.
•There is now the ability to delete individual subsections of the section Diagnostics and the entire section as a whole, i.e., quickly remove from the model the measurement results of the specified type and all the measurement results at once. Previously, you could delete only objects in the subsections of the Diagnostics section.
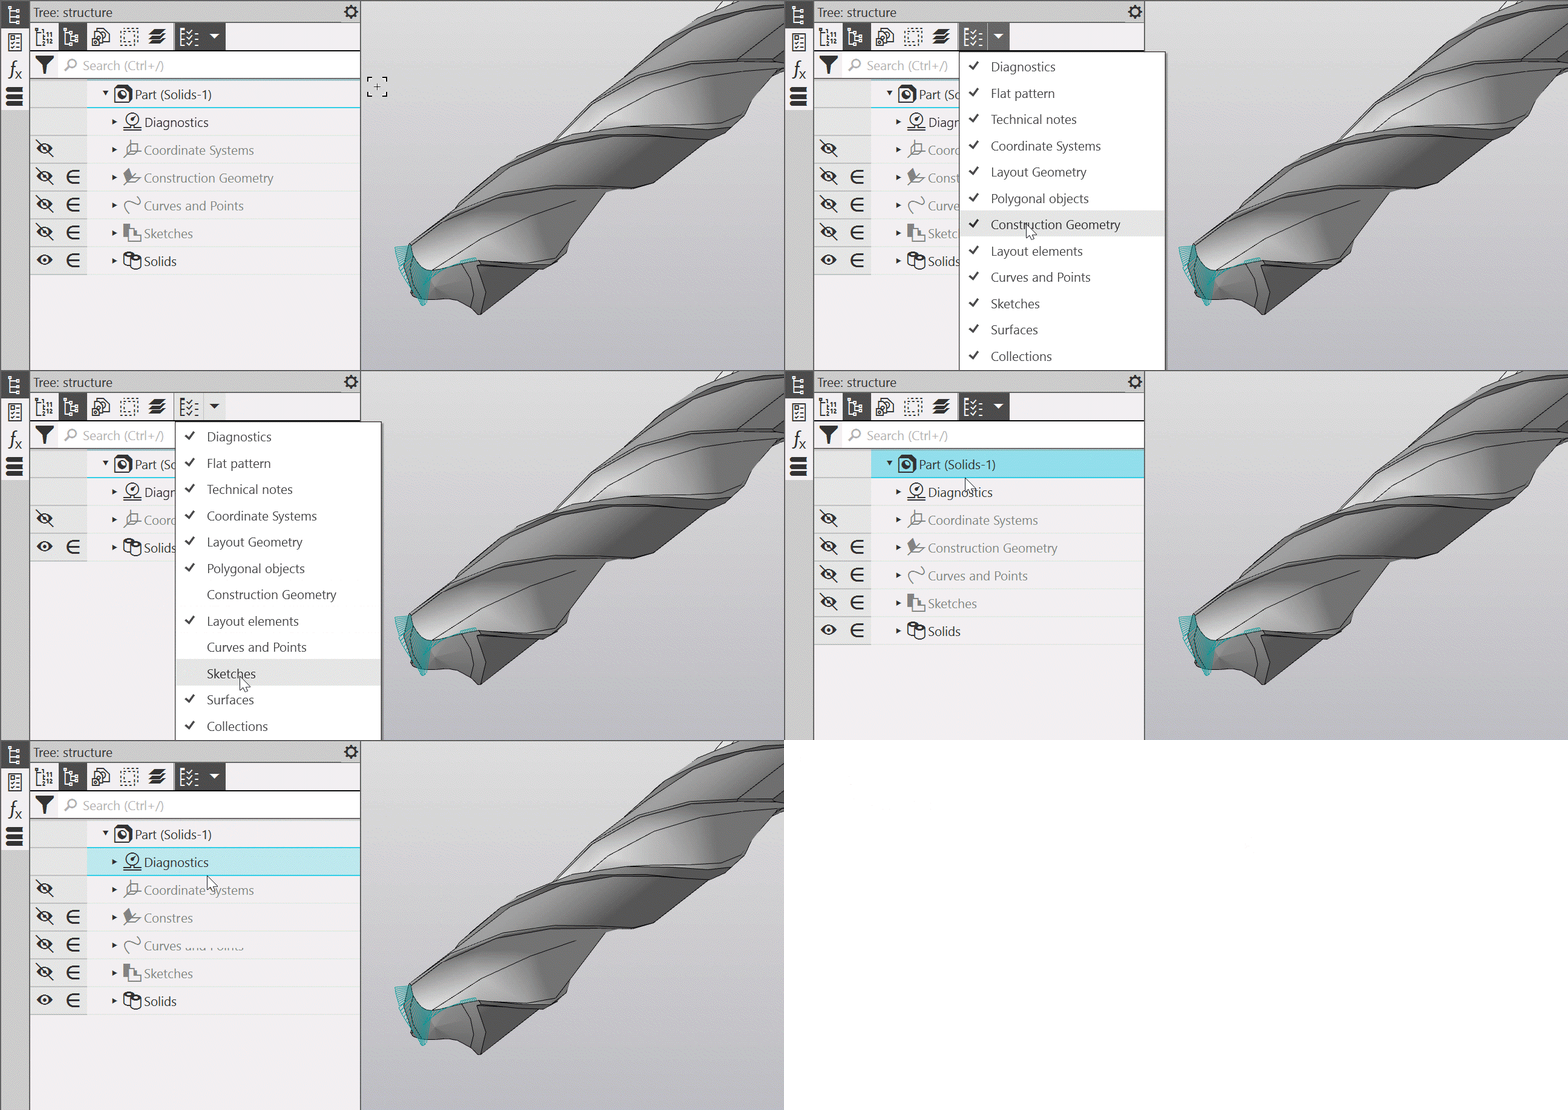
Disabling sections of the Tree; Deletion the Diagnostics section
23.When performing operations in the assembly, it has become possible to use sketches belonging to components, and when contextually editing components – sketches belonging to the assembly or other components. Working with such 'external' sketches has some constraints: it is impossible to change the sketch dimensions and start editing it within the process where this sketch is involved, also you cannot use separate sketch regions (only the entire sketch can be used).
Previously, the operation sketch was required to belong to the same model in which the operation is performed.
24.It became possible to special display of smooth edges — edges between faces that are joined together along the tangent. This allows to make models with surfaces smoothly transitioning into one another more distinguishable. The style and color settings for "smooth" edges are available, as well as the BOM of the maximum angle between the tangential faces at the edge points, at which this edge is considered as "smooth". Moreover, you can disable displaying of "smooth" edges in the model. By default, "smooth" edges are indistinguishable from the others.
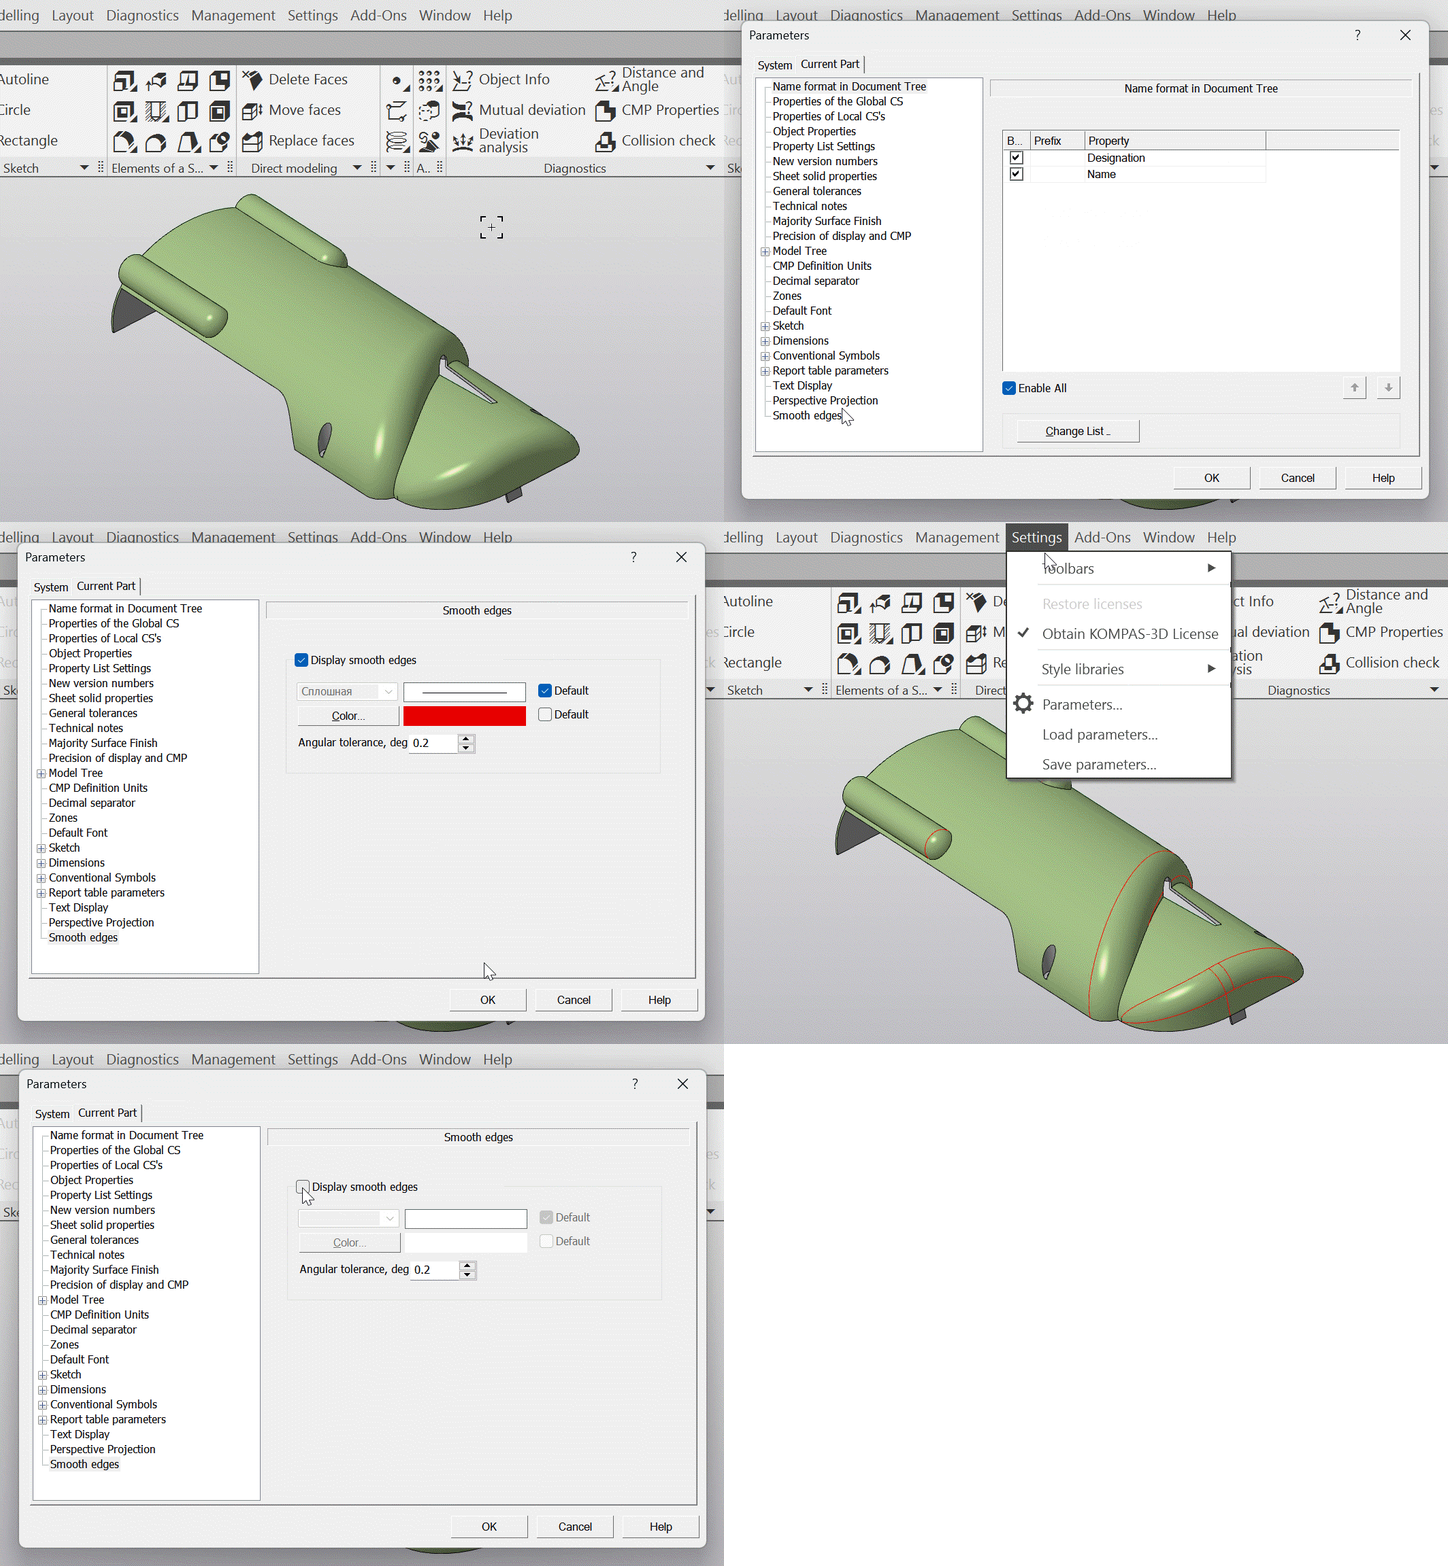
Settings of smooth edges
25.You can build an construction plane of the required position using the Select nearest it's available to activate a mode in which it will work only with the first level components, i.e. those inserted directly into the current assembly. In this mode, not individual parts, for which the conditions specified in the command are met, are specified, but entirely first-level components that include these parts.
26.The process of building an element by sections has been improved: from it, you can start building a spline by points to create guiding curves.
27.In the sheet-metal part, the capability to retain holes generated during circular corner treatment has been added in the flat pattern with simplified contours (earlier, this flat pattern variant was created without these holes).
28.A method for determining the center of mass properties of a model variant has been added, in which all these parameters are taken from the base geometery of the model. The selection method is available when creating a variant and also when establishing its properties.
29.In operations utilizing curves, it is now possible to select a curve represented by (or potentially represented by) several separate contours as a guiding object. For example, a Outline or an Curve of intersection . To do this, the object should be specified in the Design tree. If the operation can use multiple contours simultaneously, all curve contours will be engaged. Previously, in similar cases, you could only select the contour(s), but not the entire curve.
30.When setting the properties of the model, manual input of axial and centrifugal moments of inertia (in the central coordinate system) became available.
31.To the Object info command, the capability of displaying thread parameters has been added.
32.Improved work with model sections:
•The management of sections is now performed not in the dialog box, but in the process on the Parameter panel,
•The Display model section button on the Quick access toolbar is equipped with a menu containing a list of sections and a command to launch the section management process.
33.If the result of building an extrusion, rotation, trajectory, or section surface consists of several parts, then each part is now created as a separate surface.
34.Improved drag-and-drop operations of objects with the mouse in the Model tree, particularly handling situations where the dragged objects need to be placed directly above or below an existing macro-element.
35.When working in the sketch, the settings of the current model have become available (previously, only the system settings were available).
36.Automatic creation of construction projections of model objects in the sketch is excluded.
37.Improved the visualization of a sketch when shifting/moving it to another plane: such objects as texts, drawing inserts, and fragments are now displayed in the phantom shown during this process, if they are present. Previously, the phantom included only geometry objects built in the sketch.
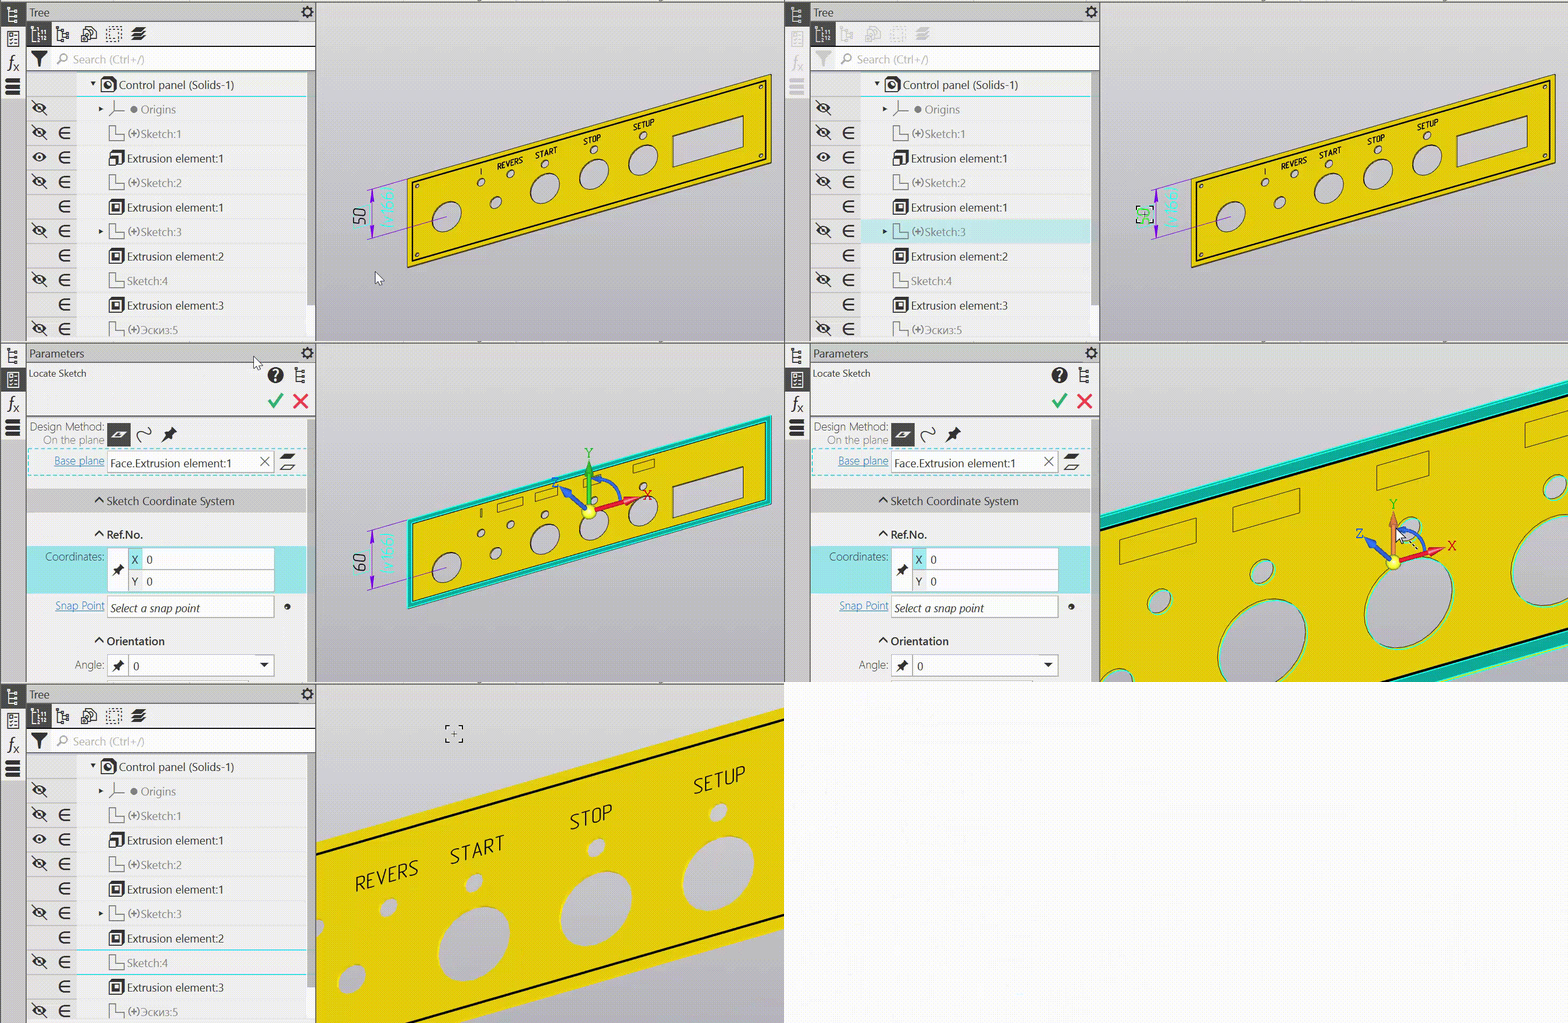
Moving the sketch containing texts
38.Accelerated model rendering with display types Shaded wireframe and Hidden lines removed. In general, a 1.5-fold acceleration has been achieved, and on individual models — up to 4-fold increase. The greatest effect is observed when working with models that have a large number of components entirely located within other components (inside gearbox housings, bodies, etc.).
39.Accelerated rendering (and rerendering) of the phantom during creation and editing of surfaces.