|
3D modelling V24 |
Scroll |
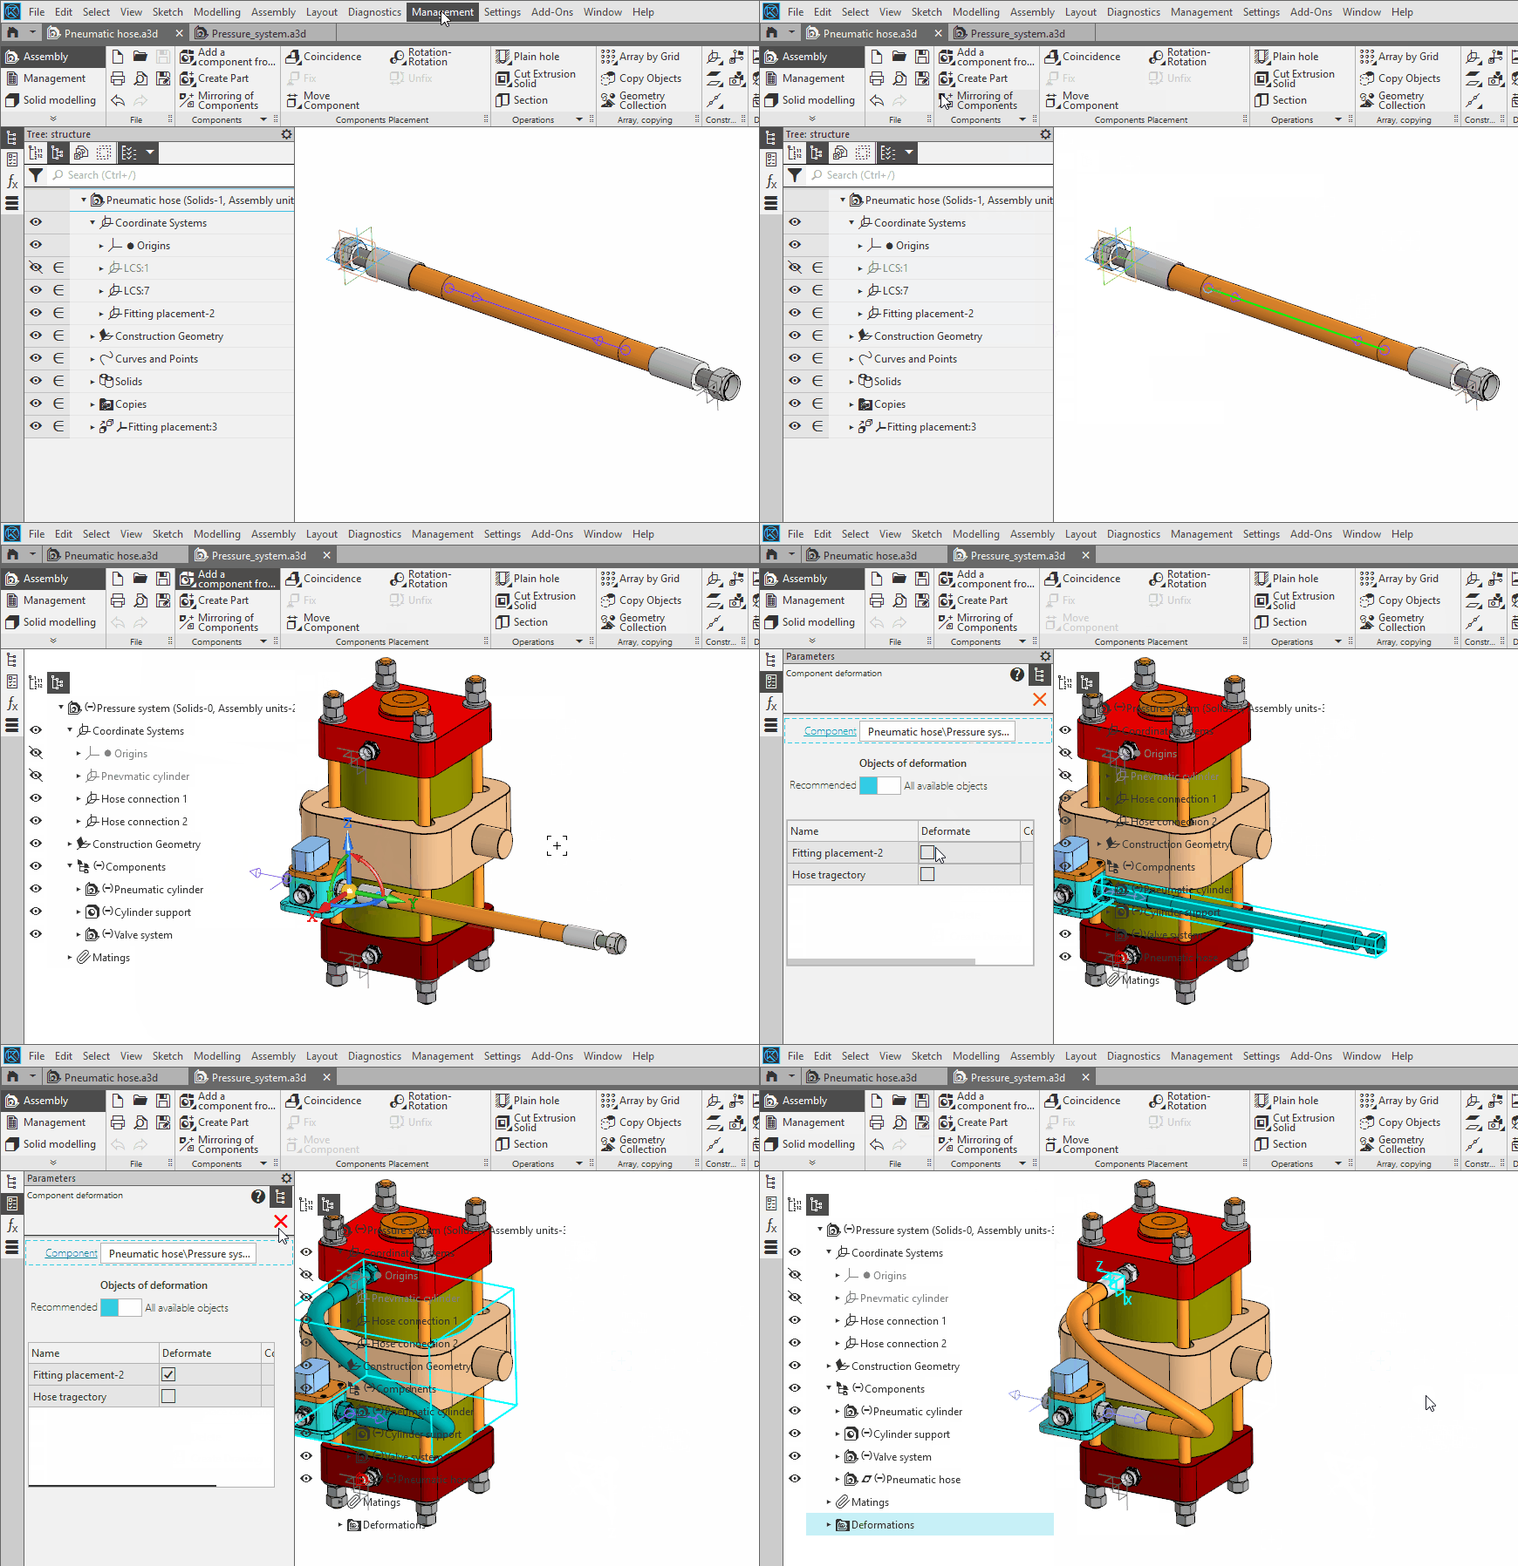
1.When working with an assembly, it is now possible to change the shape of components by location, i.e. without modifying source-files. Changing is performed using operation Deformable buildings,during which it is available to edit the operations performed in the component (Extrusion element, Revolution Element, Lofted element, Element by path, Pipe element, as well as operations for building curves of some types), replacing their source objects with new ones—built in the assembly or in other components. For splines and broken lines, it is available to edit the coordinates of the vertices; the numerical parameters of other operations cannot be changed.
The parameters and the result of deforming a component are stored in the assembly where the deformation was performed, i.e. the component file and its inserts in other assemblies are not changed.
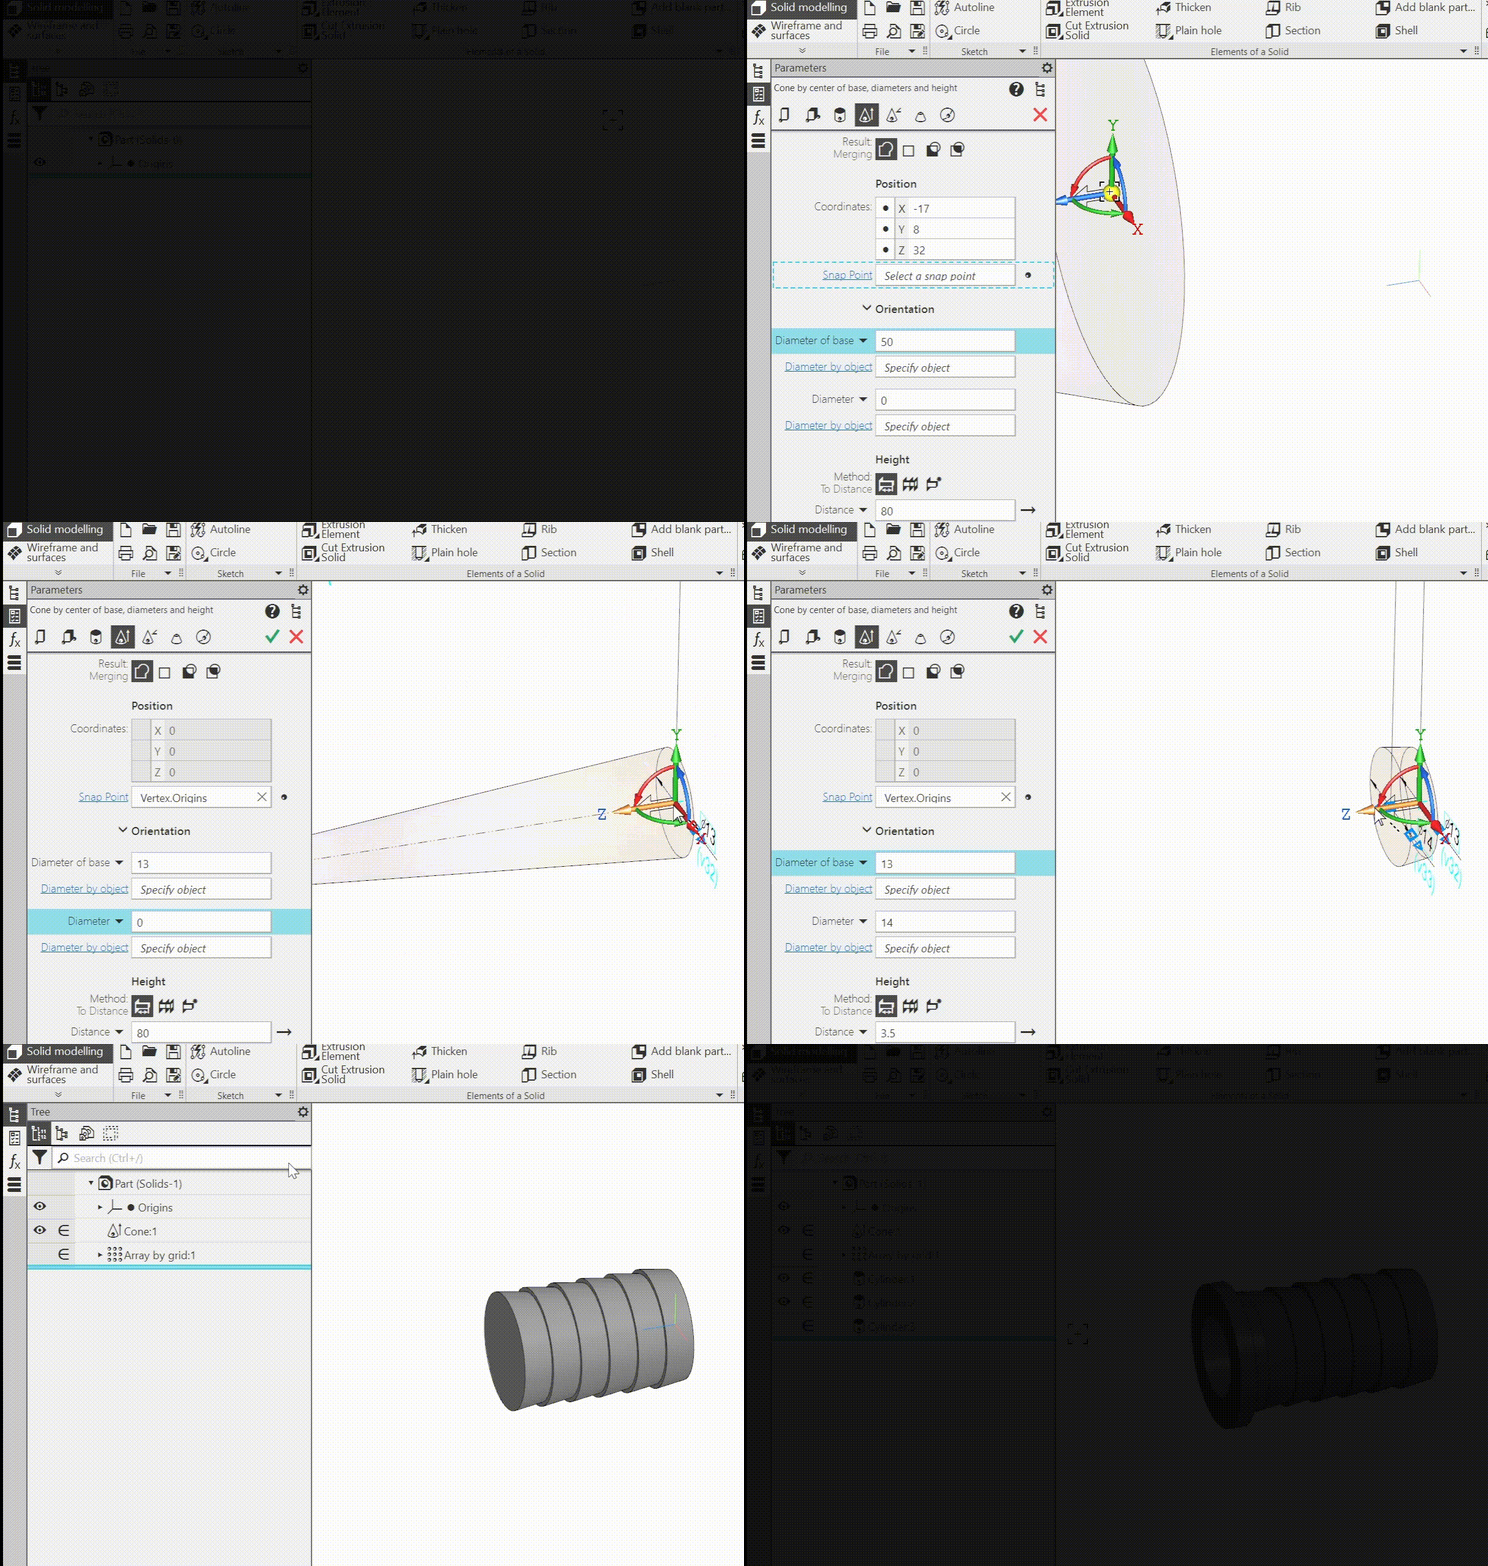
2.Added commands for building a geometric body in the form of a straight circular cone::
•Cone by center of base, diameters and heights,
•Cone by center of base, diameter and angle,
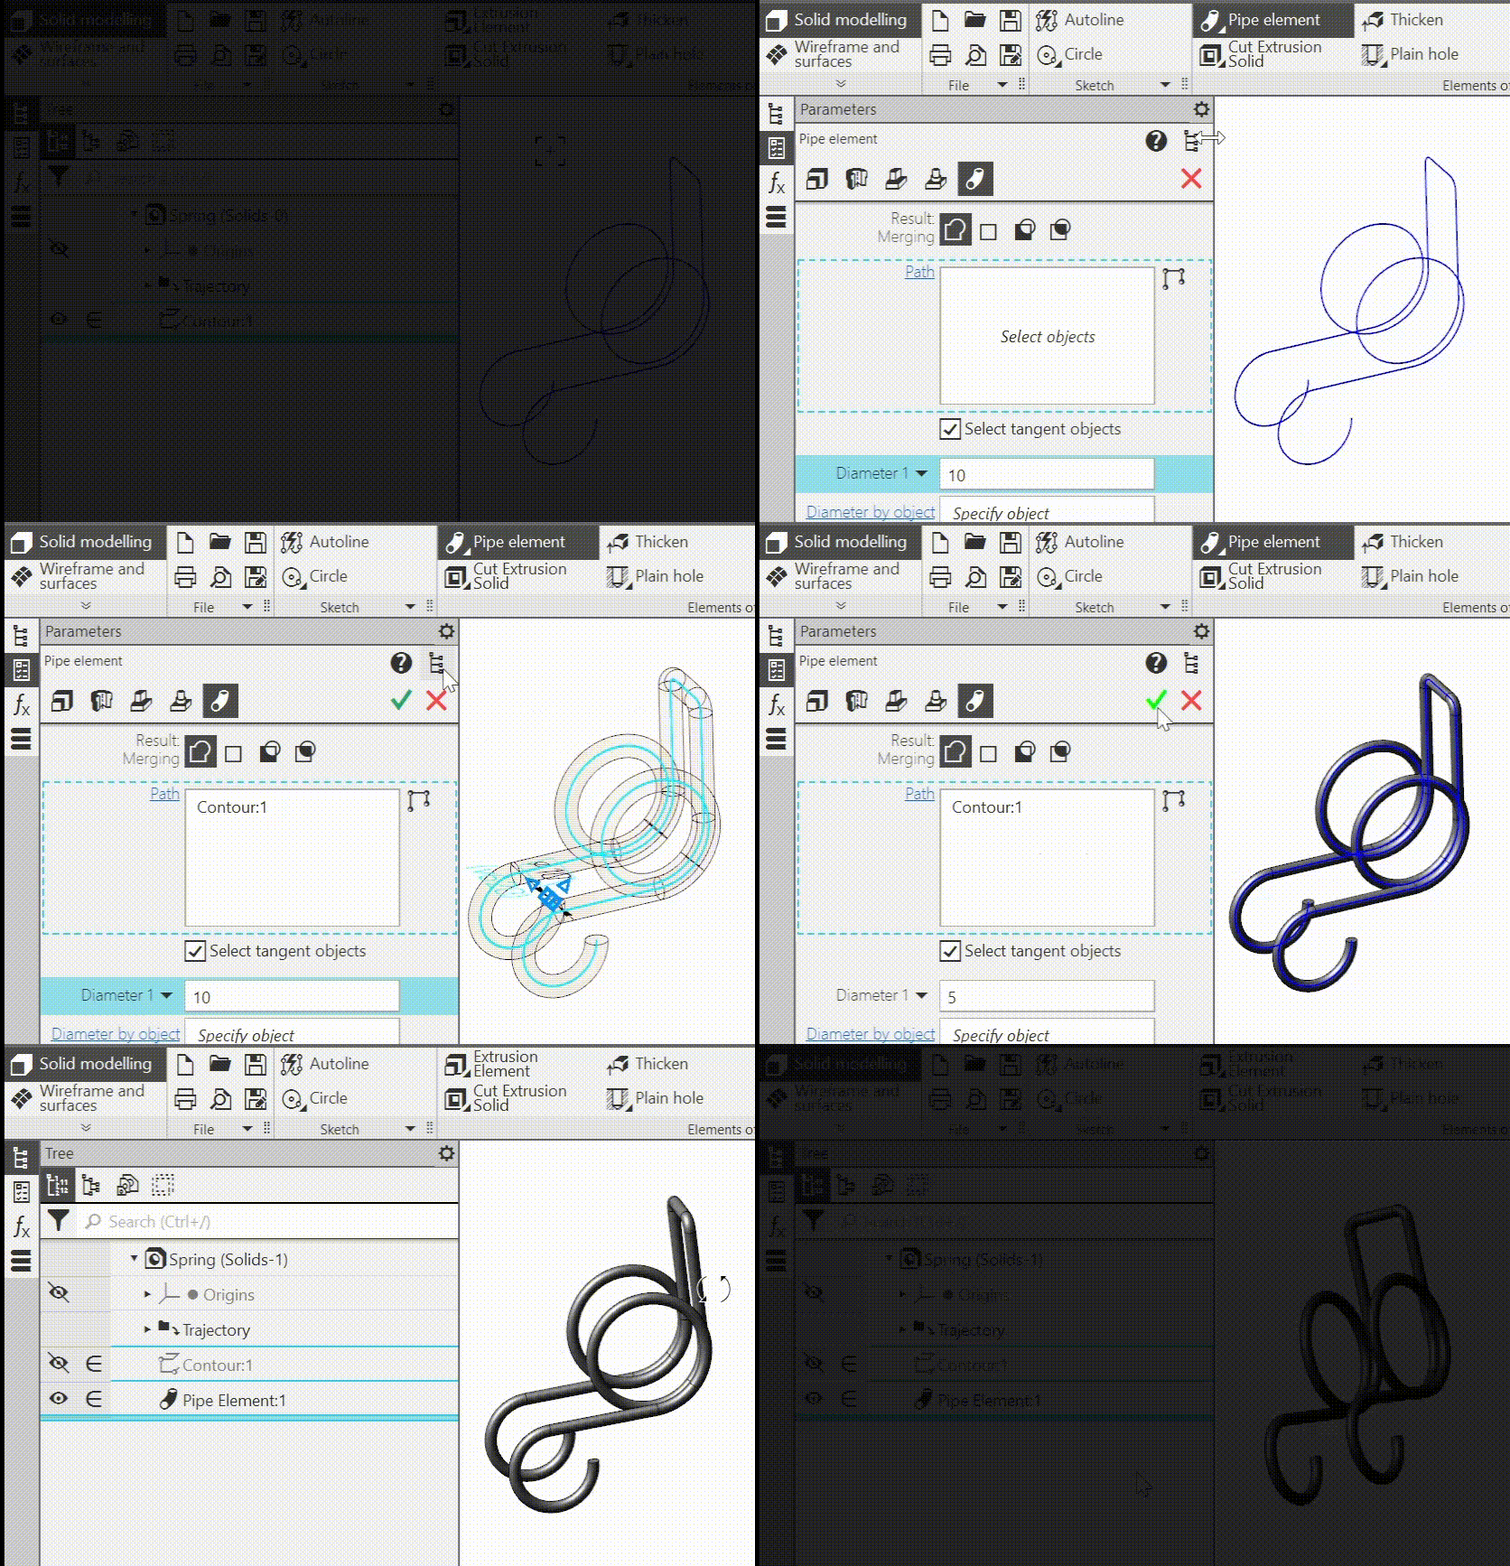
3.Added commands Pipe element and Cut with a pipe element. They perform operation along a trajectory with an automatically formed section in the form of a circle of a given diameter. The trajectory is specified by the user. The pipe may be solid or thin-walled. In the latter case, either the wall thickness or the second diameter value must be entered.
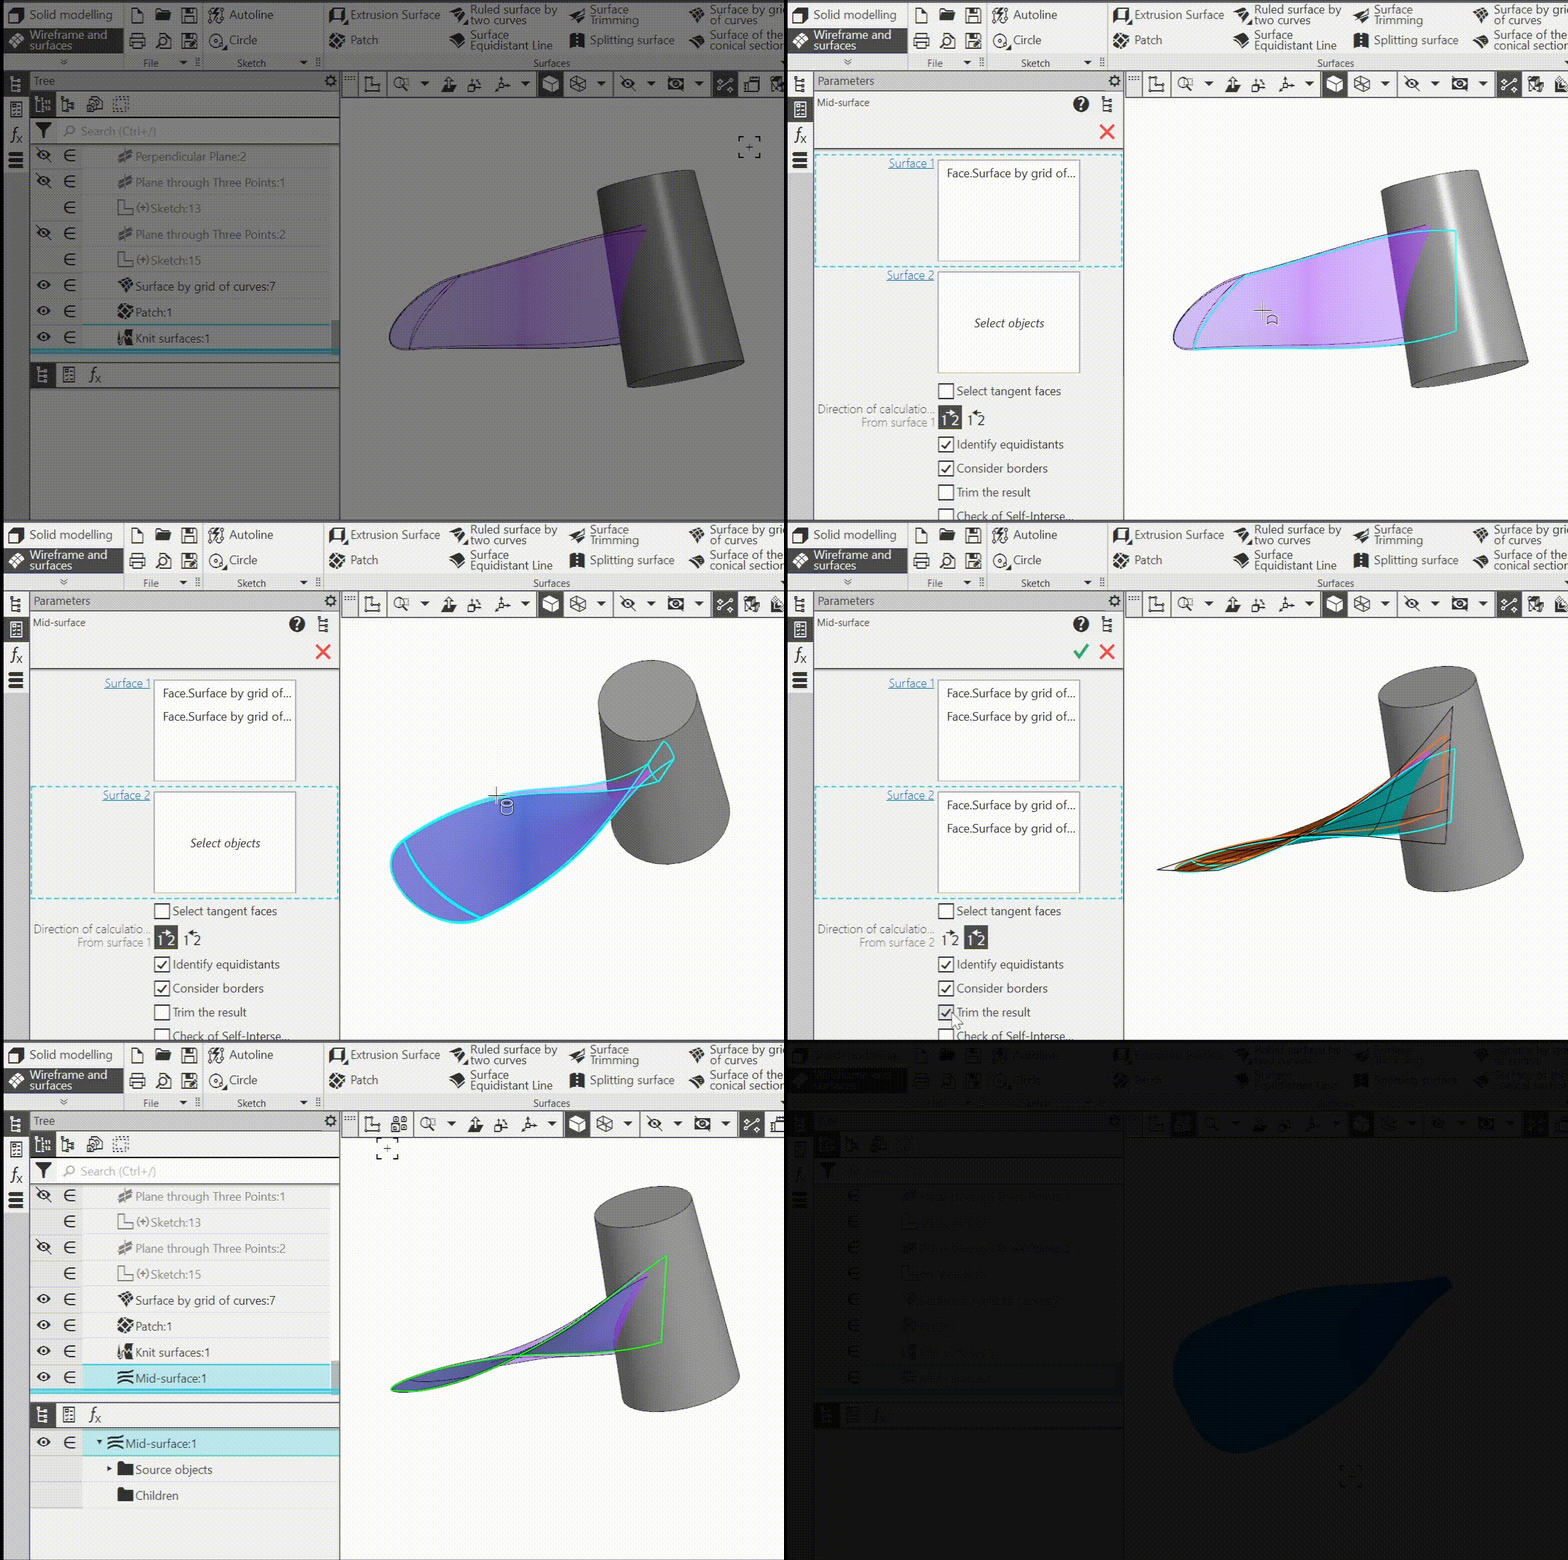
4.Added the command Mid-surface, which is used to build a surface that is the geometric location of points equidistant from two specified surfaces.
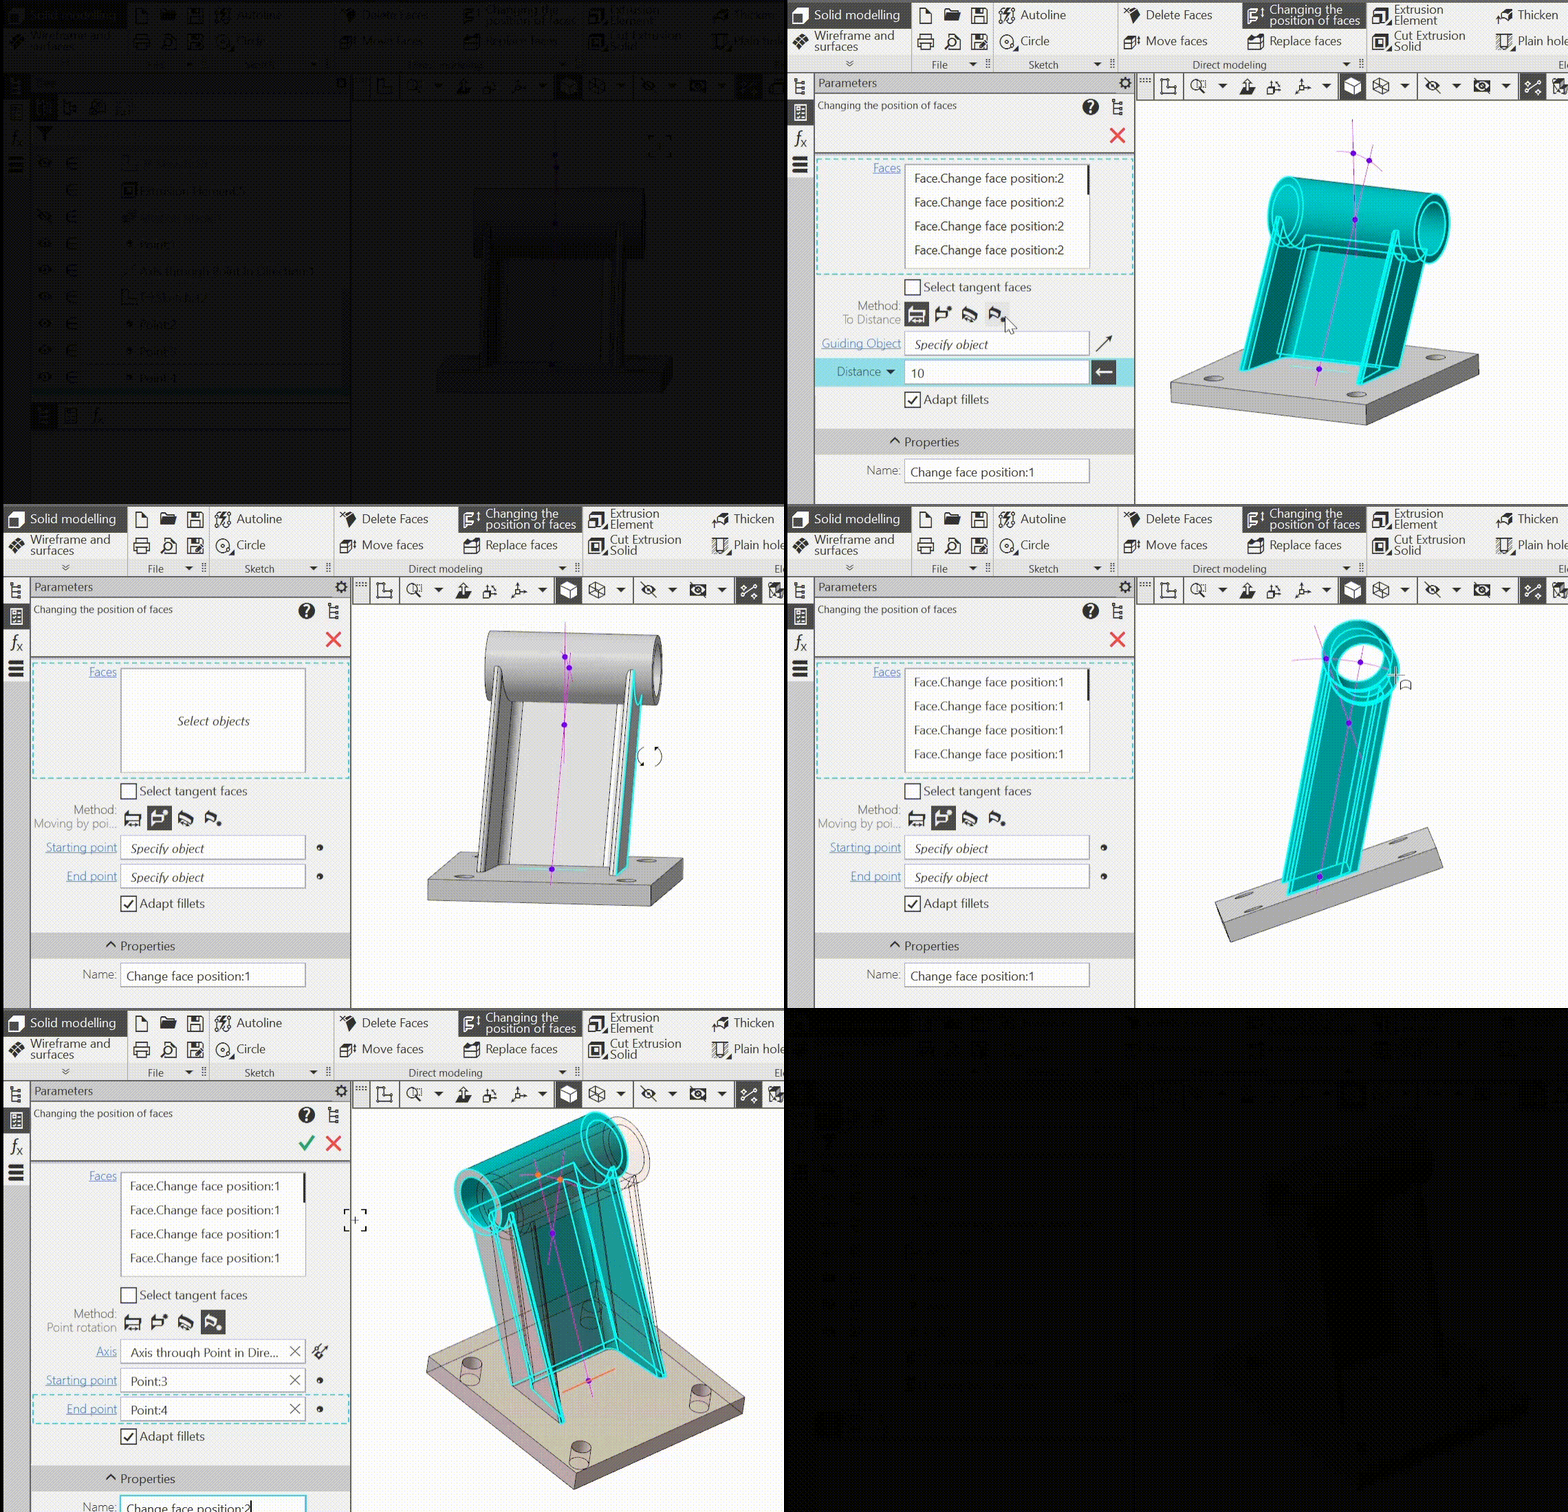
5.Added a new direct modelling command — Changing the position of faces . It allows to move the selected faces in a given direction by a certain distance or rotate them around a given axis by a certain angle.
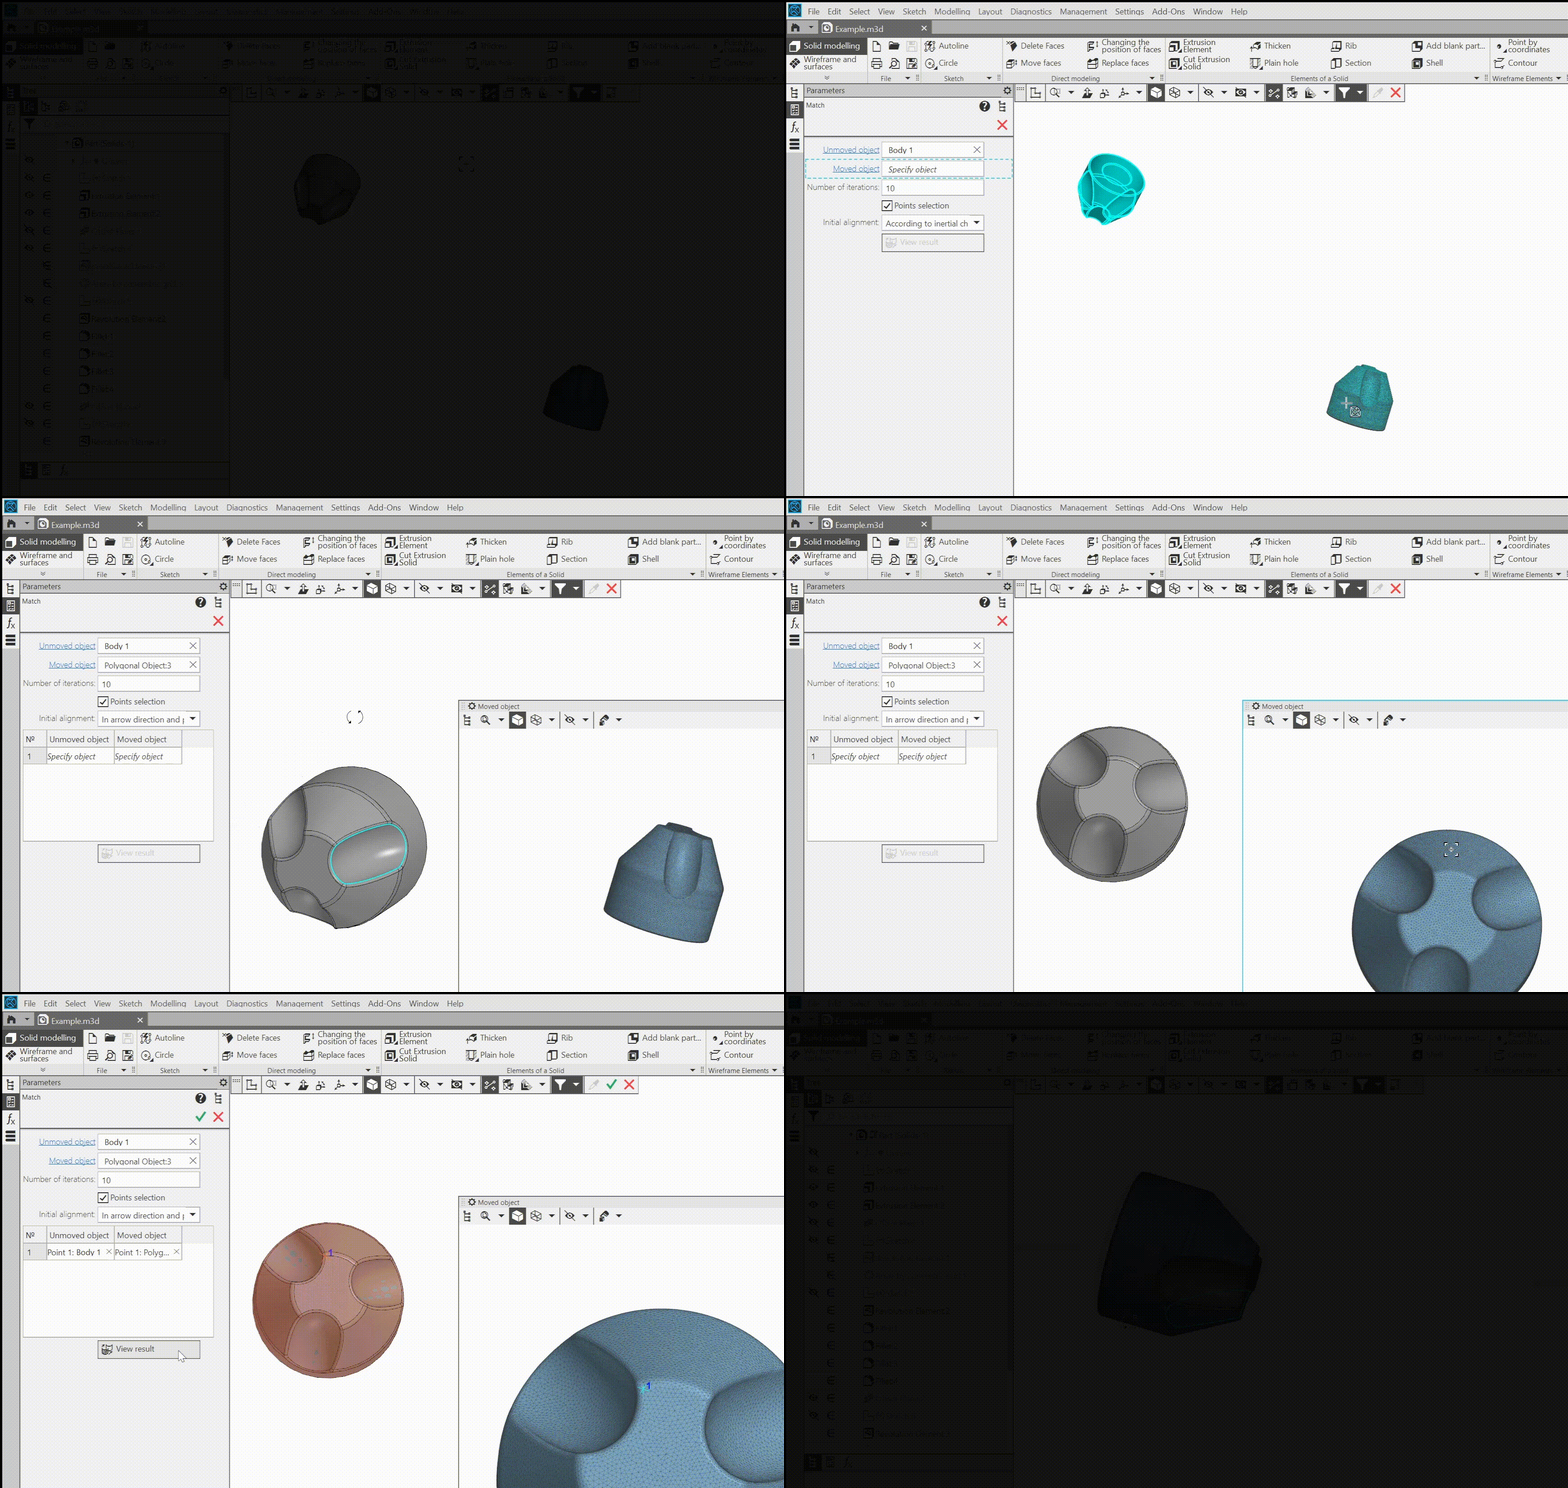
6.Added the Match command to match a polygonal object with an existing body, surface or other polygonal object in the same model. The result of the command is to change the position of the polygonal object (or one of the polygonal objects) so that the deviation between it and the second object is minimized.
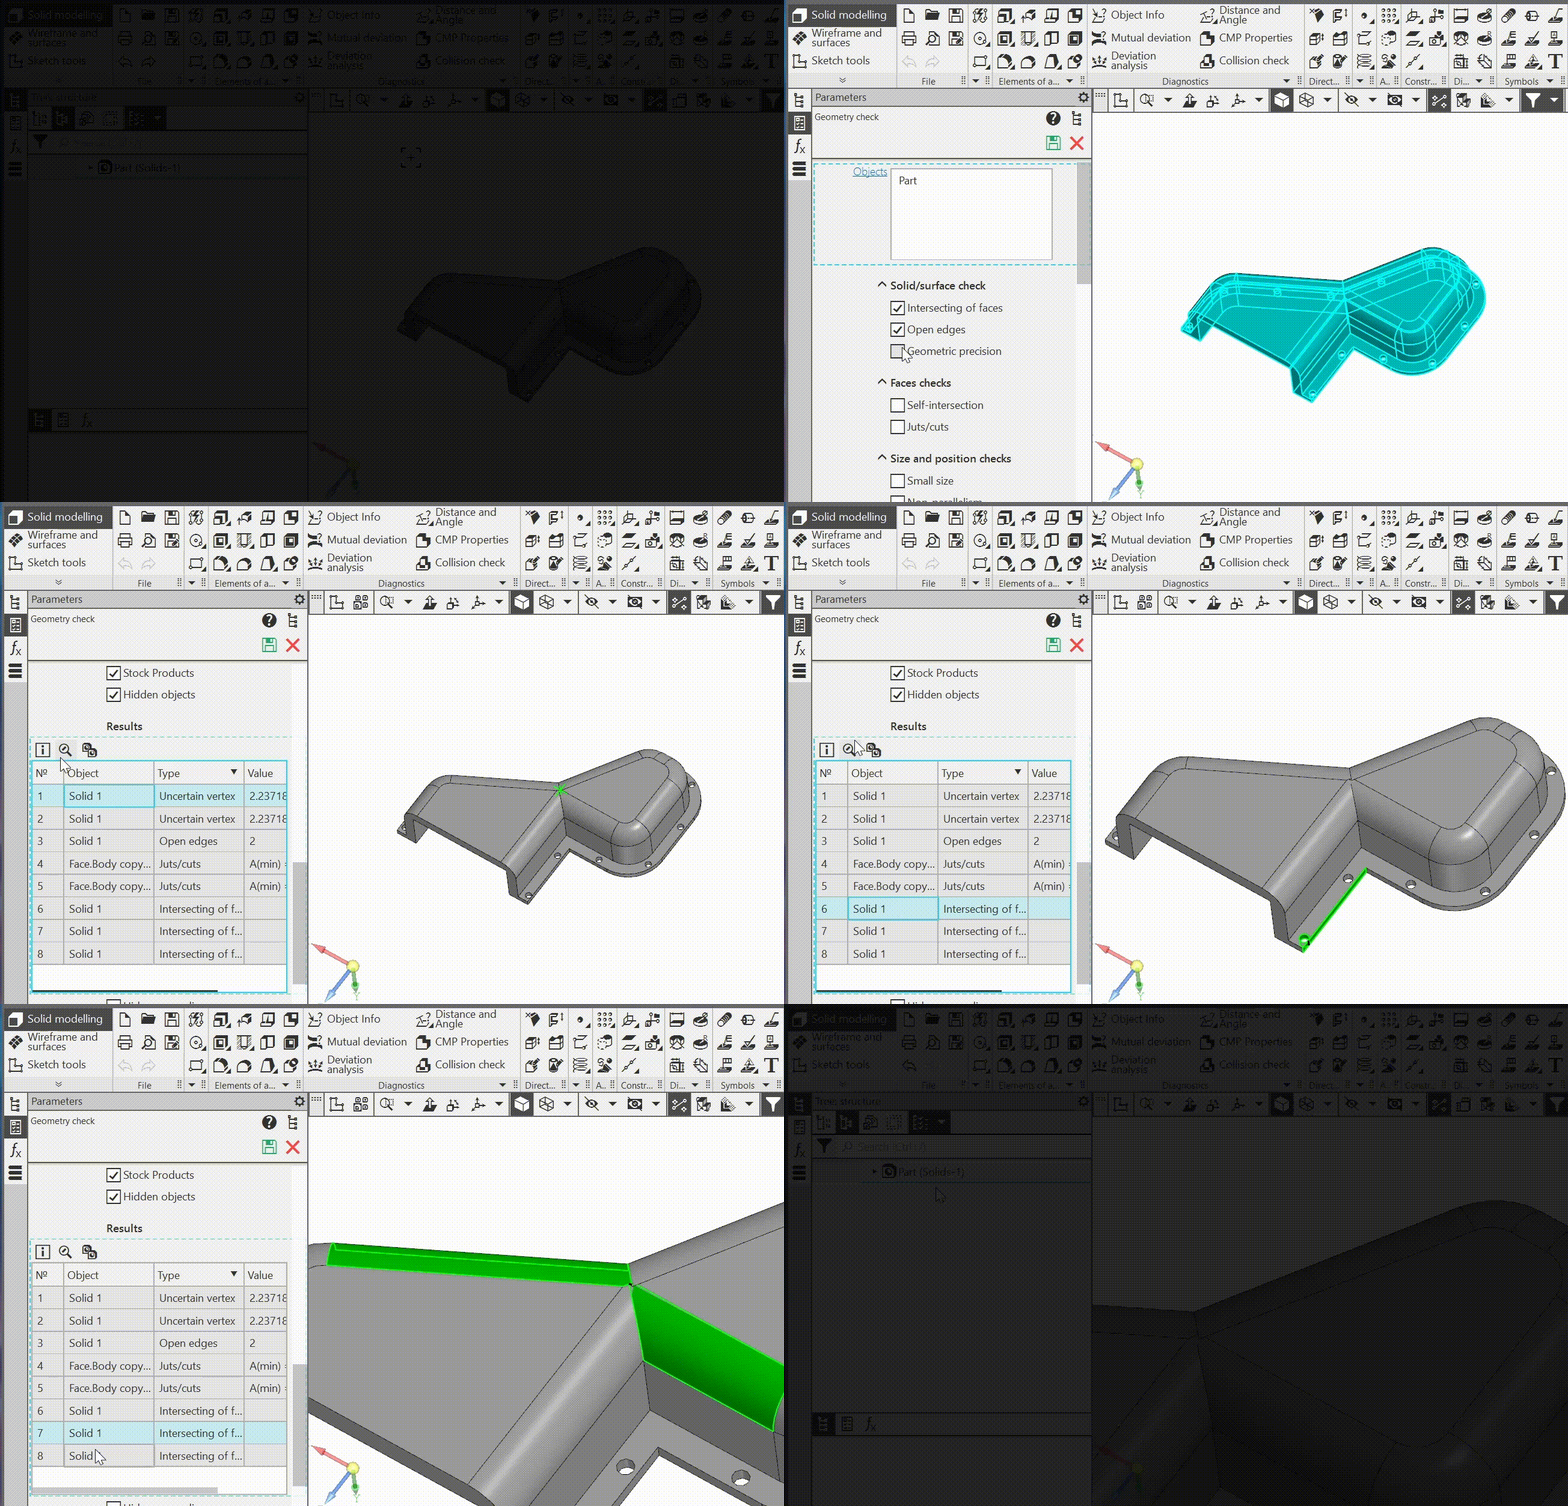
7.Added the Geometry check command for diagnosing bodies, surfaces and faces for correctness of mathematical description. Executed for individual selected objects or for all objects included in an assembly or in a specified component.
•Intersecting of faces — identification of faces of a body (or surface) that intersect other faces without forming a common edge,
•Open edges — identification of open edges, as well as overlapping open edges of the same body/surface/face,
•Geometric precision — identification of geometrically inaccurate vertices and edges (the available deviation of the position of objects from the theoretically precise one is assigned by the user),
•Self-intersection — identification self-intersecting faces and edge boundaries,
•Juts/cuts — identification of faces with angles less than the specified one.
•Small size — detection of objects with size smaller than the specified size,
•Non-parallelism — detection of edges located relative to the axes of the specified coordinate system at an angle less than the specified one,
•Size check — detection of objects that are outside the cube of specified dimensions with the center at the beginning of the original coordinate system.
It is possible to exclude layout geometry, standard parts, and hidden objects from the check.
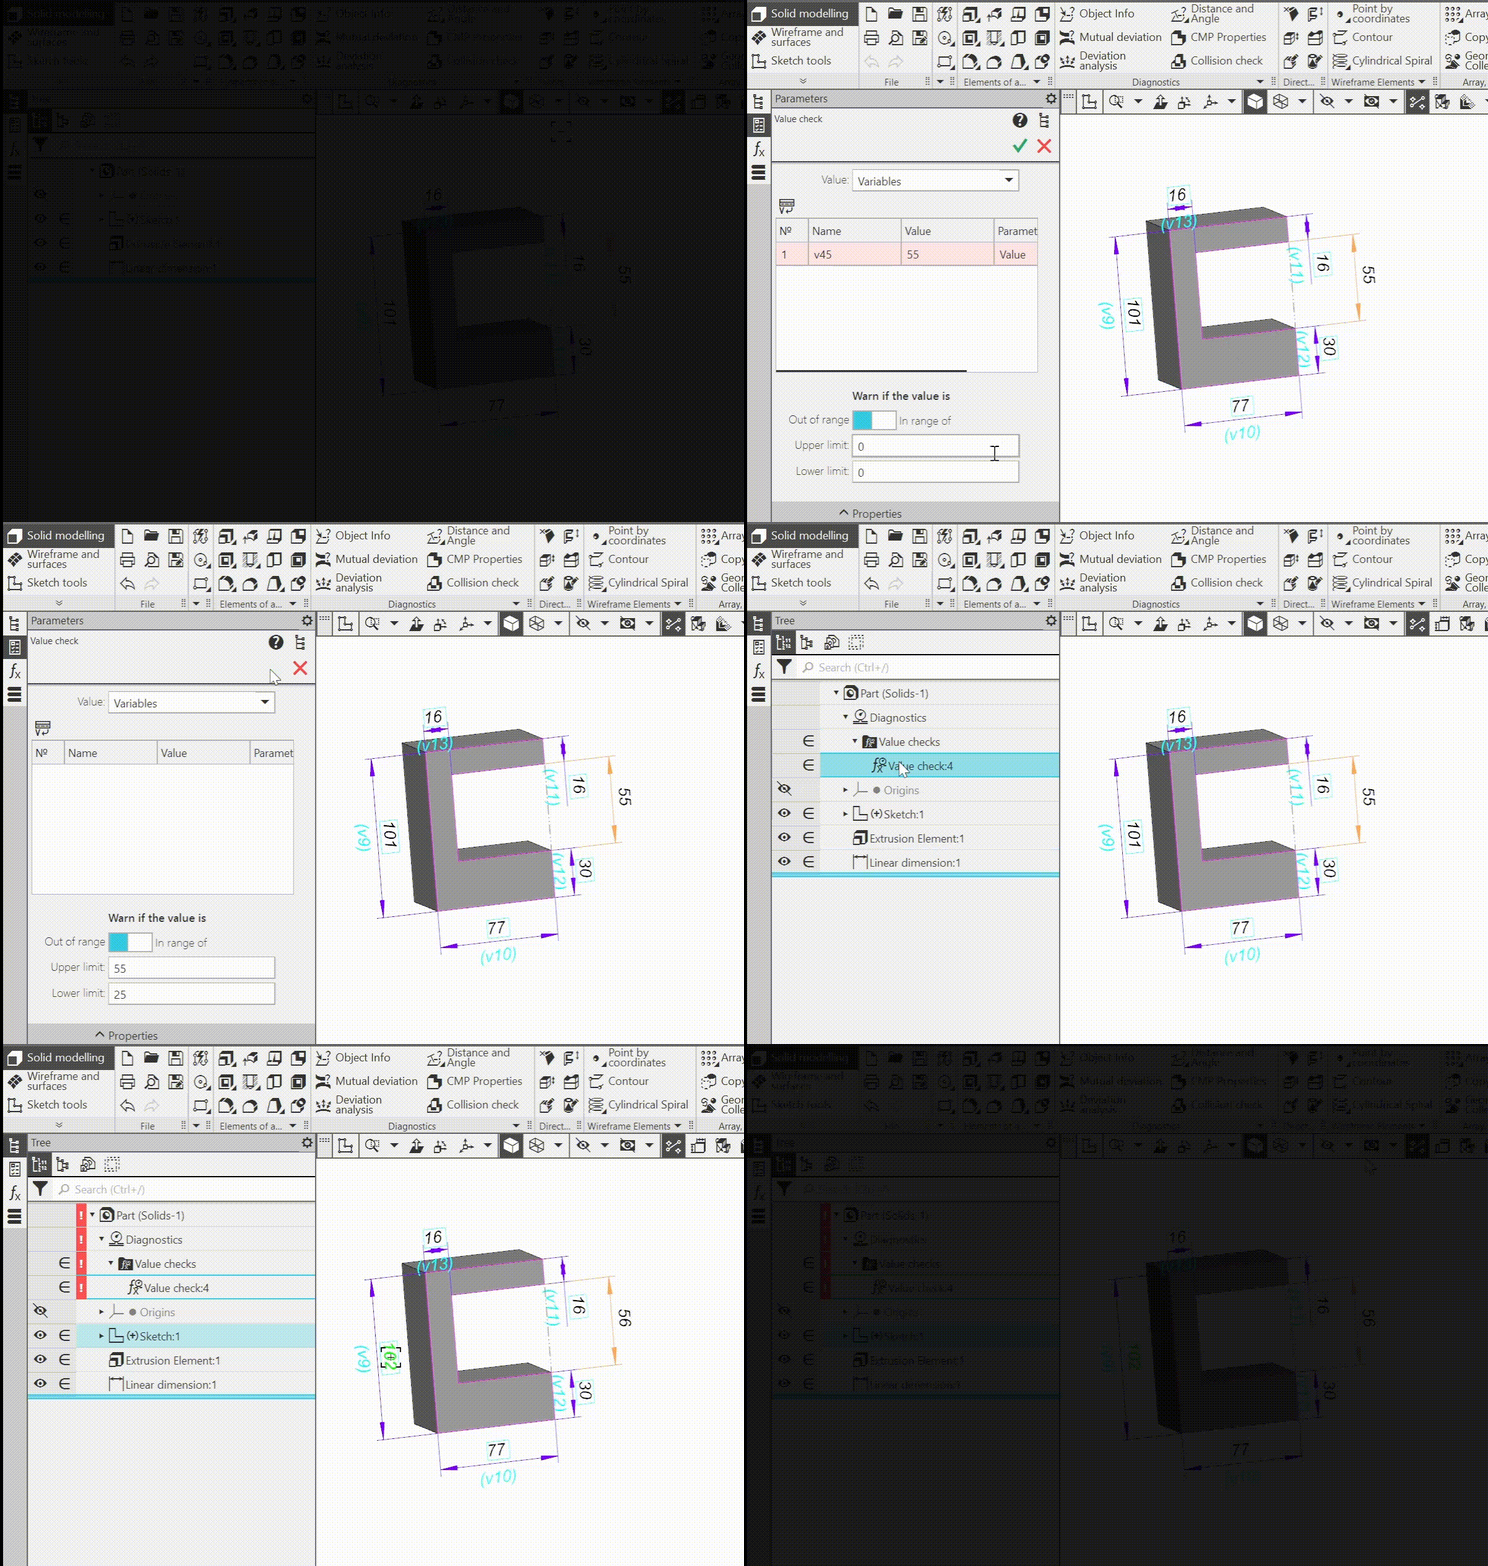
8.Added the Value check command, which allows to assign the range of acceptable (or unacceptable) values for selected variables, as well as for the model mass. If the value goes outside the range (or enters these limits), an error message appears.
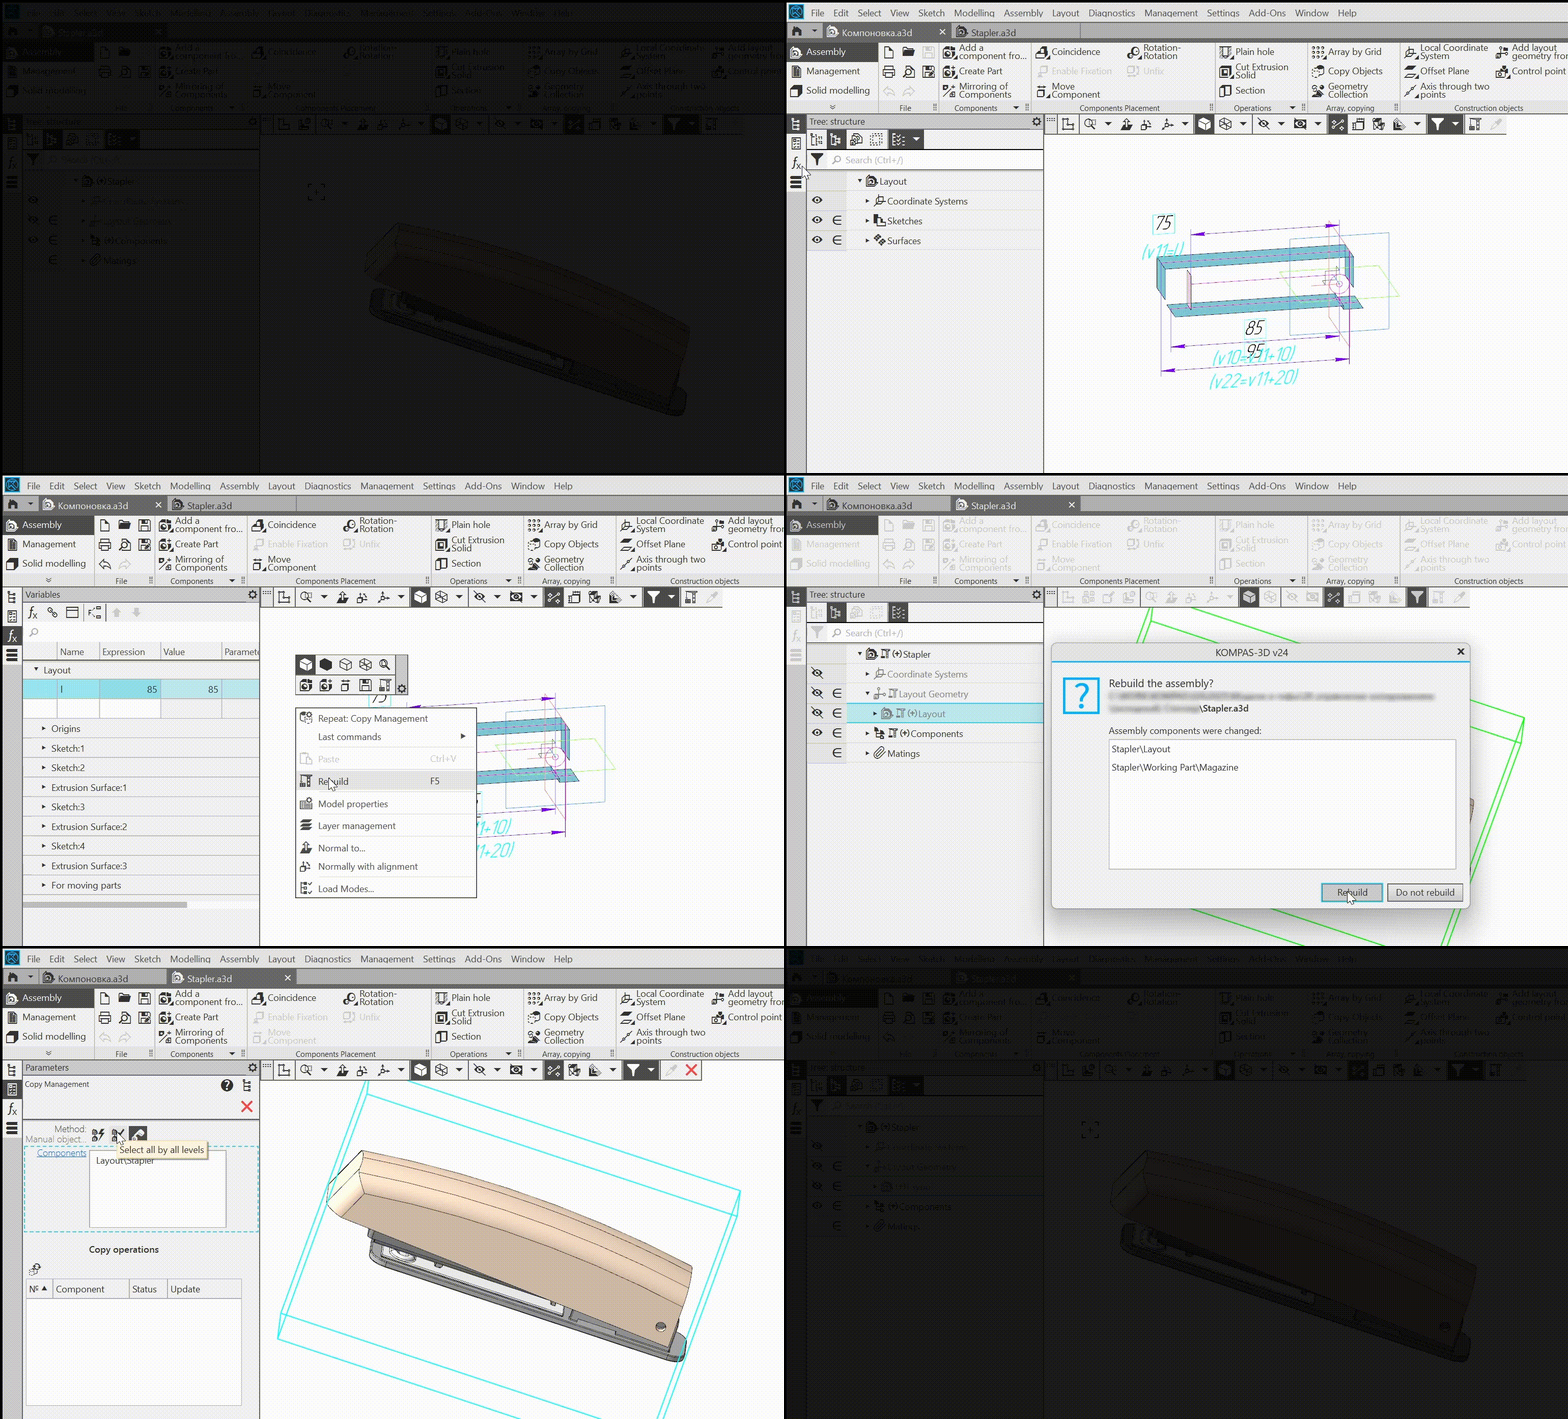
9.Added command Copy management. It allows to find copy - operations in the model itself and its components up to a specified level or only in selected components. For each operation, its current status is displayed and it is possible to control the parameters. For example, the user can enable source change tracking for copy operations that have it disabled, or update all or selected copy operations. In addition, it is possible to proceed to editing any copy operation.
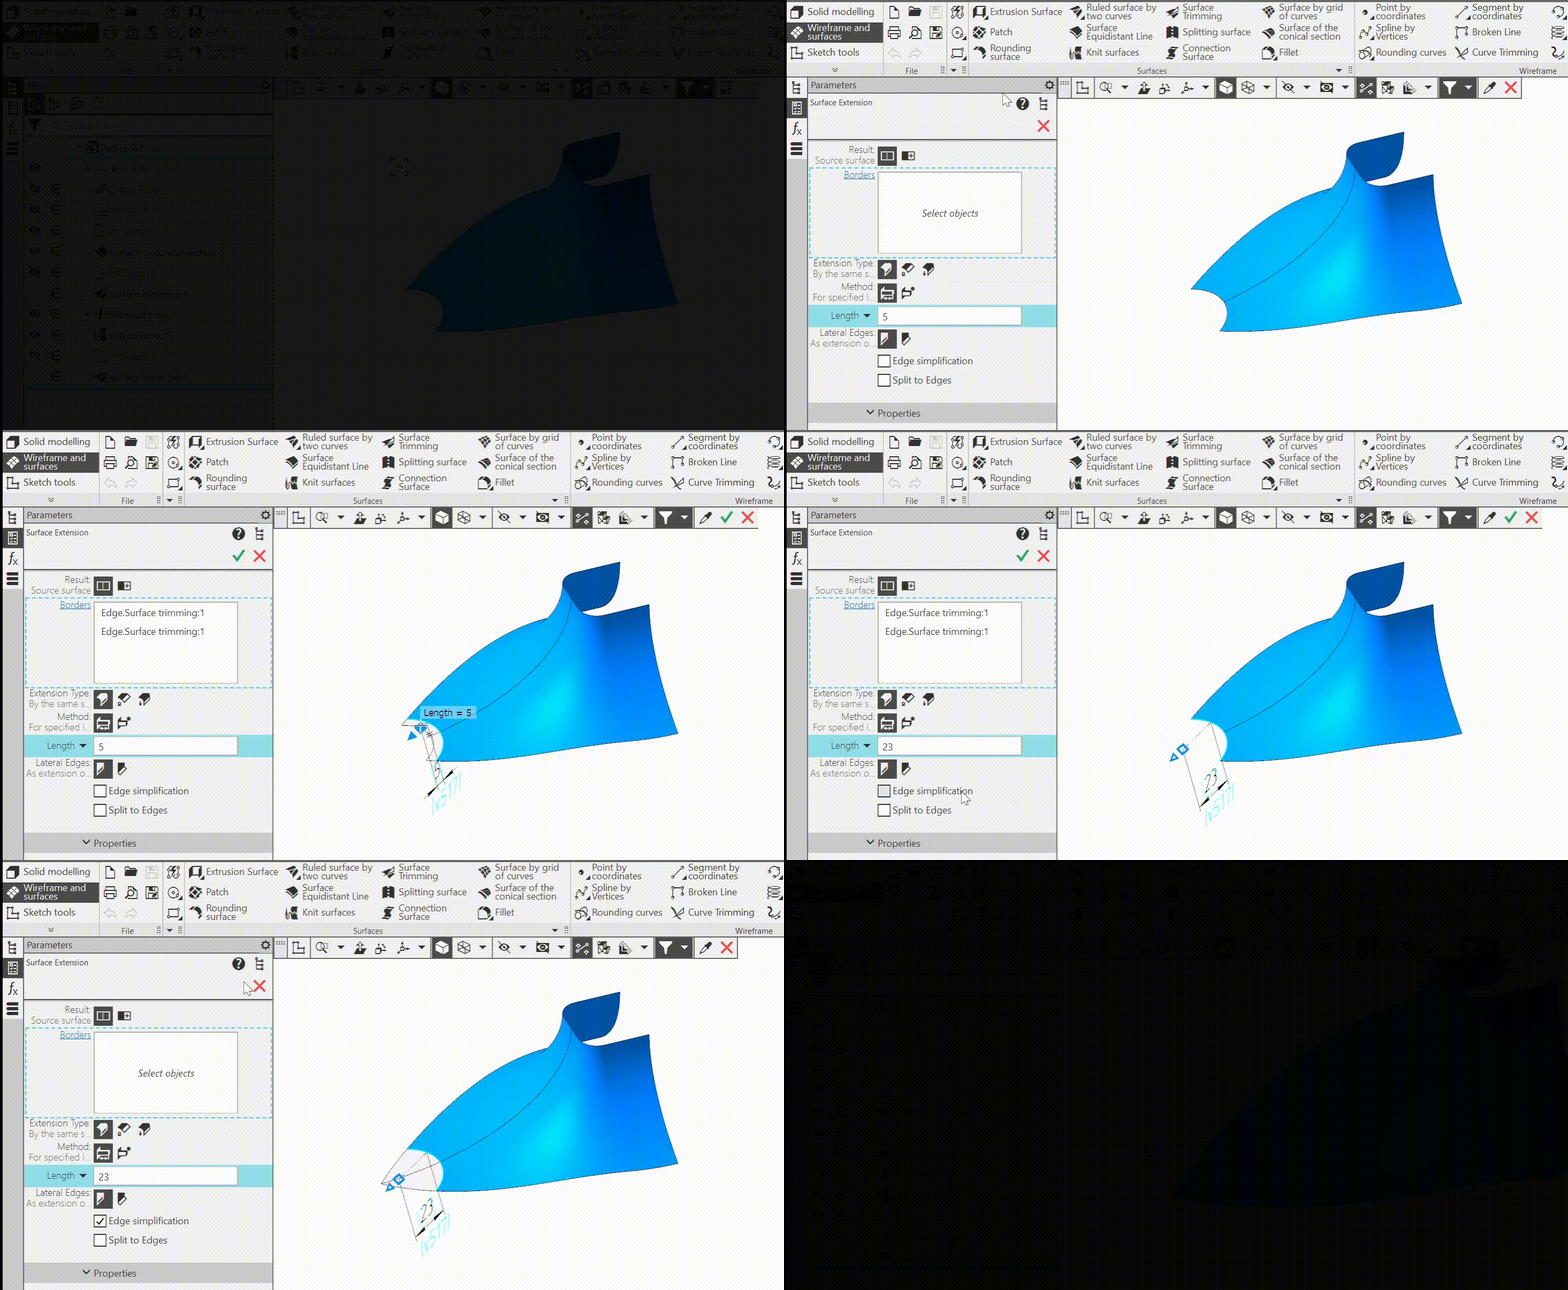
10.The command Surface extension:
•For an extension by the same surface, edge simplification —this can be included to increase the length of the extension in the case where it is limited by the degeneracy of the edge equidistant of the original surface or by the fact that the equidistant has ceased to intersect with the extensions of the side edges. A simplified edge is not an precise equidistant of the source surface edge (i.e., it does not suppose a user-specified value of extension at each of its points).
•It is now possible to select the result of extension, i.e. to specify whether the added surface area should be a new surface or a part of the source surface. In case of building an extension as a new surface, it is possible to to specify a non-open edge as an edge, and choose, which of its adjacent faces should be extended.
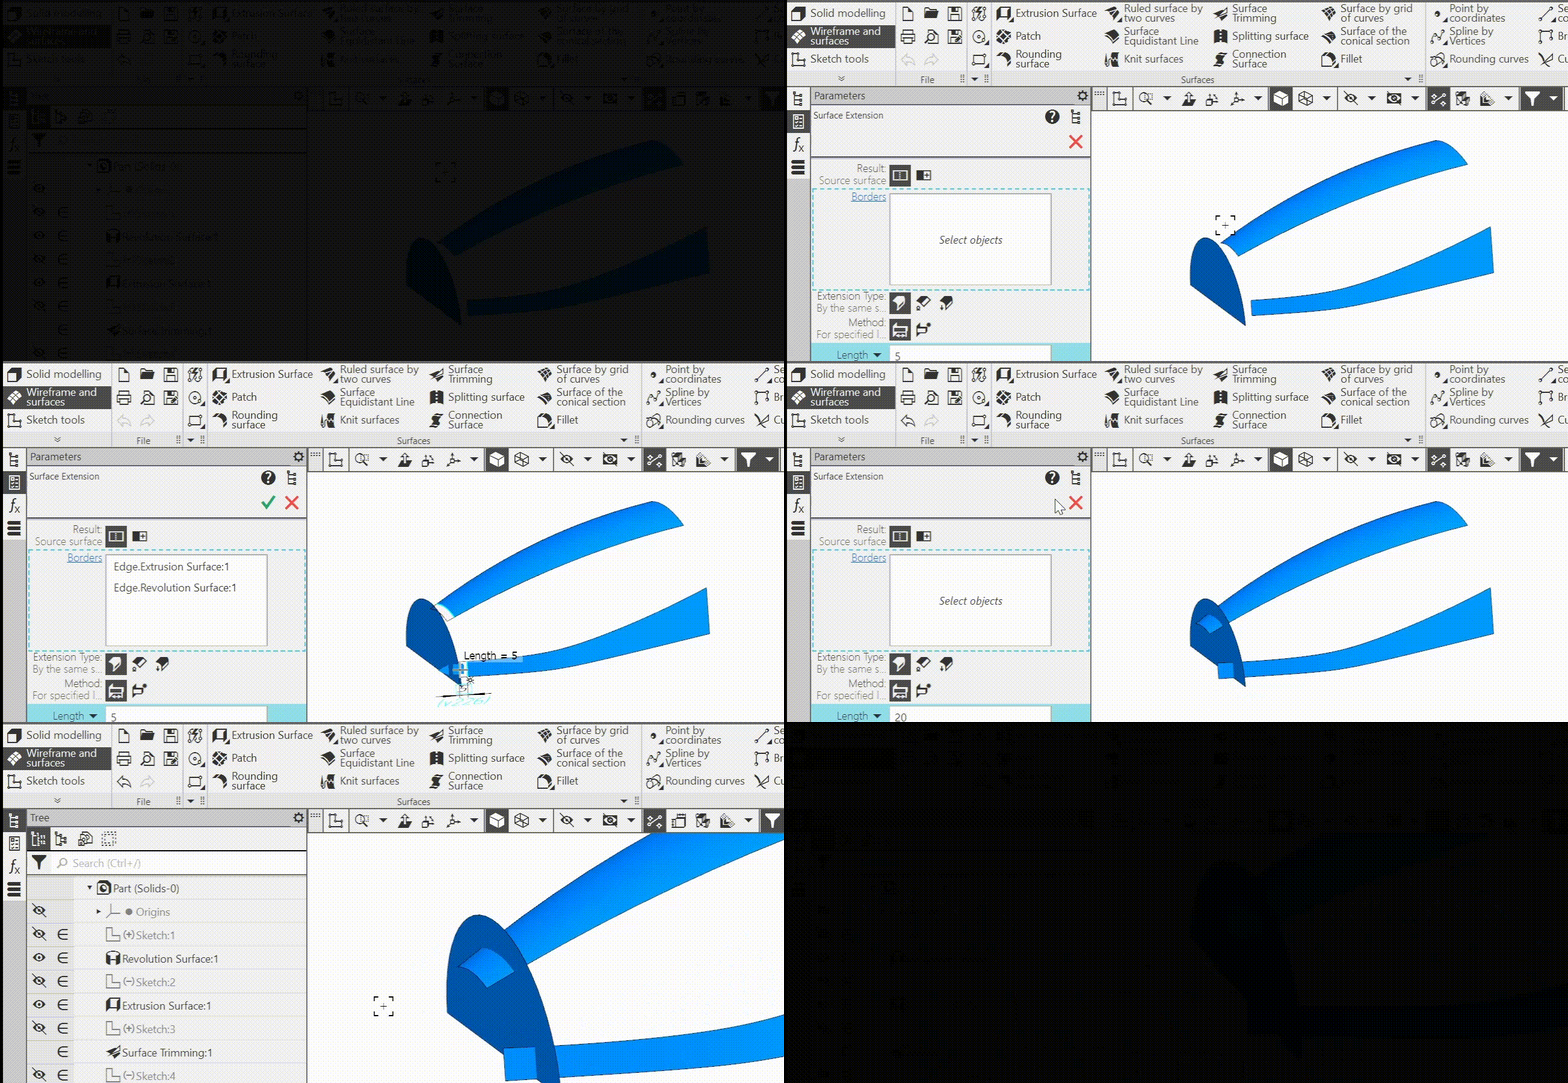
•It became available to extend several different surfaces in a single command call.
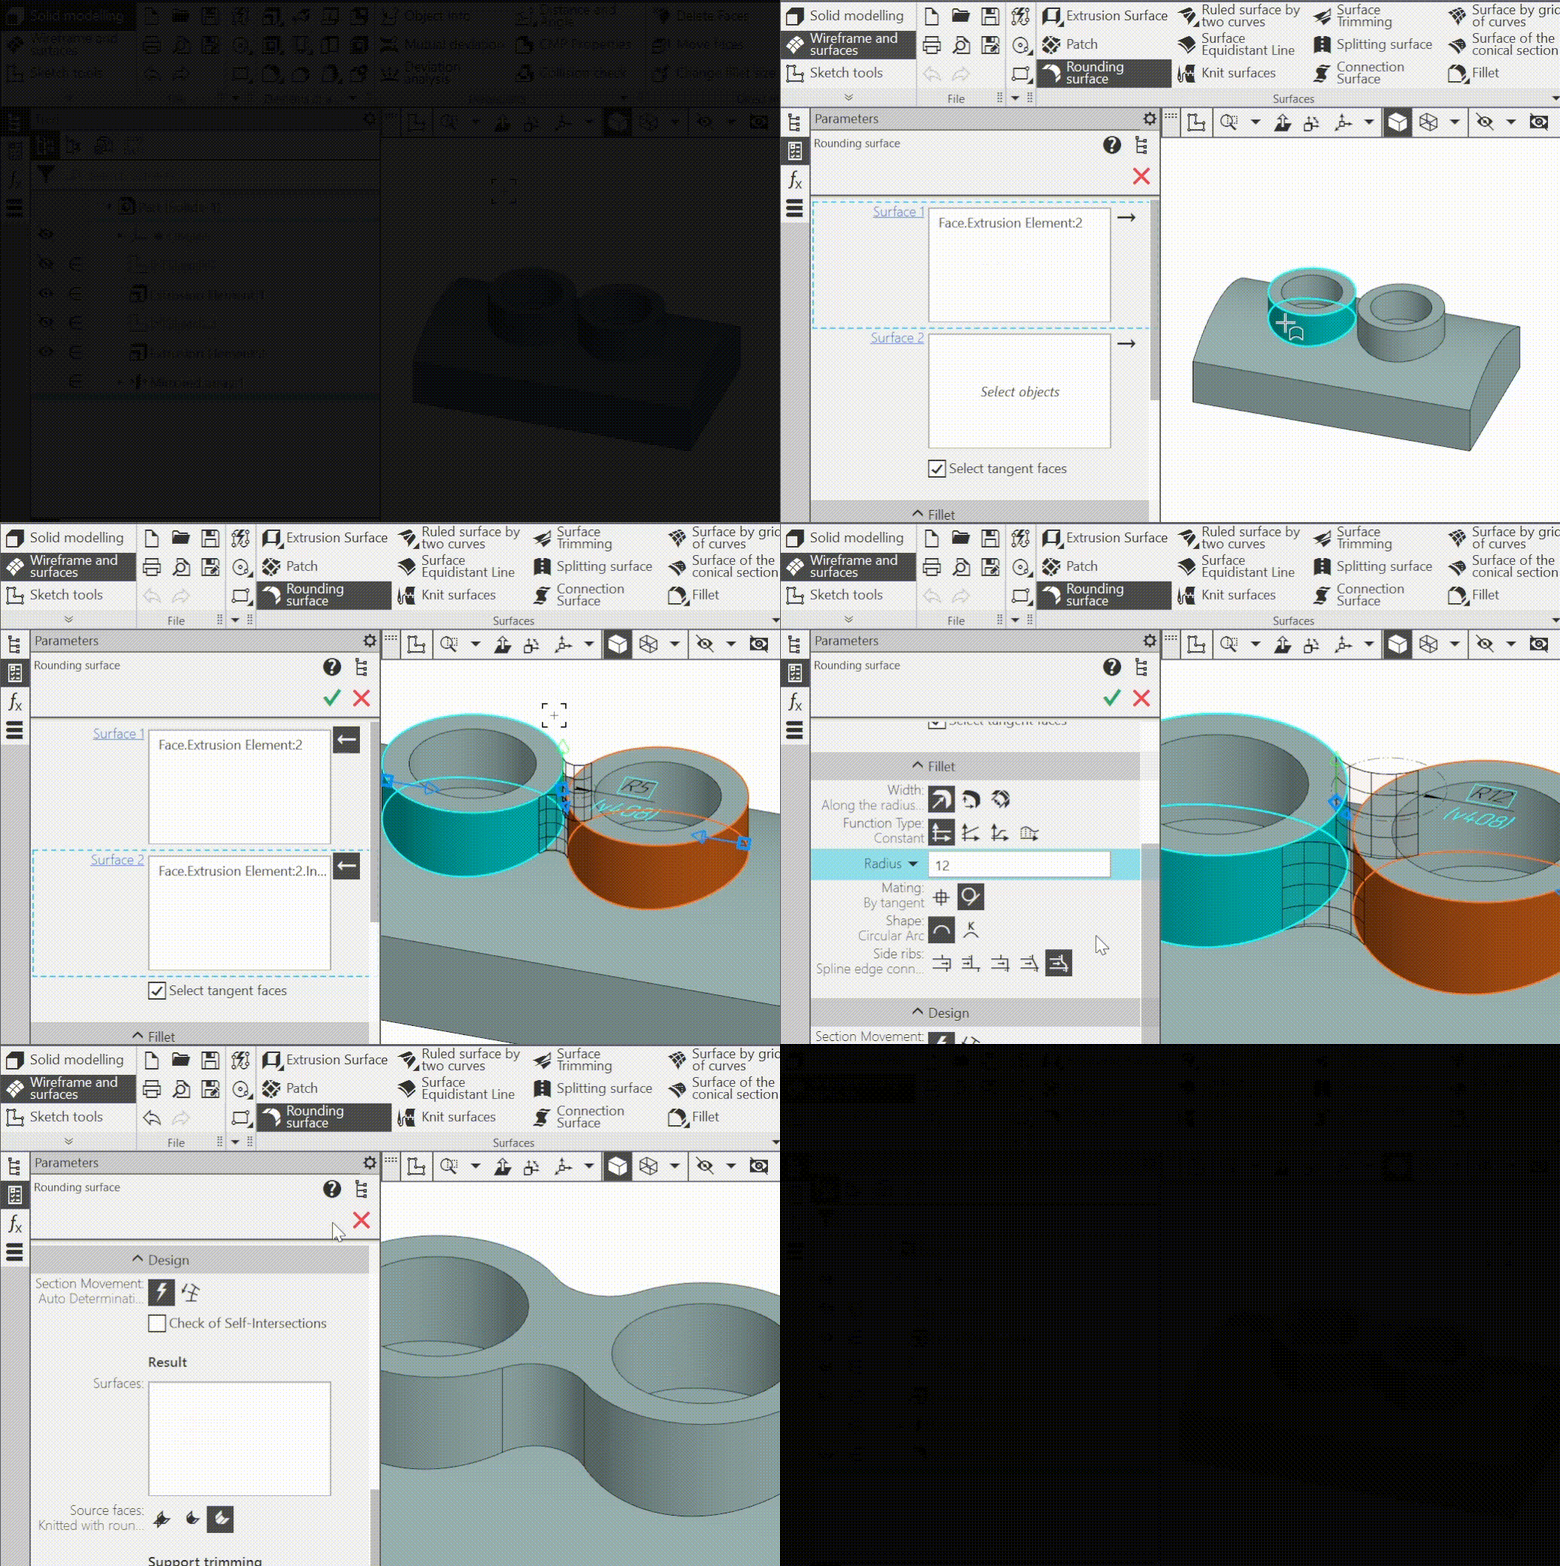
11.Developed command Rounding surface:
•added a building method, that does not require specifying an orienting line, but only specifying the rounded surfaces (the rounding surface in this case is the result of "rolling a ball" of constant radius between the rounded surfaces; the surface boundaries are formed by the points where the "ball" touches the source surfaces),
•added the possibillity of selecting the result of the operation:
•the rounding surface and the source faces are unchanged,
•rounding surface and trimming of the original faces along its boundaries,
•trimming of the source faces and knitting them with the rounding surface into a single surface.
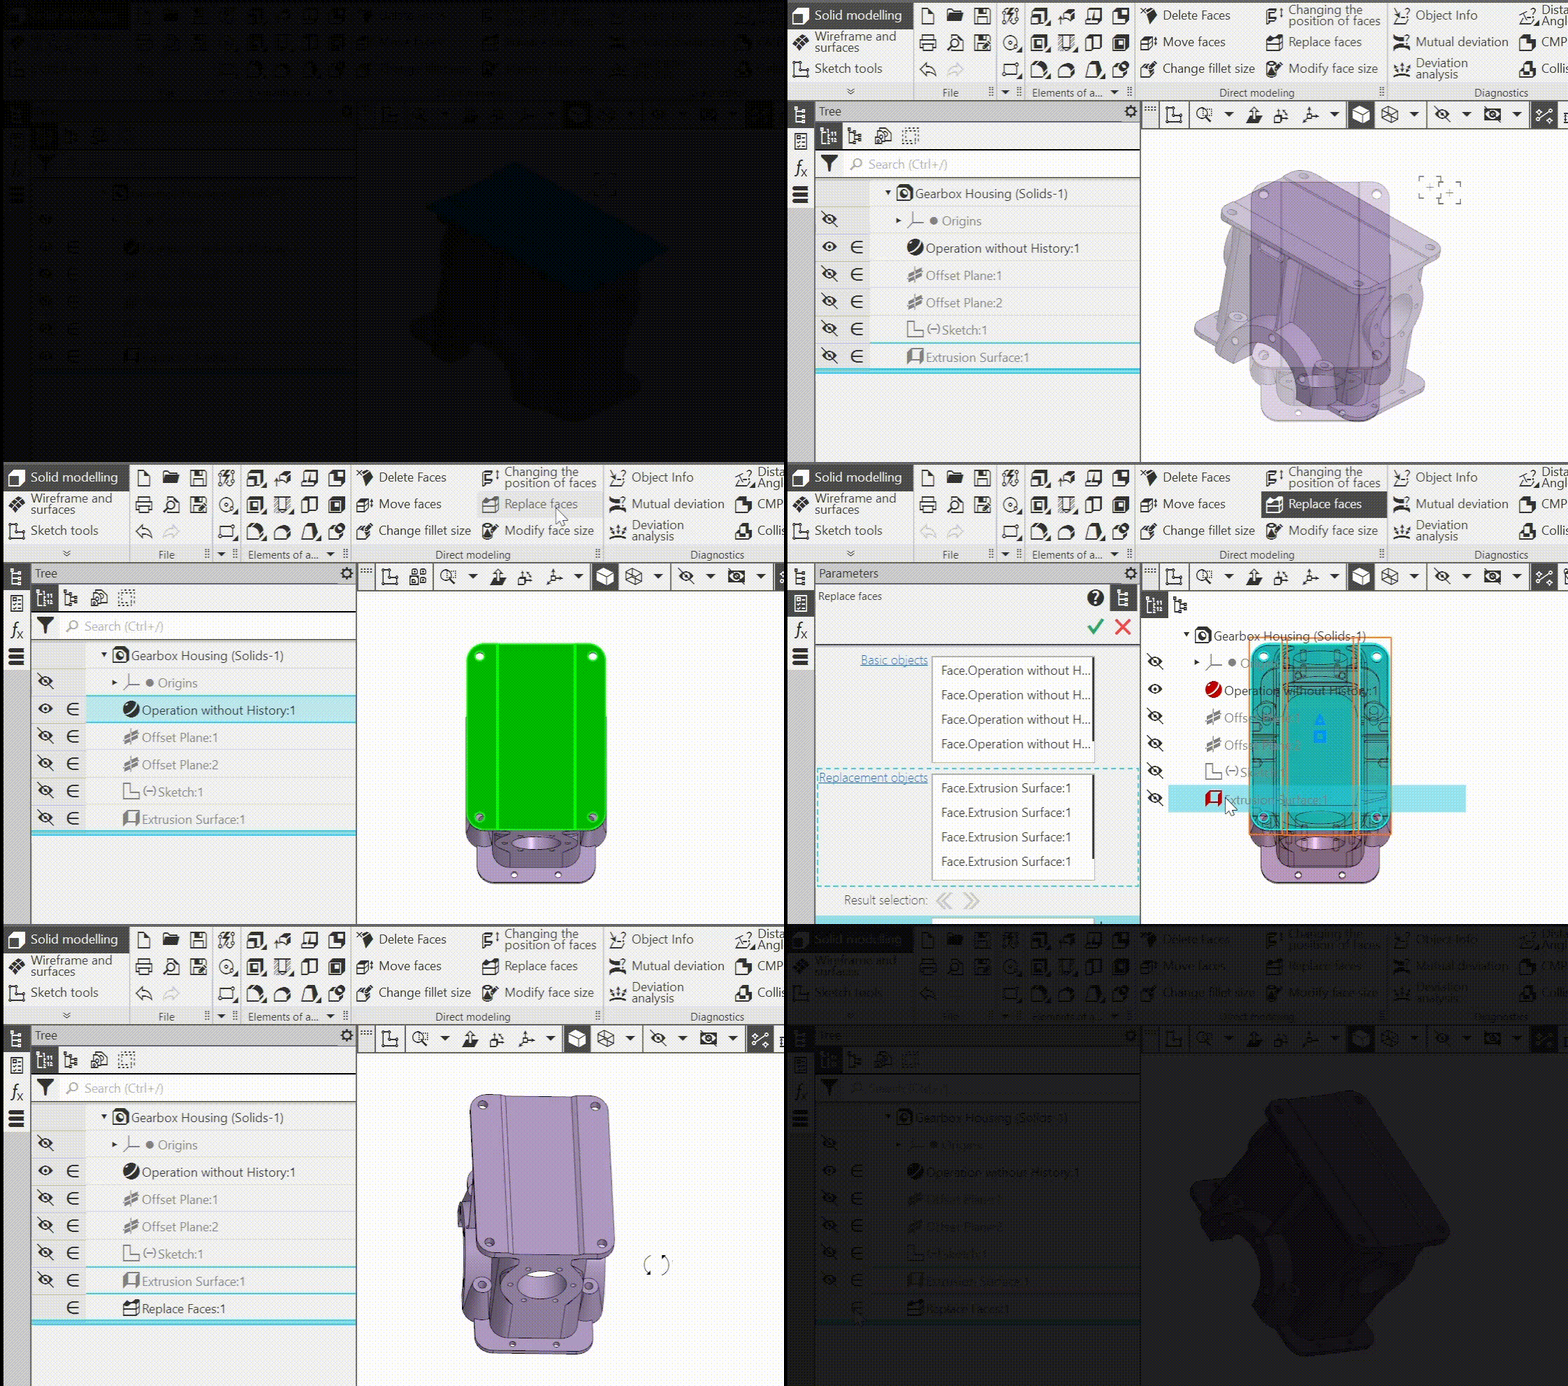
12.Improved command Replace faces: added possibility to replace one group of faces with another group of faces. In this case, the replacement group must necessarily be a linked set of faces, and the replaced group must not.
13.Developed commands Collapsed curve and Unfolded curve:
•both commands now work with extrusion surfaces and unfolded ruled surface: it is available to collapse curves and points onto these surfaces and unfold from them,
•in the command Collapsed curve , it is now possible to trim the collapsed curve with edges that limit the surface, i.e. lateral edges and cut edges, if any,
•in the Unfolded curve command it is now possible to control the position of the surface cut line for cases when it is closed (cylinder, cone, etc.)..
14.Improved command Model family:
•The possibility of creation Family table blank: the user selects properties and variables to be included in the table, establishes the parameters of the table file, and then, having opened this file in the table editor, fills it in. The result is a table which column headings match the names of properties and variables, which is a prerequisite for a workable family table. ch
•Added the following ways to assign the properties of family model-instances:
•Determining the density of a material by its name (available if the method of CMP calculation of the Family template - By density): if there is a specified material in Family table, name of which is in the density file (Graрhic.dns), then the density of the instance is assigned according to this material.
•Assigning an arbitrary mass value from the Family table (available if the method of CMP calculation of the family template - By mass).
Note: Similar possibilities for assignment of properties appeared when creating in the model of versions by reading data from the table, their availability depends on the method of calculating CMP of the main version.
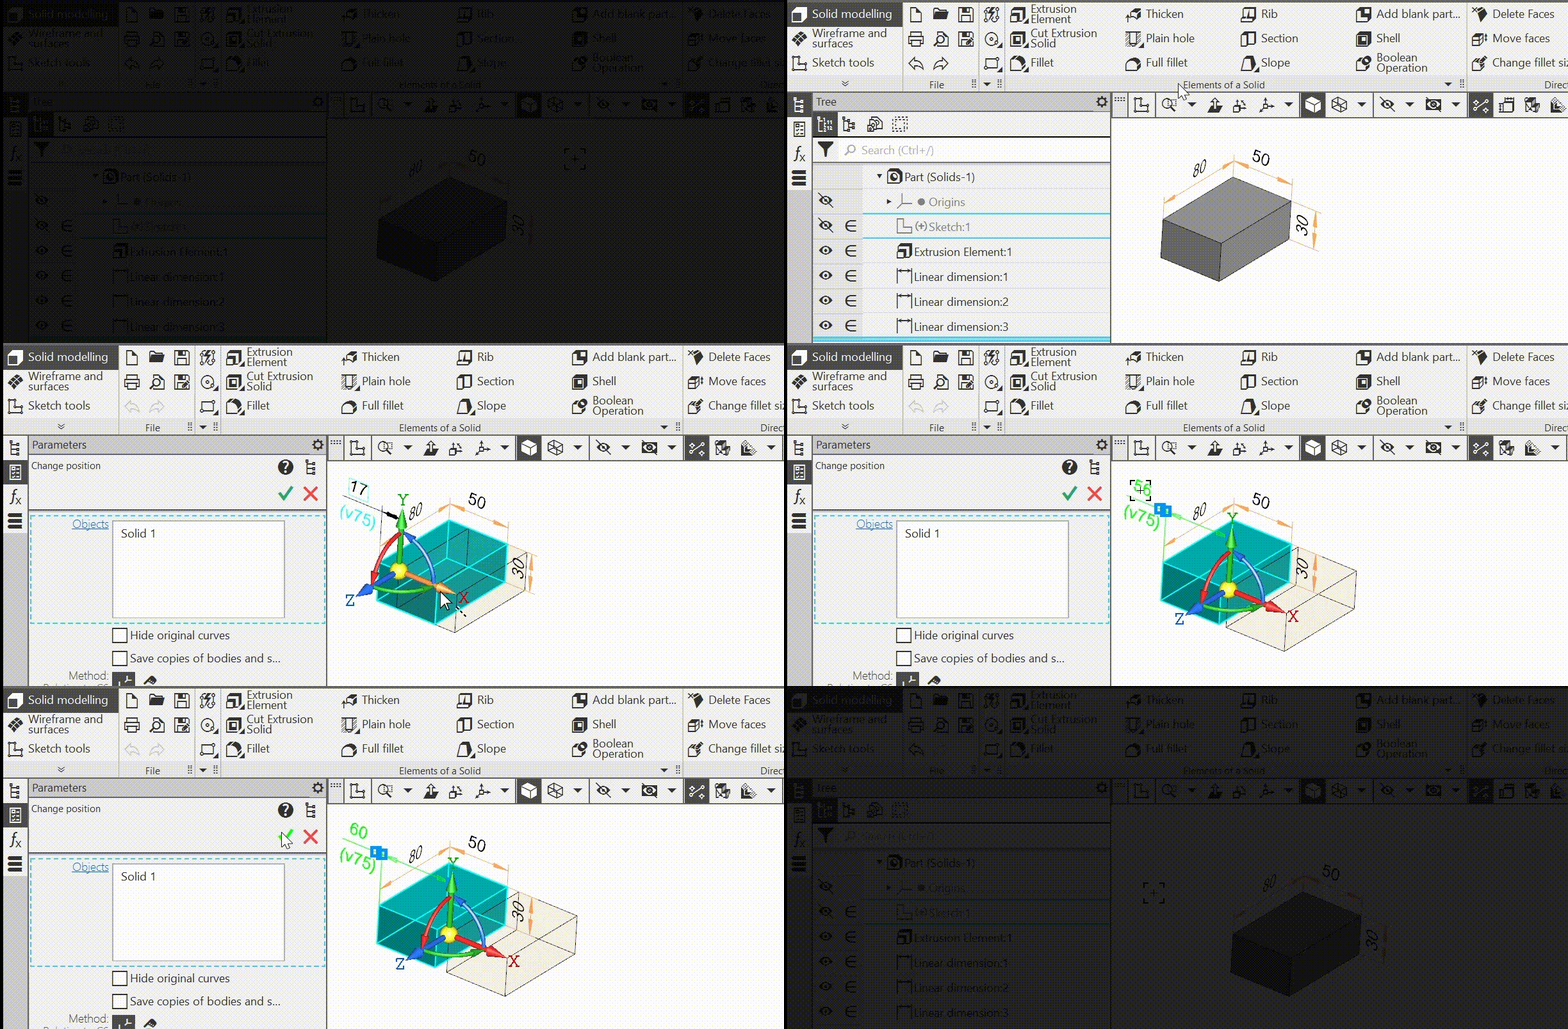
15.The Change position command has been improved:
•edges, faces and vertices retain their system names after the operation, so that objects based on them (e.g. dimensions or matings) are correctly rebuilt and the sheet body does not lose its properties as a result of moving,
•added the possibility to apply the command to curves and points, not only to bodies and surfaces; moreover, it is now possible to select several objects at the same time, including different types, to change the position,
•the option Delete source object has been eliminated; the options Hide source curves and Save copies of bodies and surfaces have been added,
•using the method of moving relative to the coordinate system, the dimensions of the operation—offset distances and rotation angles — have become available; thus, these values can now be edited in the graphic area: when performing/editing the operation, or in the mode of displaying the dimensions of the specified element, or as derivative dimensions of the operation.
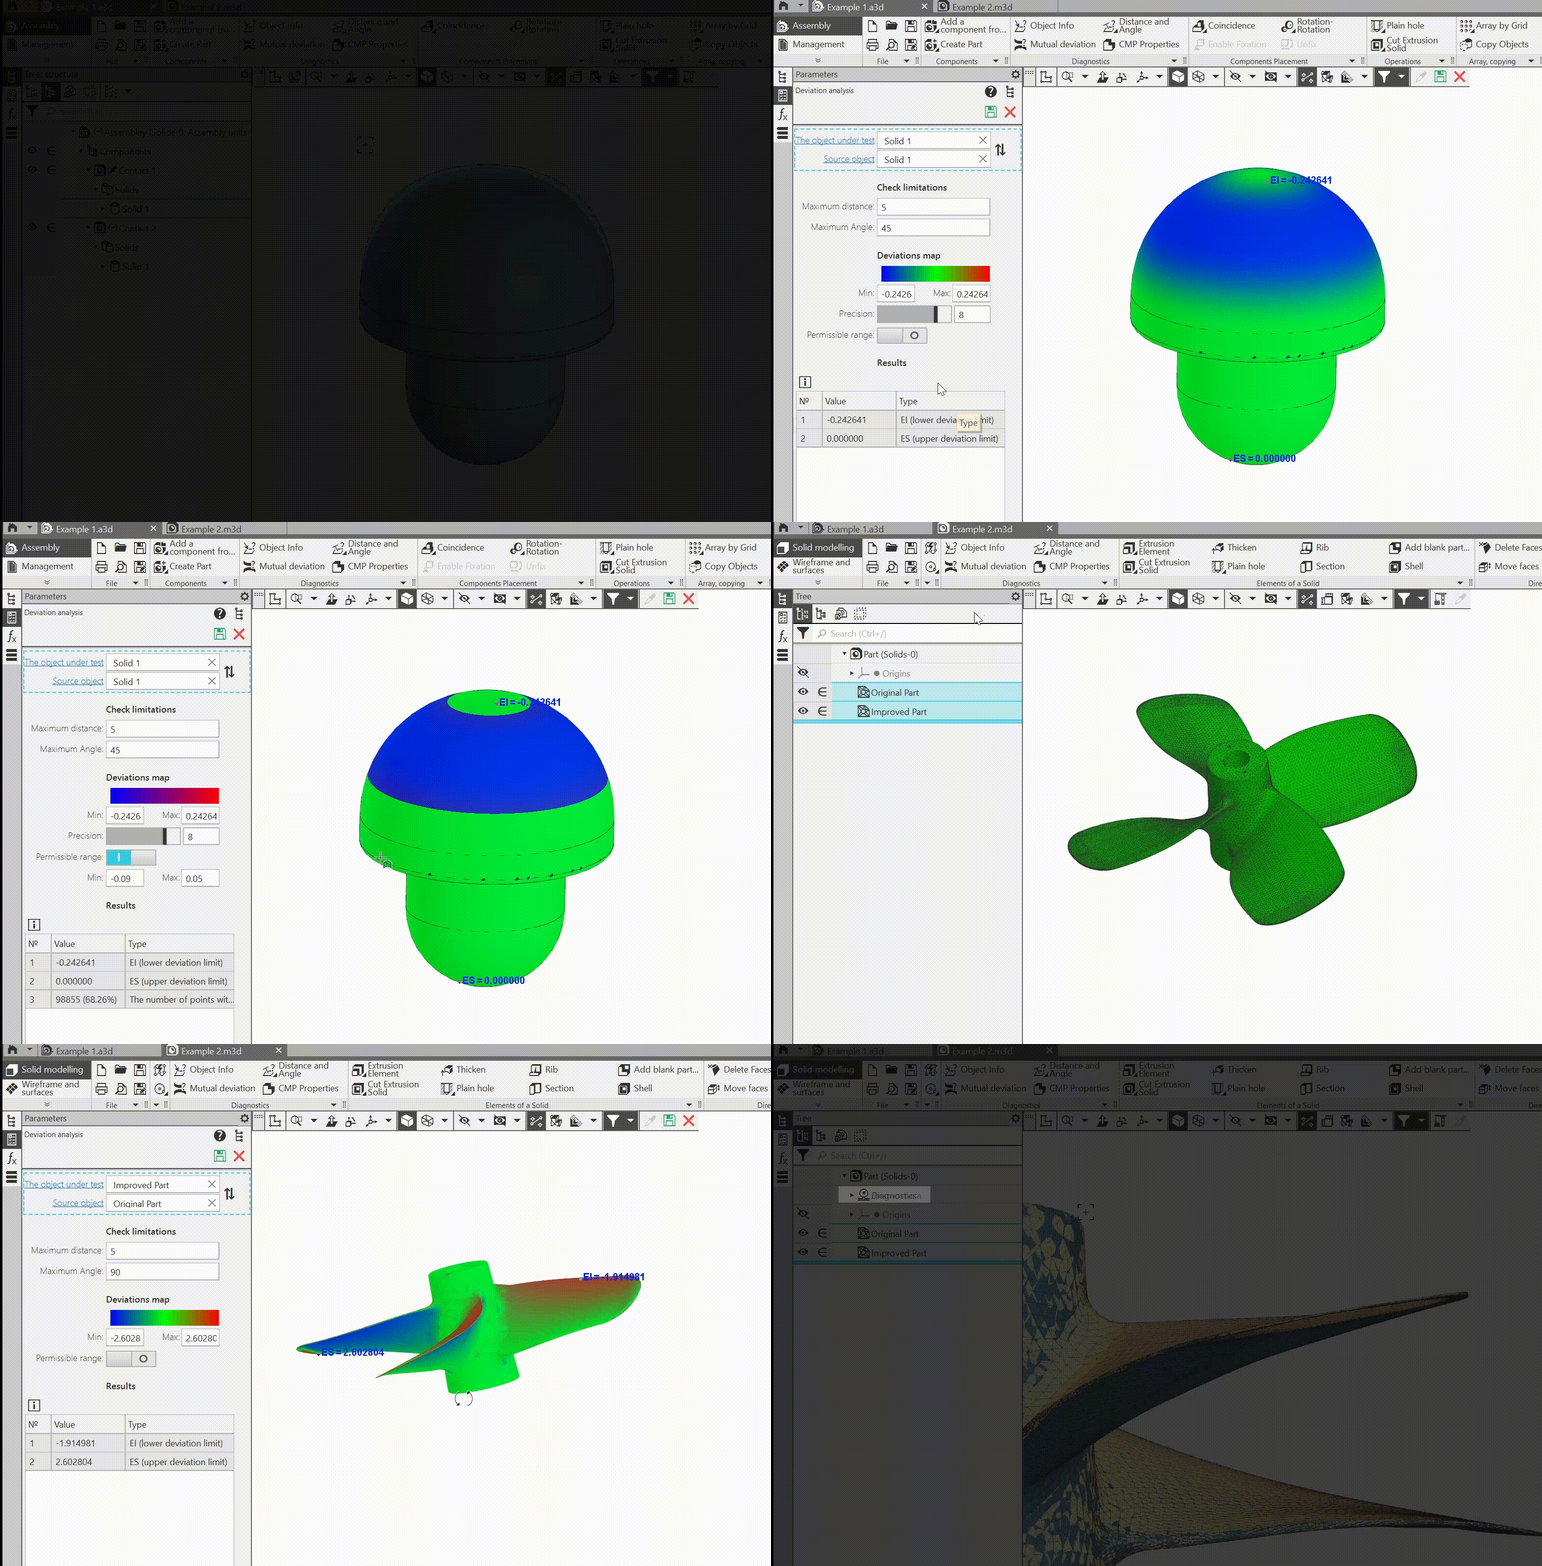
16.Improved command Deviation analysis:
•it became available to measure deviation not only between a body/surface and a polygonal object, but also between two bodies/surfaces/polygonal objects in different combinations,
•there is now a measurement precision setting that controls the number of points at which deviations between objects are measured,
•added possibility to assign an acceptable range of deviations and to highlight on the color map those areas of the analyzed objects where deviations do not exceed this range; if the range is set, the number of points falling within it is displayed in the table of results,
•the analysis process itself is started by the user after the configuration is completed and is displayed as an indicator in the lower left corner of the screen; if necessary, the process can be interrupted (previously it was started automatically after selecting objects, and interruption was impossible),
•when moving the mouse cursor over a color map, the deviation value in the point under the cursor is displayed near it,
•the setting of length units applies not only to the measurement result, but also to the parameters expressed in these units (maximum distance and range limits),
•the names of the points where the maximum deviation values are displayed have been changed: they were “L_min” and “L_max”, and have become, respectively, “EI” and “ES”.
17.The Standard part inserted in the part can now be converted to a blank. The blank created in this way is taken into account in the drawing of the part and in the BOM assembly containing the part with the blank. The ability to edit a standard blank part using the Standard parts reference is retained.

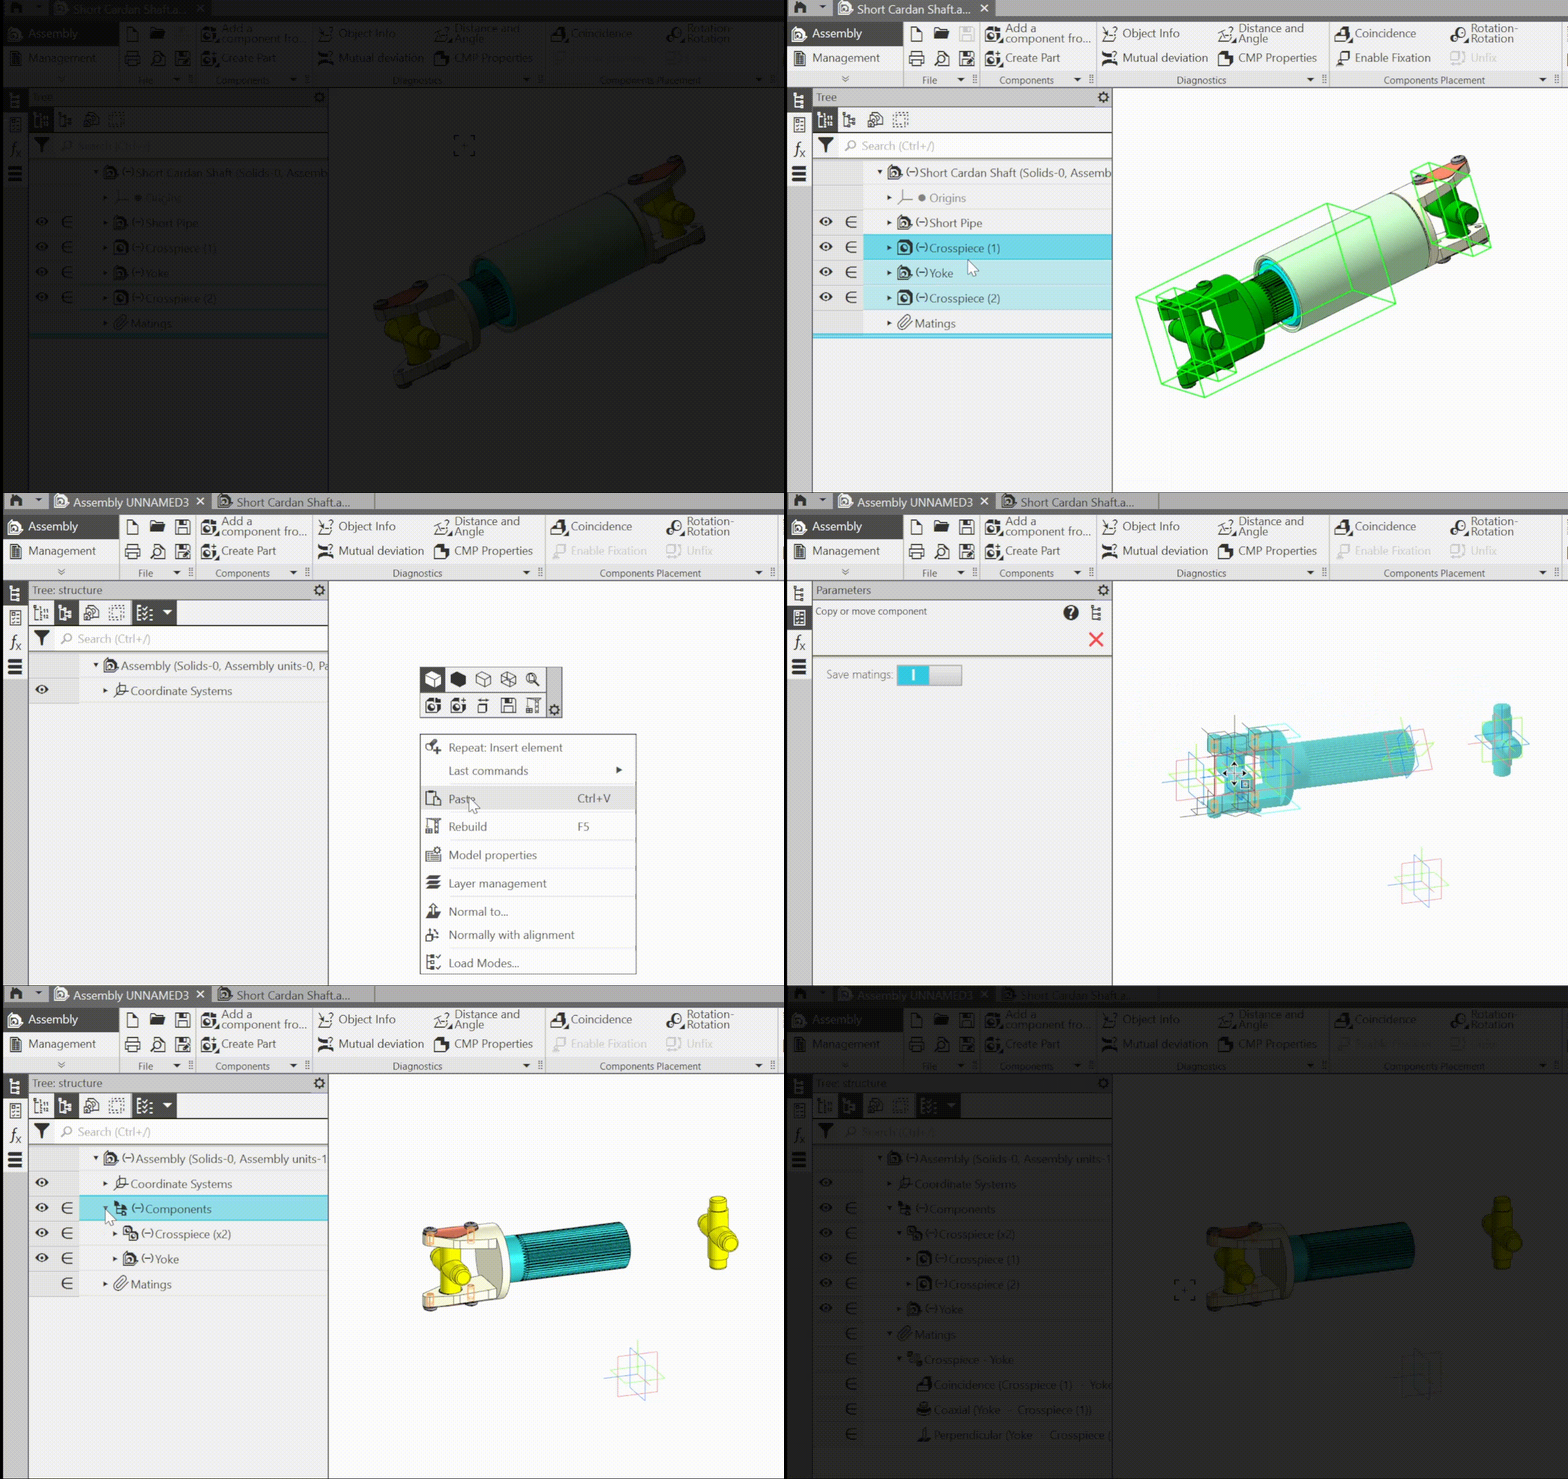
18.The ability to copy components via the clipboard and paste them into the same or another model has been implemented, including during context editing. Any component at any nesting level can be selected for copying; pasting is done at the first level. If necessary, during copying it is available to enable saving the matings between the copied components and between them and the coordinate system of the model containing them.
19.Improvements and new features for working with layers:
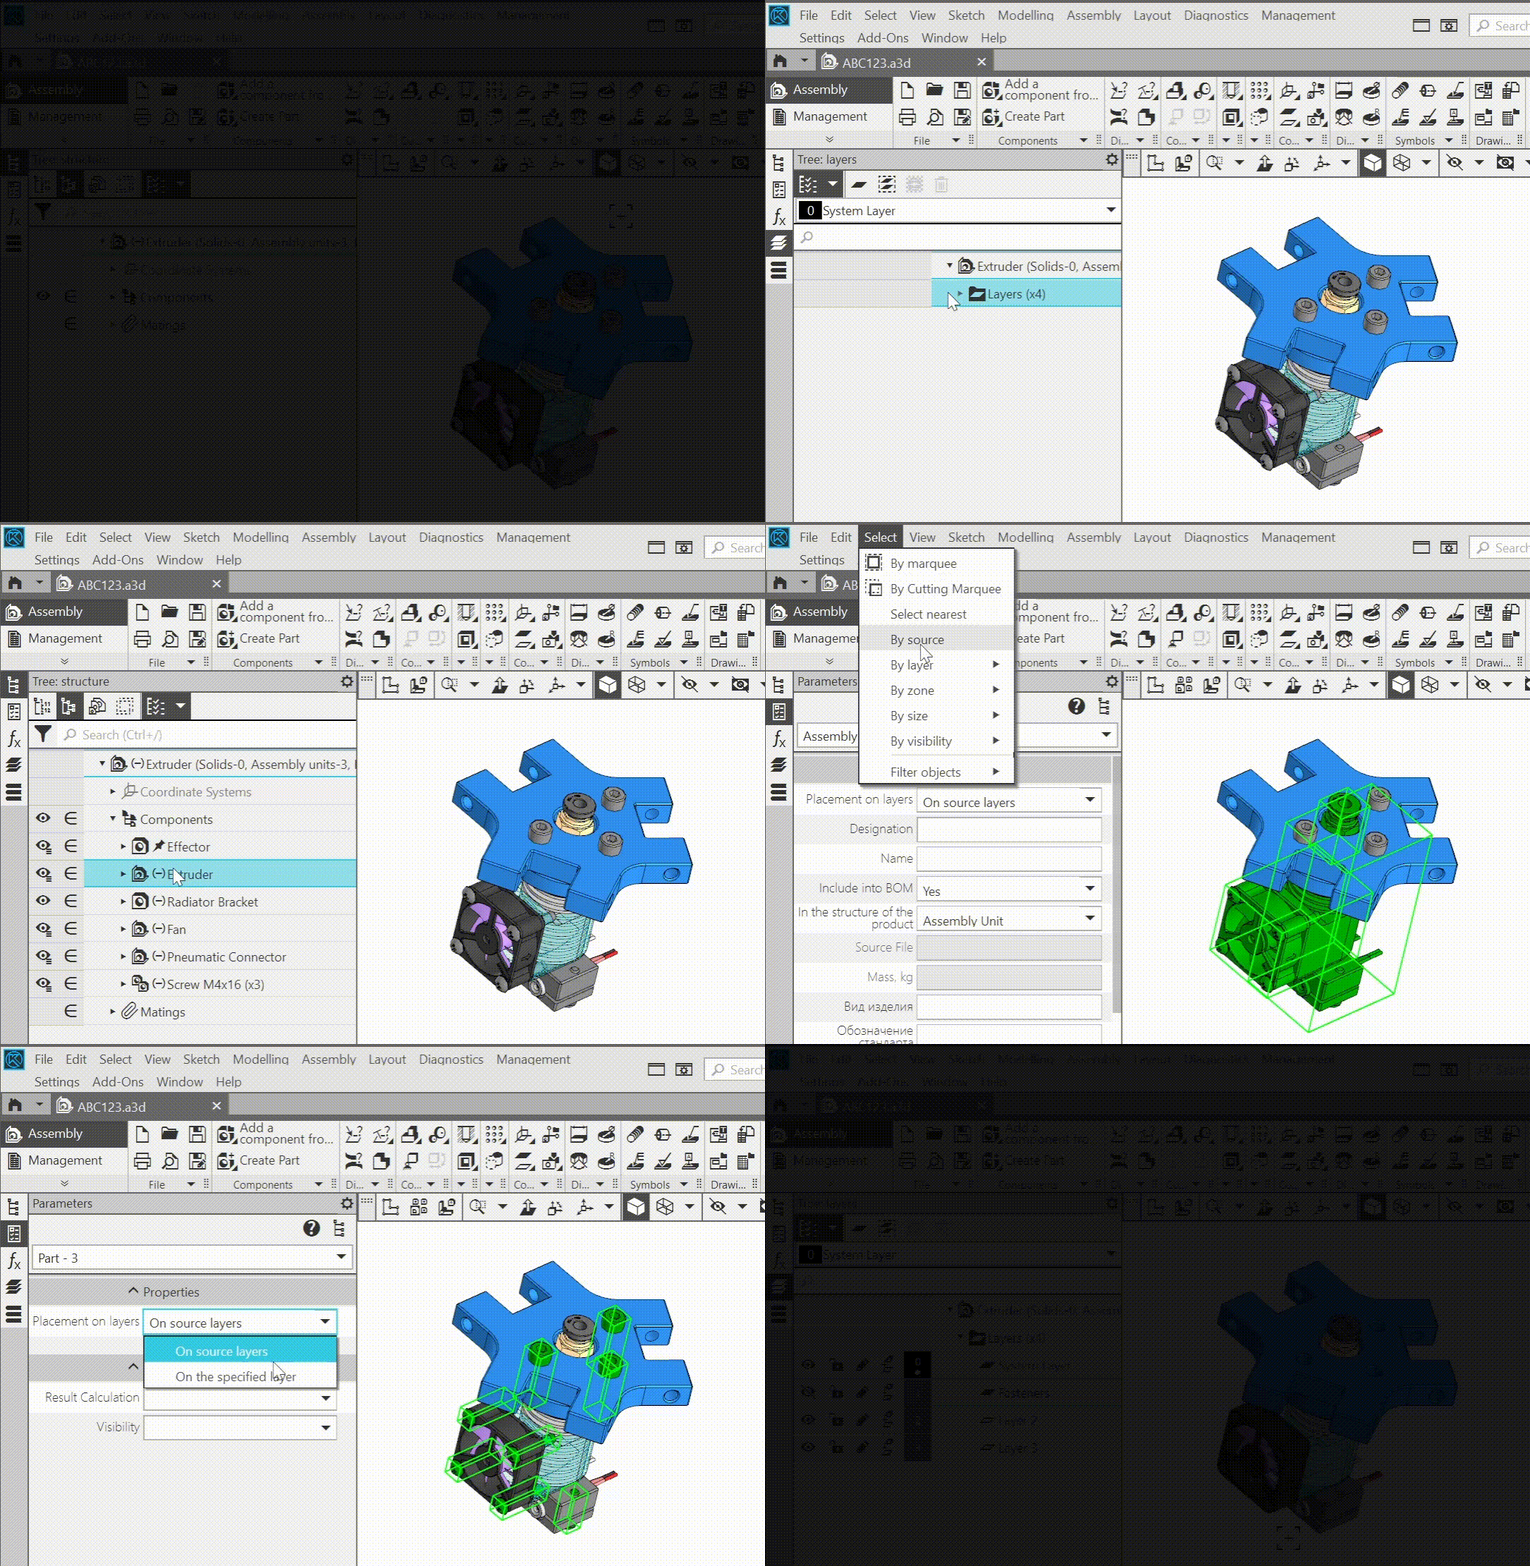
•If a subassembly is placed in an assembly using the On source layers method, any component of that subassembly can be moved to an arbitrarily selected layer of the assembly. In this way it is possible, for example, to arrange the fasteners from all subassemblies on one assembly layer - this allows all fasteners to be quickly hidden if necessary.
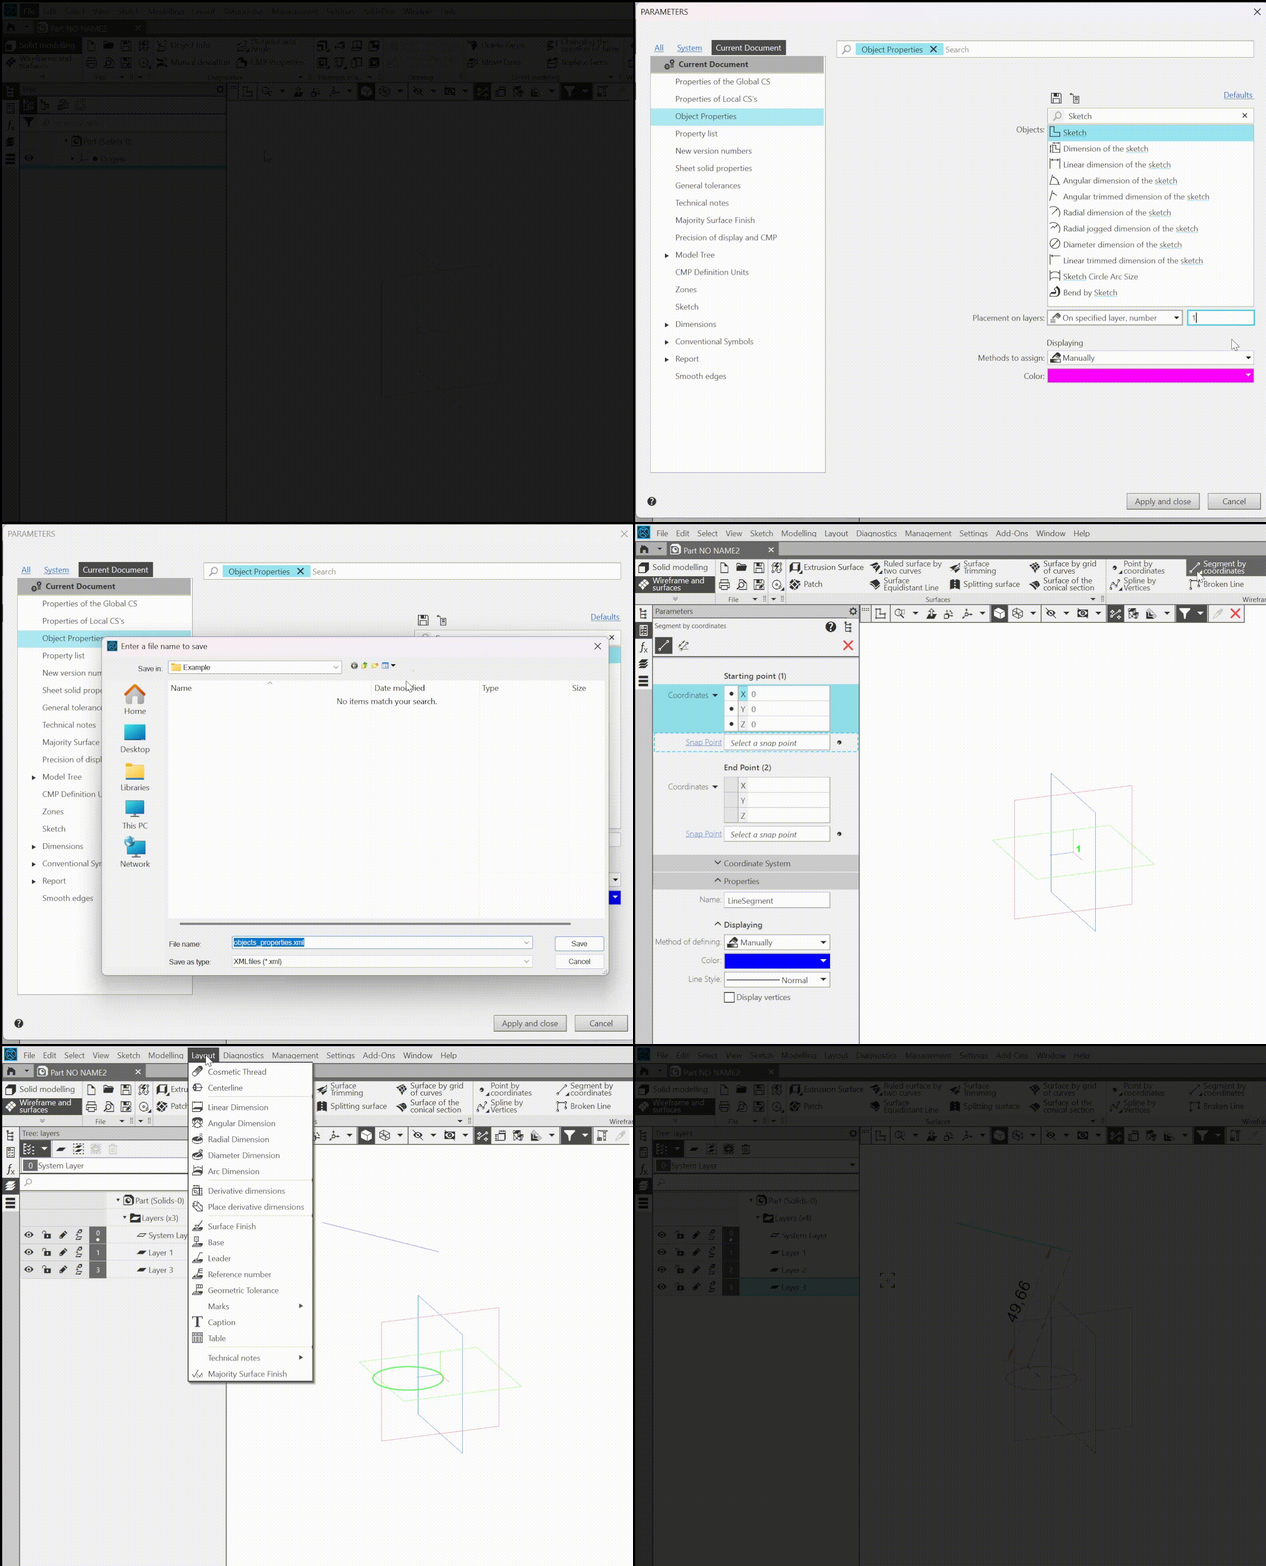
•When customizing object properties it is now possible to select the layer on which it should be located: current layer or a layer with assigned number (if there is no layer with this number, it is automatically created when the object is created). Layer selection is available for objects that can be placed on layers: auxiliary planes and axes, points, curves, etc. The settings made for the properties of objects can be saved to a file and read from the file, for example, at another workplace.
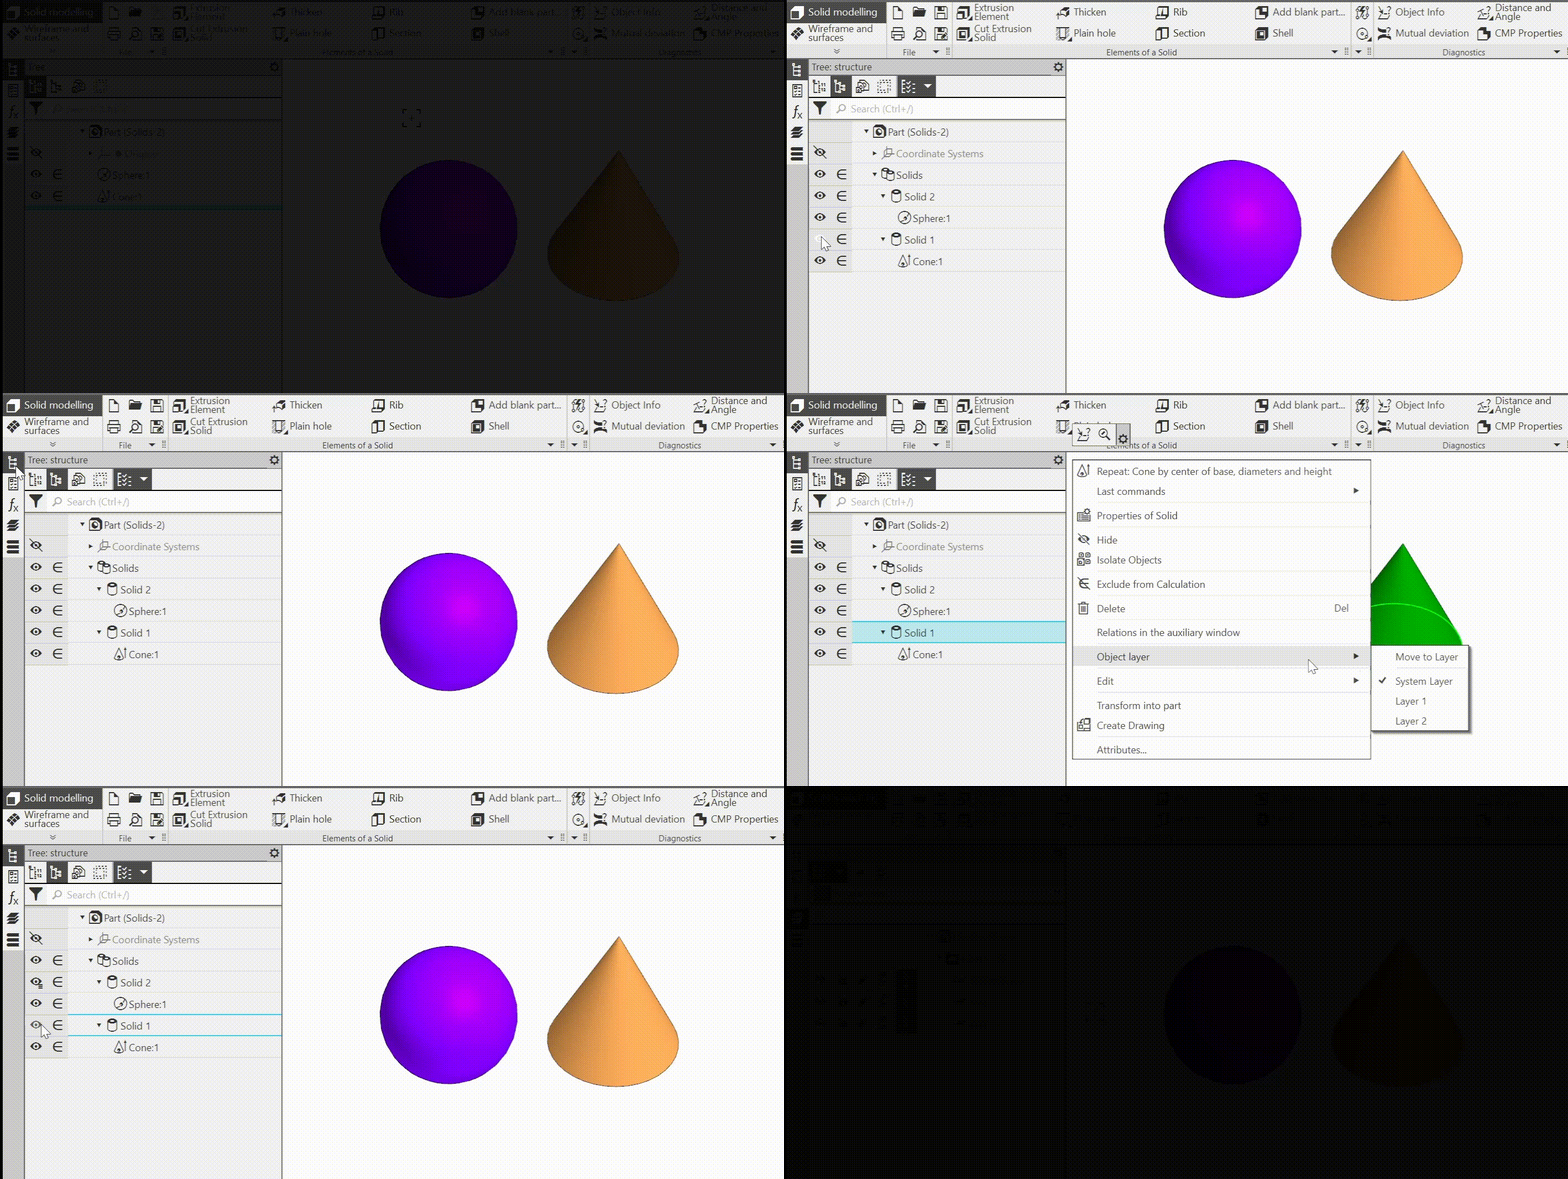
•If the model has more than one layer, then:
•objectswhich visibility is defined By layer have a special visibility icon in the Design tree (previously they had the icon Visible)
•it is available to enable visibility determination for an object using the By layer method in the Design tree (previously, only in the Parameter panel).
•The Layer tree is now located on a separate panel,the display of which is enabled by the command Settings—Toolbars—Layers or the key combination <Ctrl>+<L>. Previously, it was necessary had to switch the Design tree to the appropriate mode to work with layers.
•Selecting objects by specifying the layer containing them is done in the Parameters panel, and not in the dialog as before. Due to this, selecting objects in this way can be run as a subprocess of another process, such as creating an assembly report.
•Added layer creation command that allows to create up to 999 new layers in the model at once.
20.New possibilities for selecting objects:
•Added command Select by source. It displays a list of all components of the current model that are inserts of external files, the names of these files and their paths. A filter by component type is available, for example, it is available to leave only assemblies or only standard parts in the list. Identical inserts, including those at different levels, are displayed in the list as a single line. Selecting a row selects all inserts of the corresponding component and vice versa, selecting a component selects the row and, therefore, all other insertions of the same component, if any. Selecting a component by source can be useful if it is available to replace all inserts of a particular model with another model.
•If, when performing operation, an object that is unsuitable for the active registrar is specified, then—provided that at least one filter is enabled—a search is performed for objects that satisfy the filter within the specified one. If these objects are suitable for the registrar, then they are entered into it. For example, to select all curves in the model in the Continuity check command, it is available to enable the Curves filter and specify the root element in the Tree.
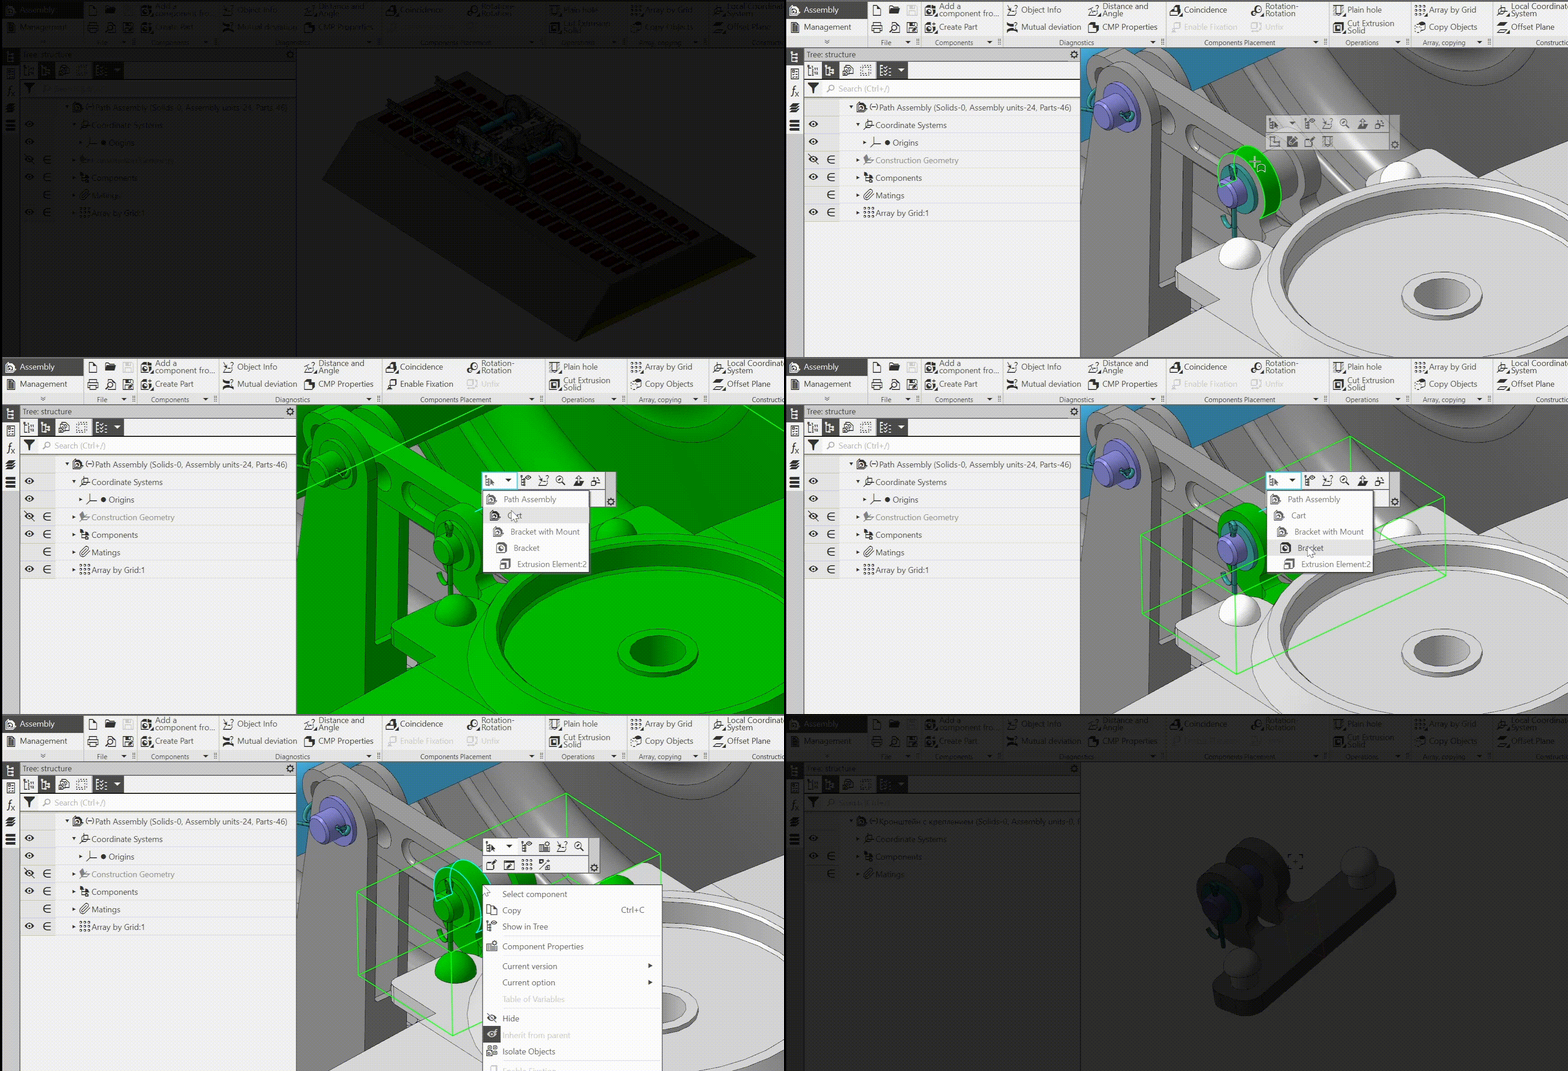
•A hierarchical list of objects has been added to the context panel that appears when an object is selected in the assembly model, including the selected one: from the operation to the root element of the Tree. By selecting the appropriate line in this list, you can specify one or another of the objects containing the selected one.
•In the additional model window, it is available to quickly specify bodies that are visible or invisible in projections onto the main planes . This simplifies, for example, the creation of a model-mockup: to obtain it, it is necessary to copy only the visible bodies of the source model to a new model.
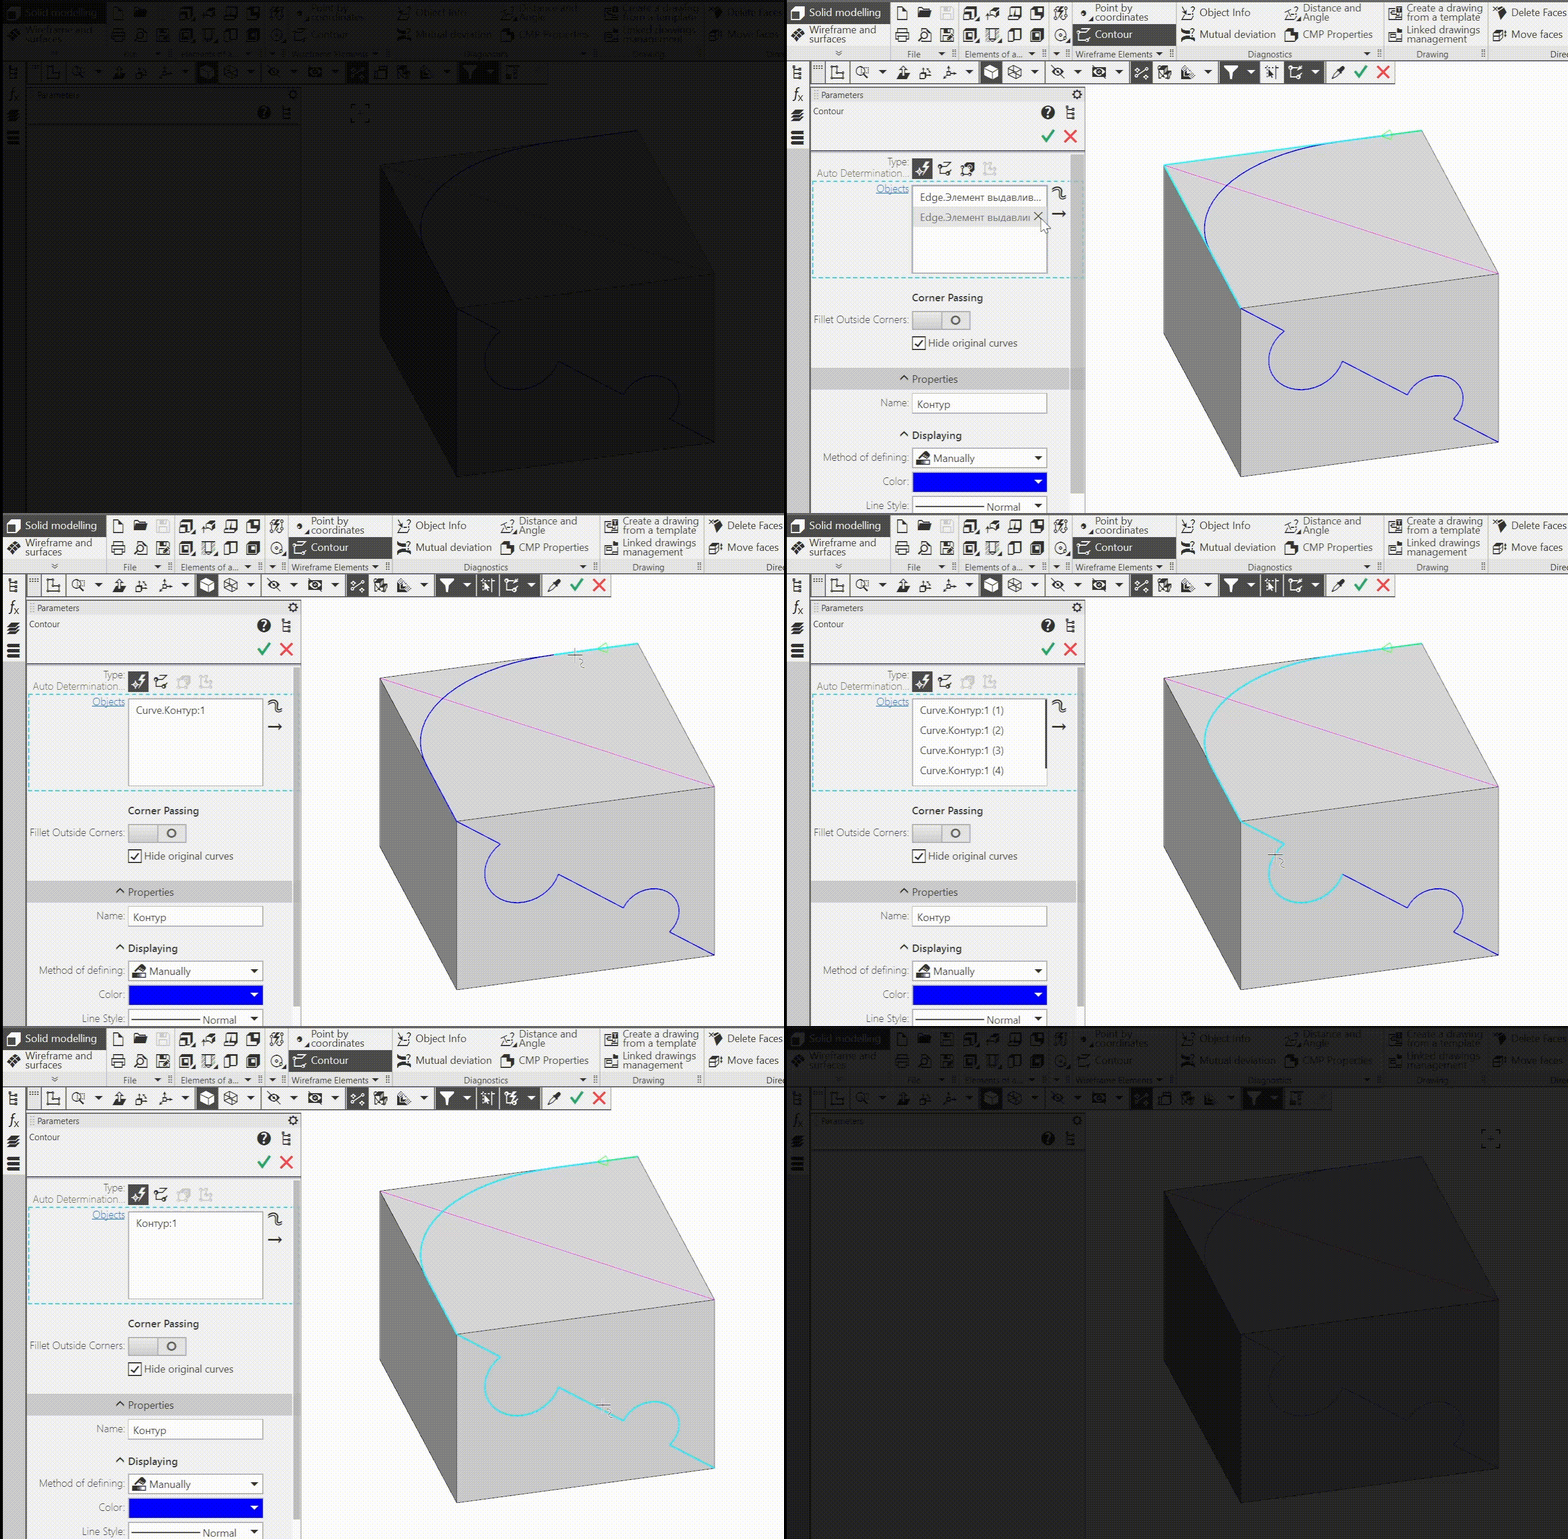
21.The Quick access panel has been updated with elements that control the process of specifying curves:
•The Select parts of curves button — is used to specify the method for selecting curves: in whole or in parts that are formed when a curve intersects with other curves. The button is present on the Quick access toolbar when working with the following objects:
•contour and equidistant;
•element by path and the surface by path;
•conic section surface and ruled surfaces, except for the ruled surface by two surfaces;
•point on curve;
•sketch - in the process of its placement on the trajectory.
•List of options for selecting curve that make up non-branching chain: Single - selection of each curve individually and Connected - selection of the whole chain. The list is present on the Quick access toolbar when working with the Contour command and replaces the Non-branching node pass method switch that was there.
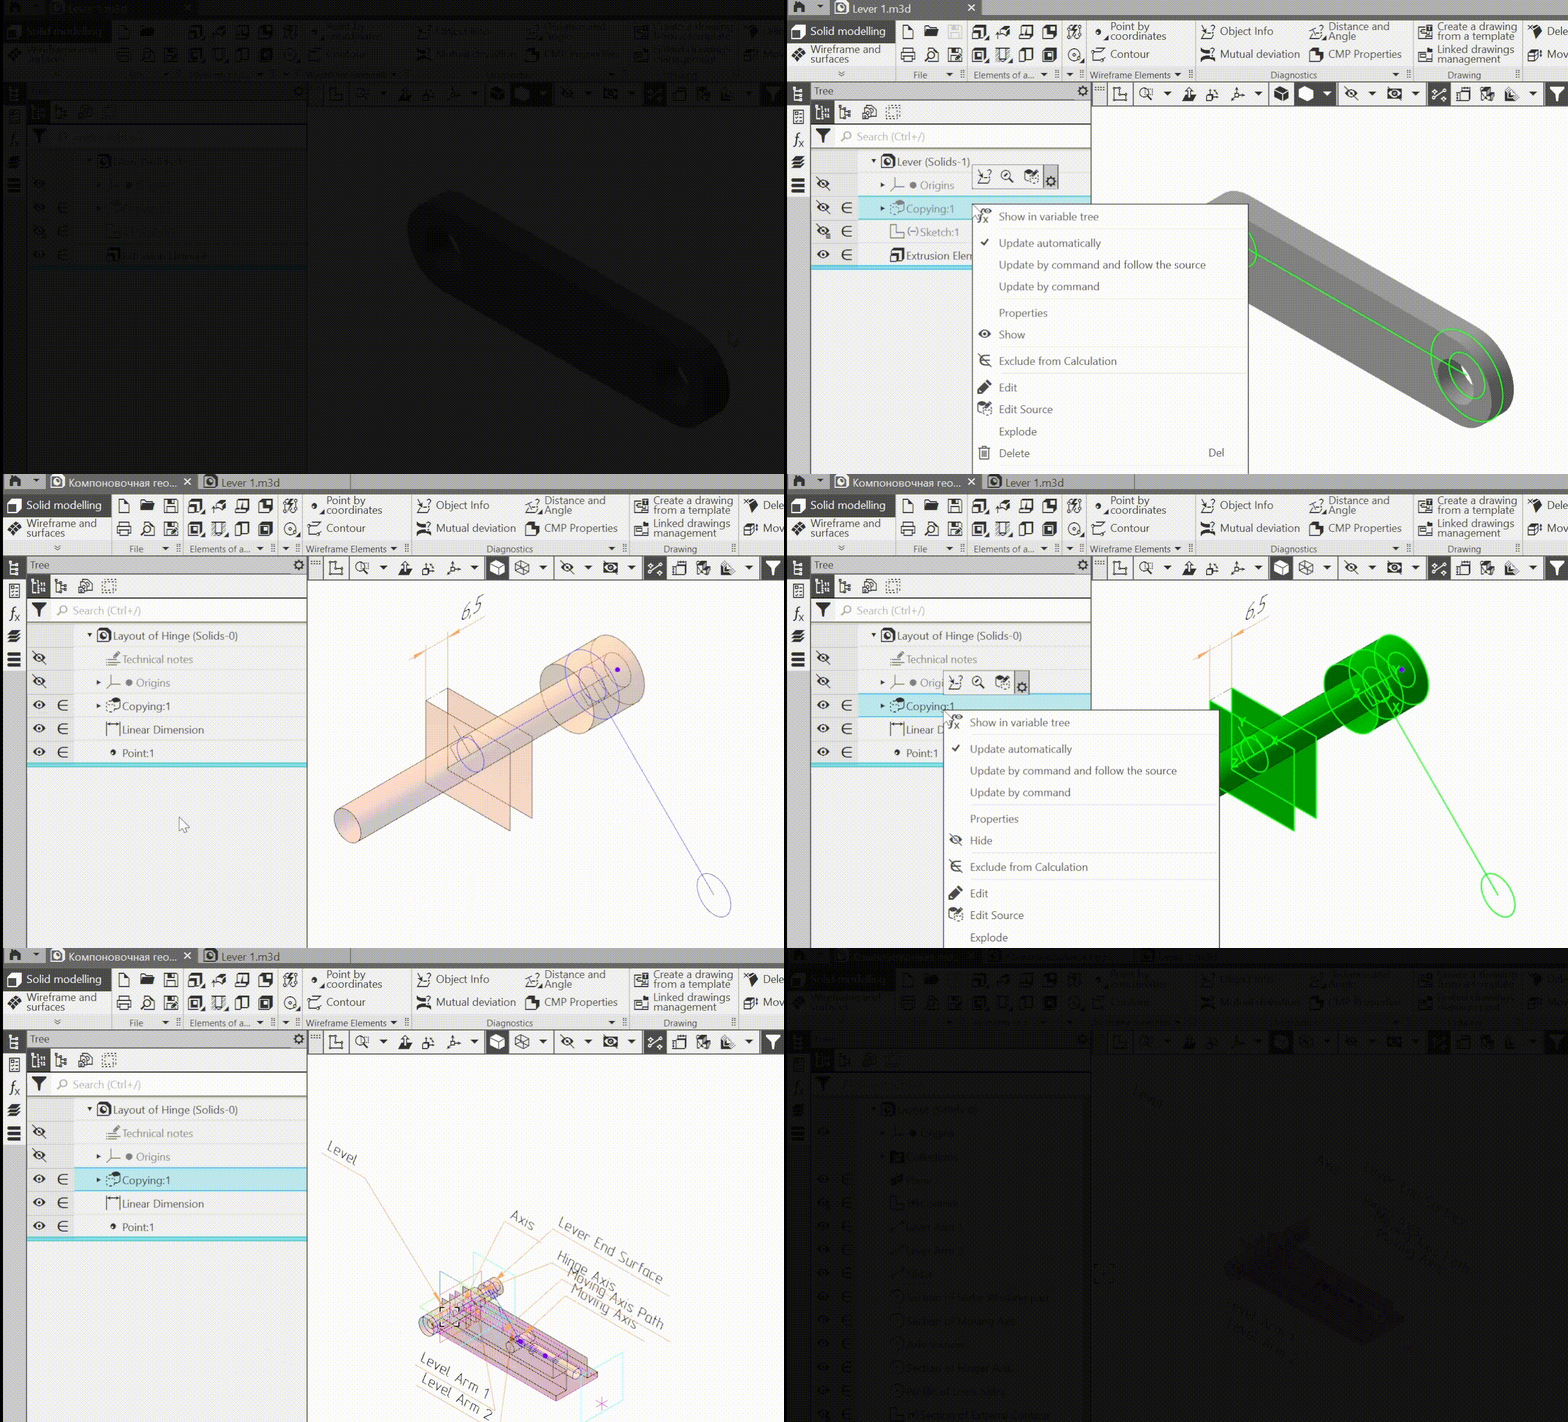
22.New features for creating copies of geometric objects and working with them:
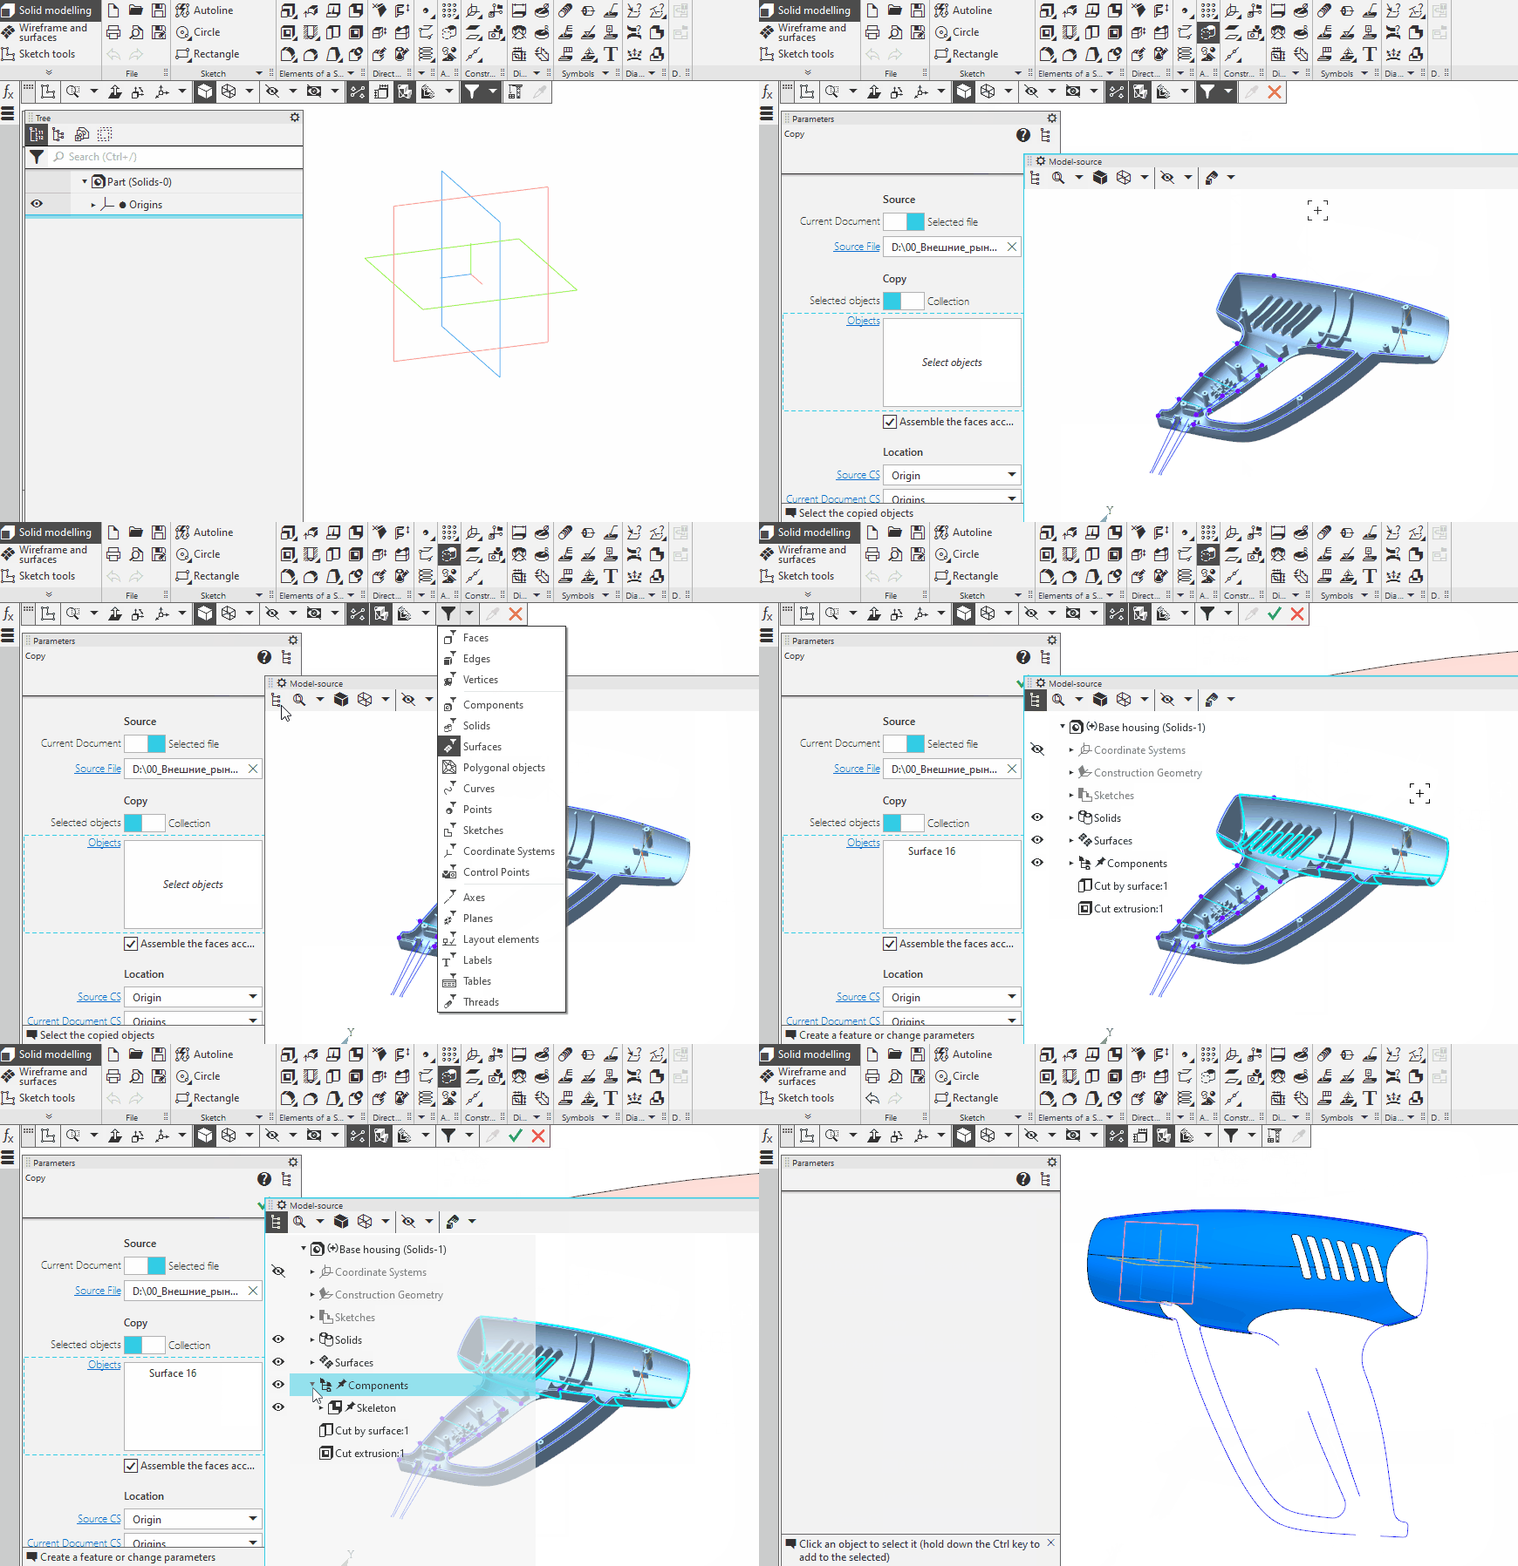
•if an operation is selected for copying, the list of copied operations includes not the faces of this operation, but the object which it belongs to (body or surface);
•copying result objects have the same properties and parameters as the source objects: copies of surfaces - optical properties, copies of bodies - optical properties and CMP parameters, copies of points and curves - colors and styles;
•phantom of copied objects is displayed as semi-transparent (previously it was wireframe);
•if the source of the copy is an external model, it can be quickly opened - using the context menu command of the copy object in the Design tree.
23.The command Surface adjustment now automatically determines the type of surface that approximates the specified section of the polygonal object. If necessary, the result of the autodetection can be changed manually by selecting the required surface type from the list.
24.Improved process of reading versions,recorded in the *.ods or *.xls file: the main version from the file no longer becomes one of the versions of the current model, as before. Instead, the values of the properties of the main version from the file are sent to the properties of the main version of the current model, and all other versions from the file are placed in the Tree while maintaining the hierarchy relative to the main version. Thus, by reading versions from a file, it is available to completely copy the structure of the Version tree of another model.
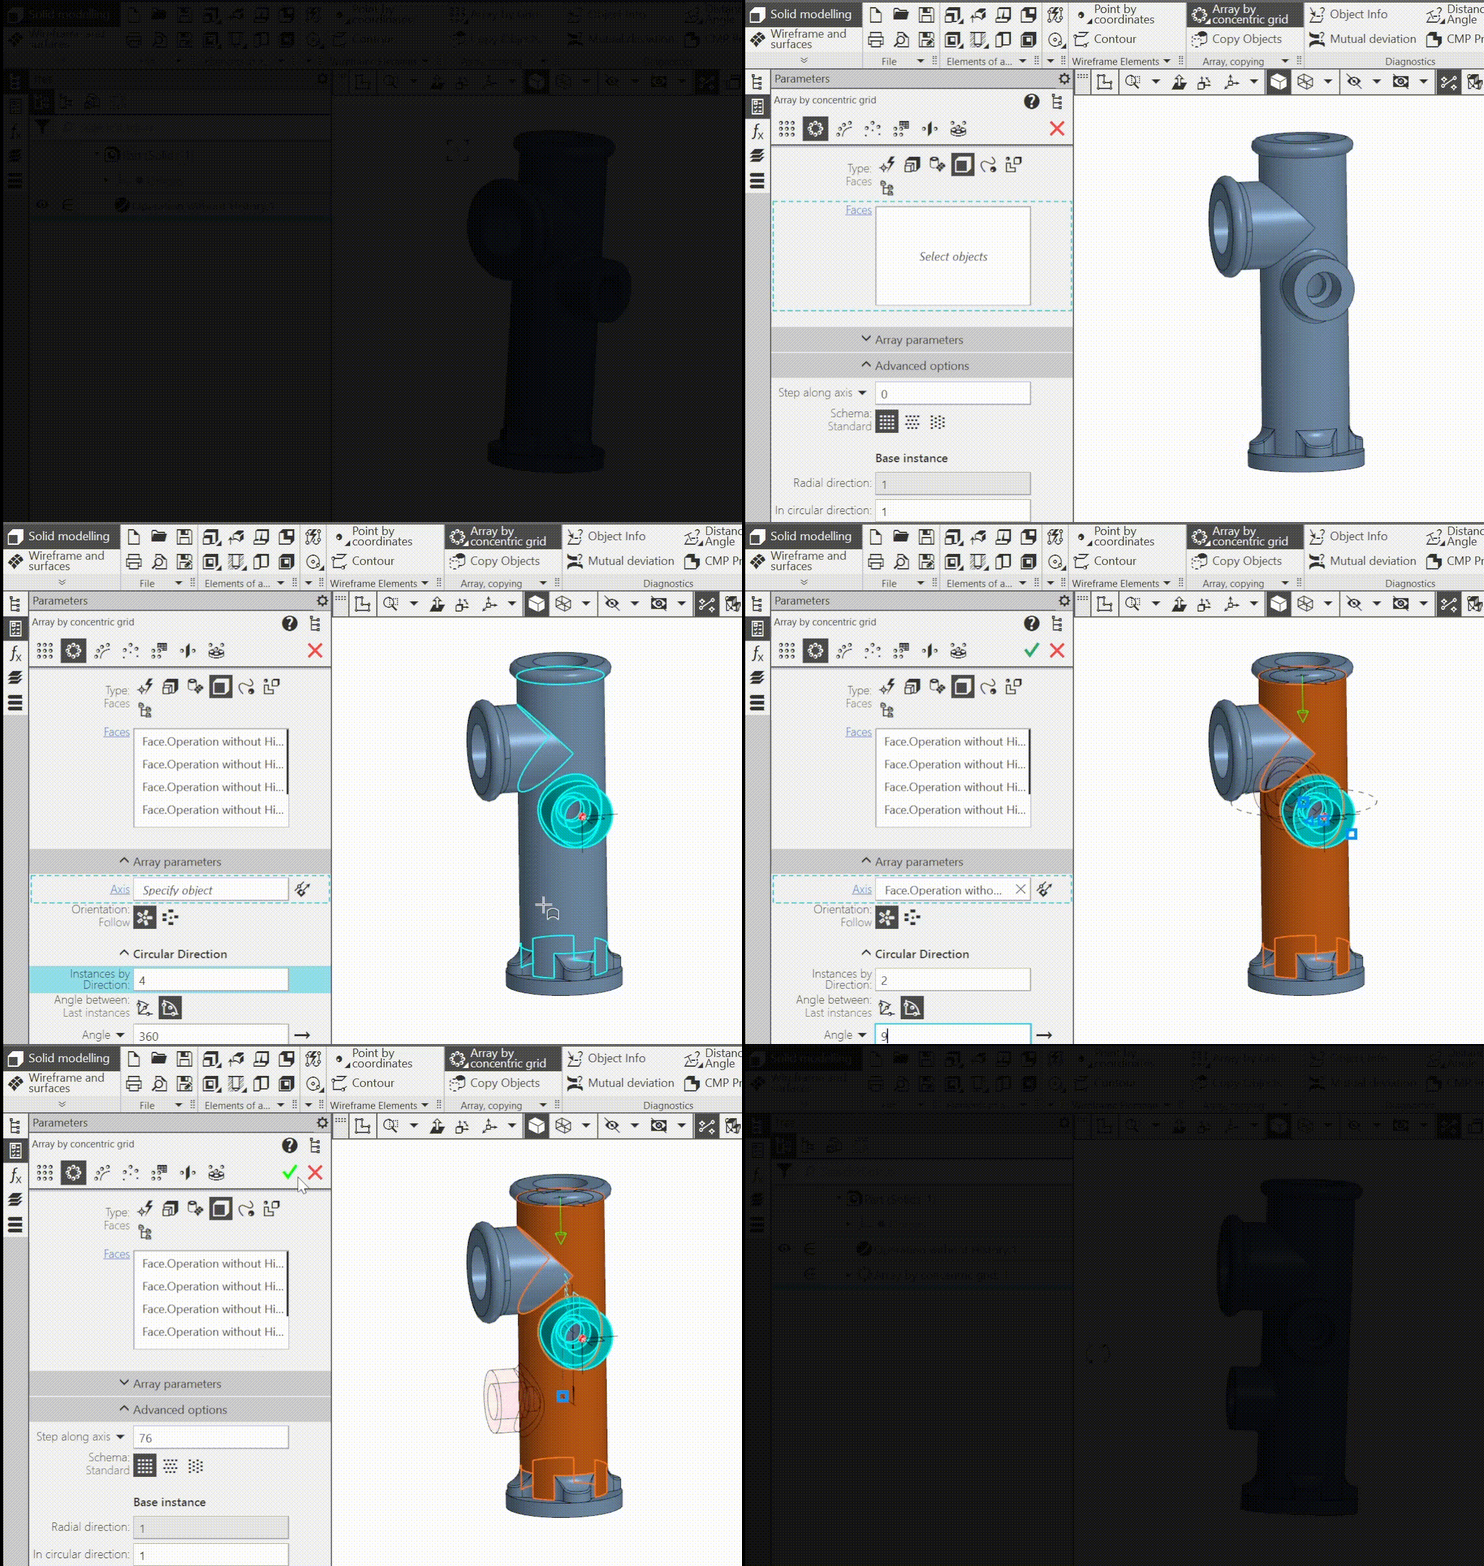
25.In the array building commands, selection of faces and, accordingly, building of their copies. It is available to specify either one or several adjacent faces of the same body/surface.
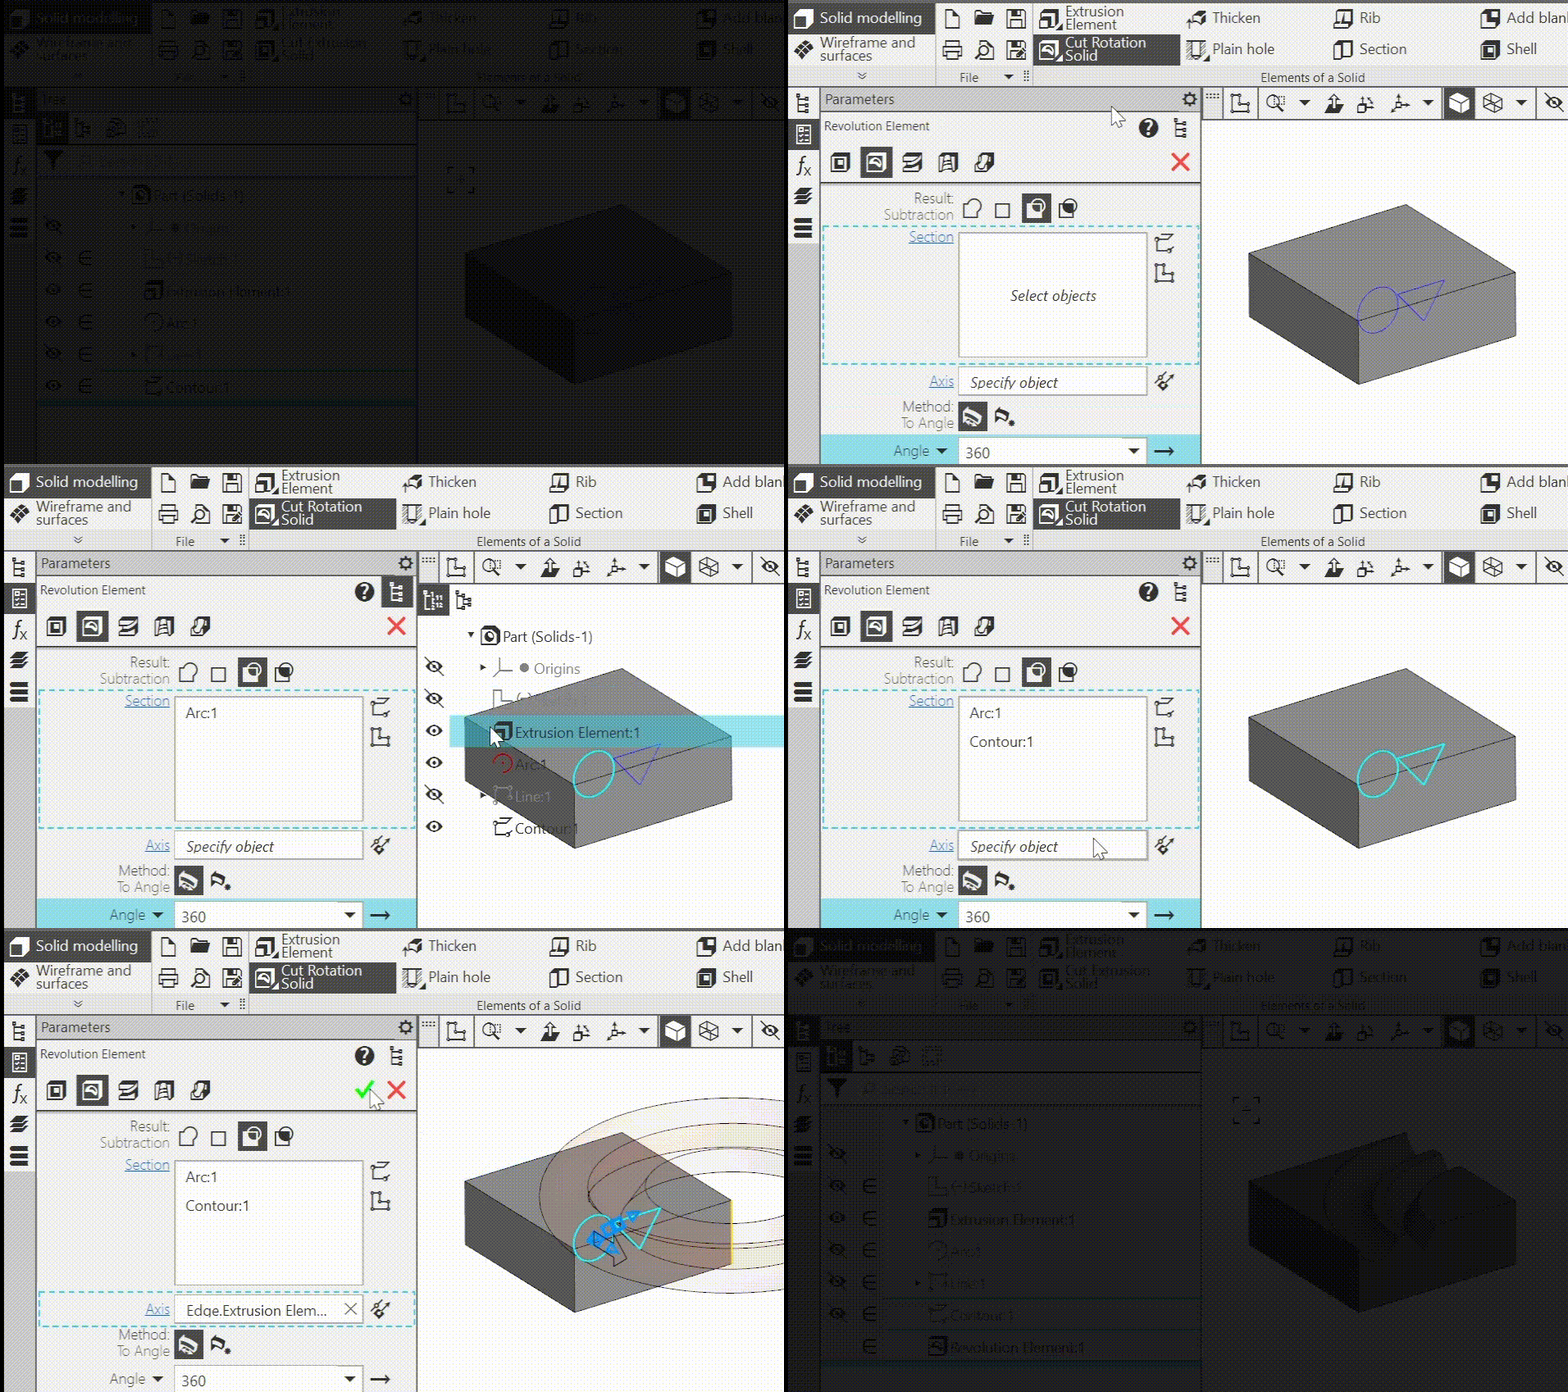
26.In the commands Revolution element, Revolution surface, and Extrusion surface, it is now possible to specify more than one object to use as a section.
27.In the case where a surface and an edge of another surface are specified for measuring mutual deflection, in addition to the distances between the points of the edge and the surface,also the angles between the tangent planes to that surfaces at these points are calculated.
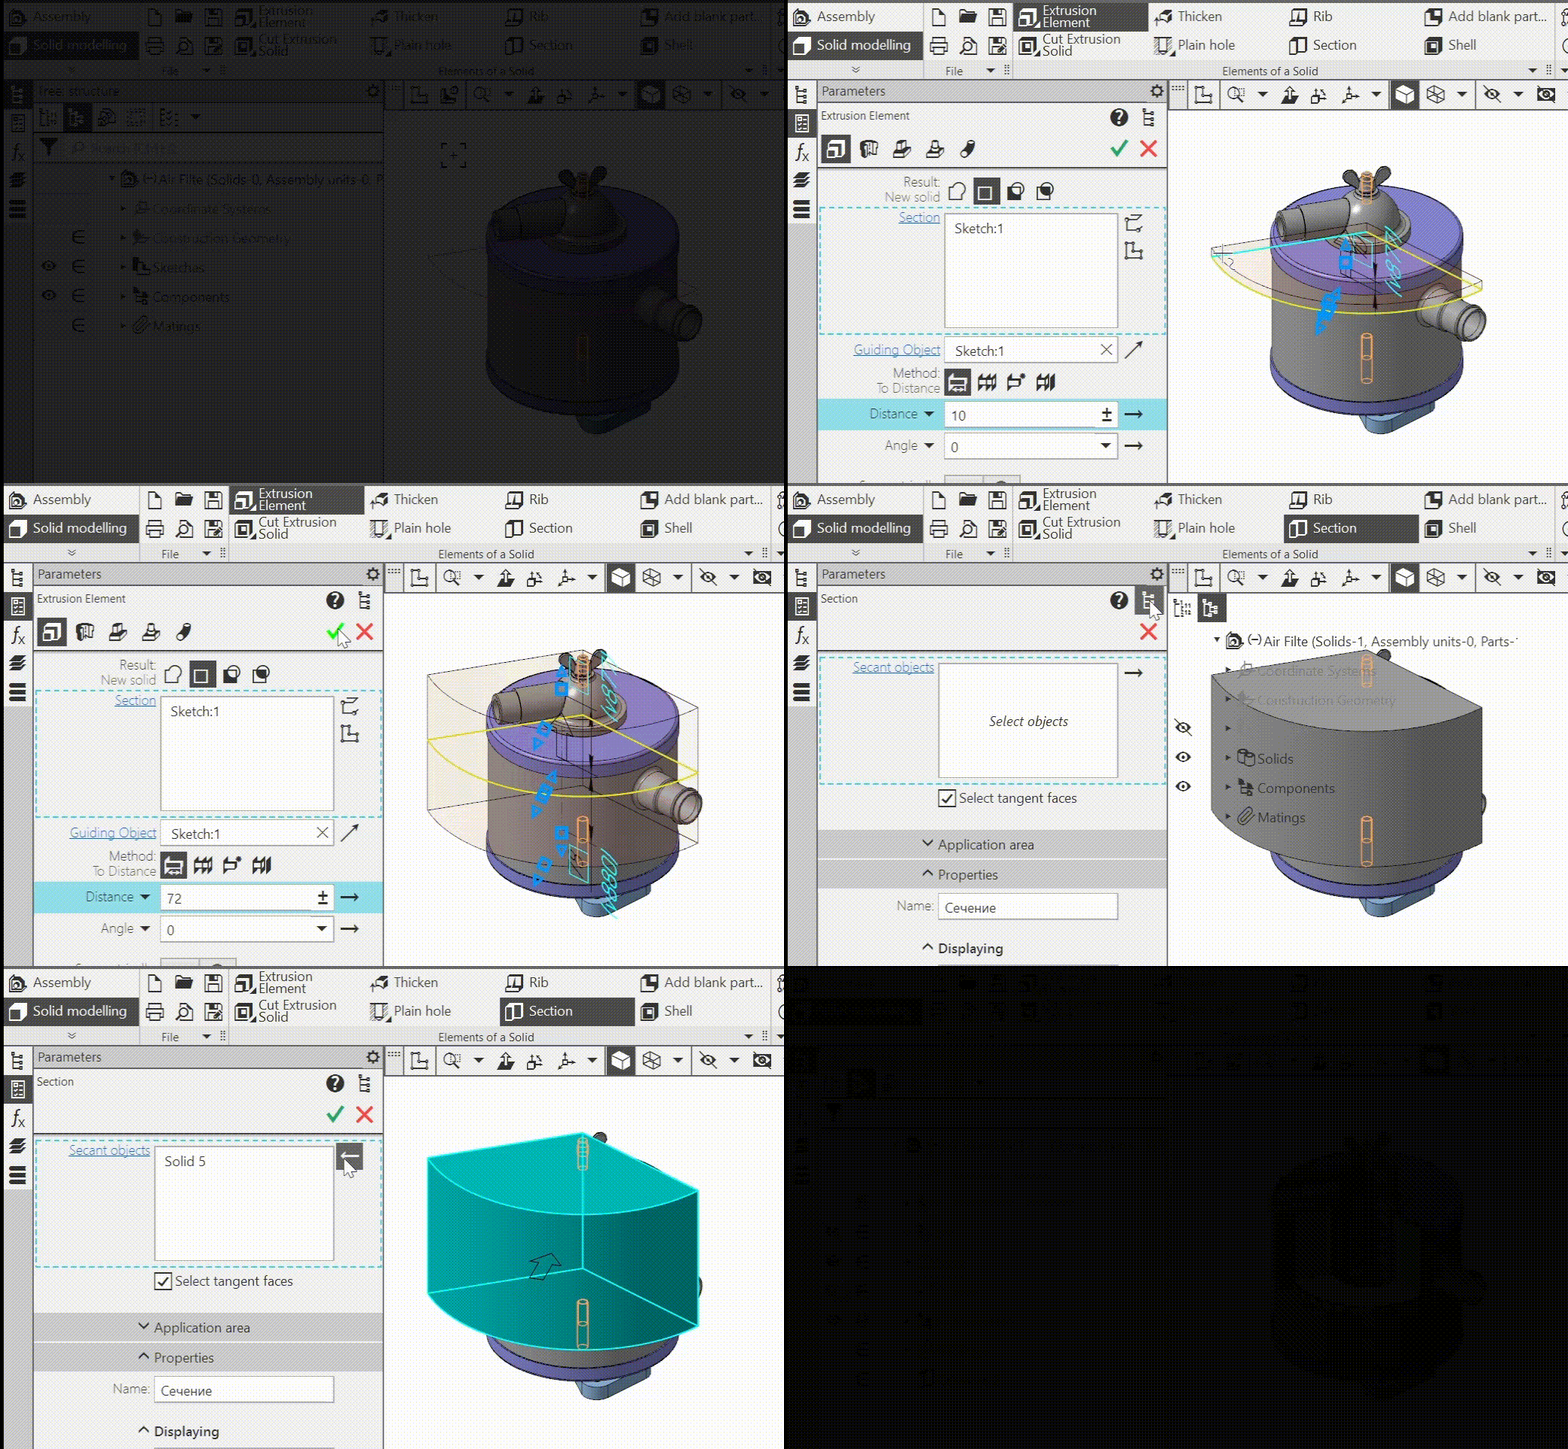
28.In the Section command , it is available now to use a body, a surface, a linked set of body/surface faces, and a set of unlinked but adjacent faces as a section object.
29.The Mirrored array command now has the ability to build a plane of symmetry without exiting the process.
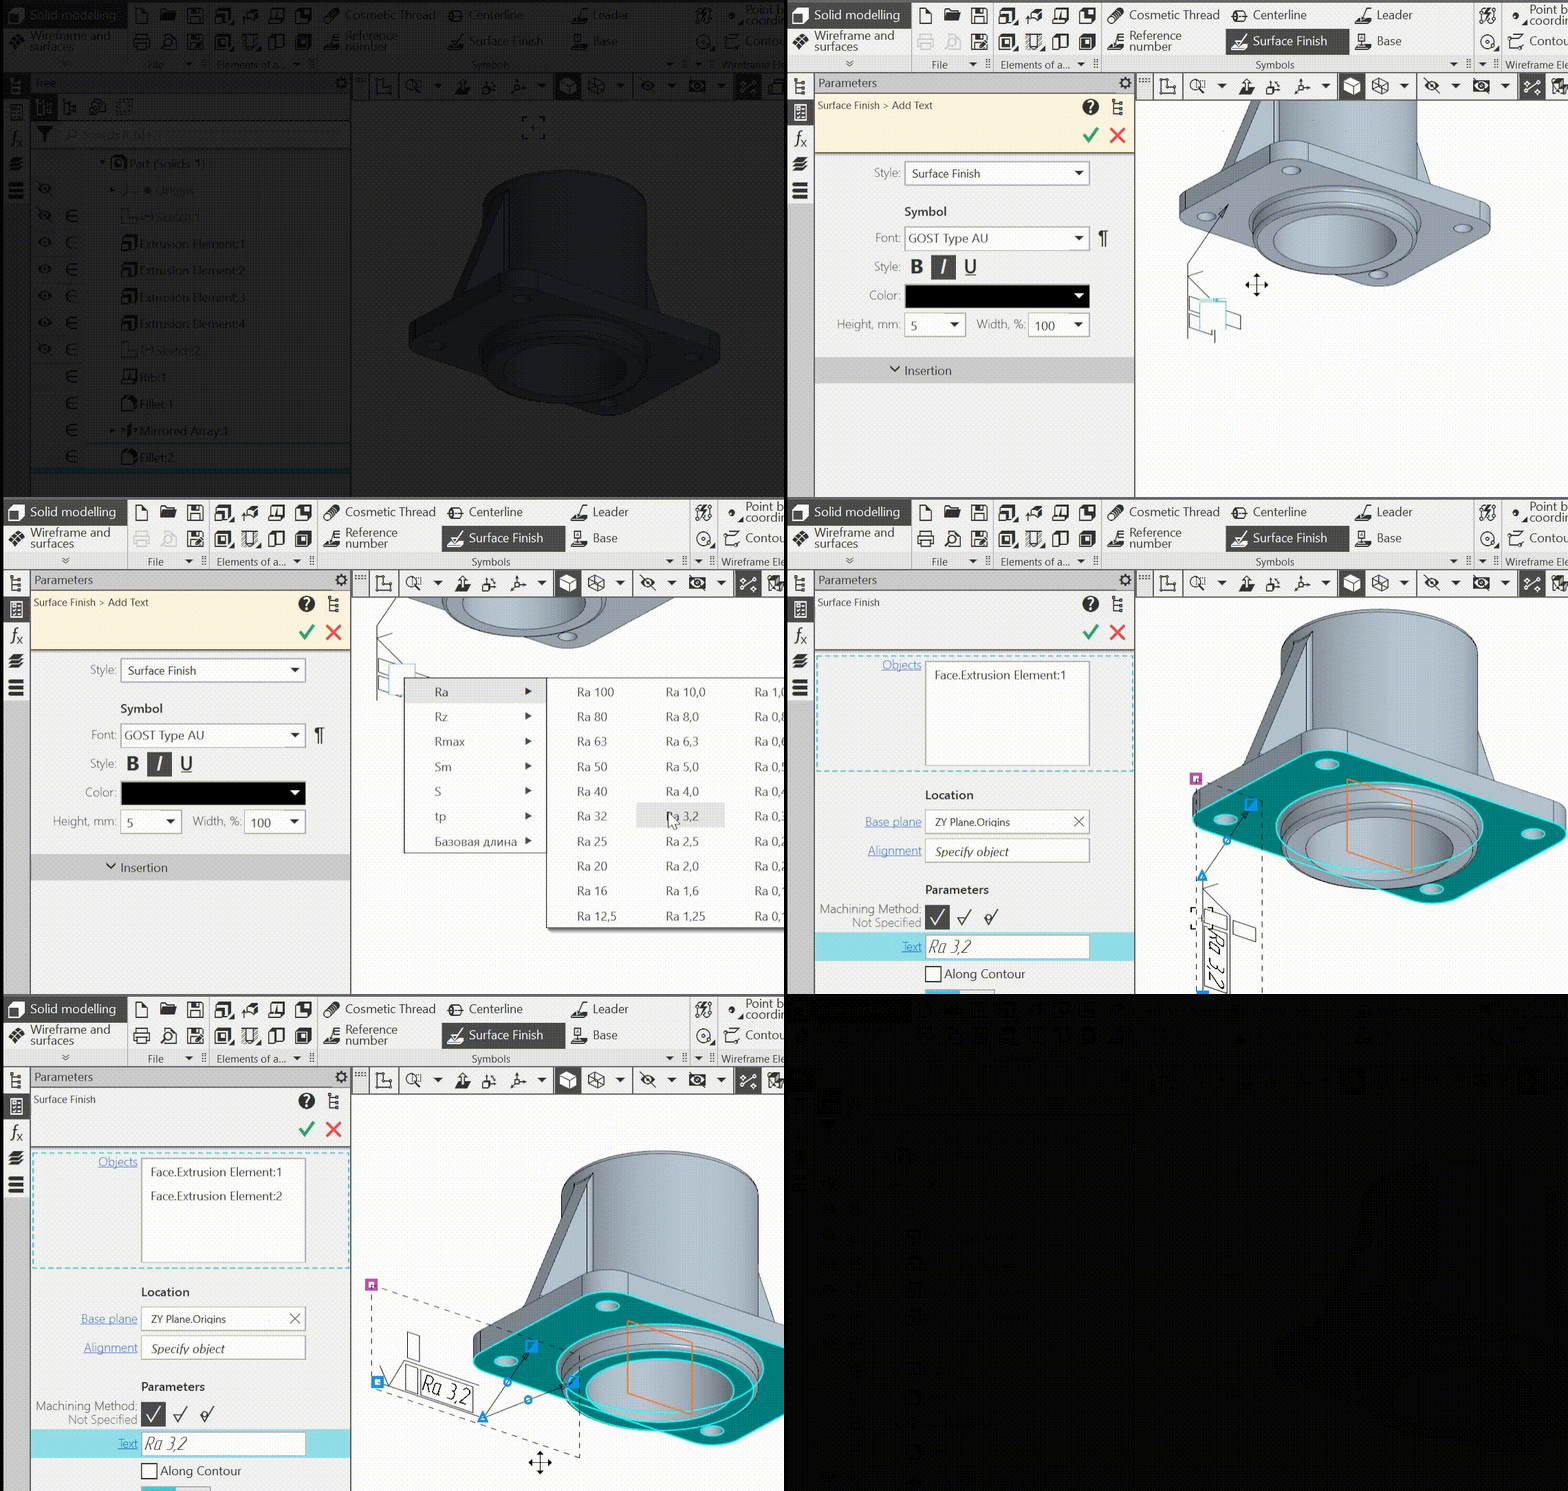
30.When creating /editing a surface finish designation it is now possible to select multiple objects (previously, only one could be selected). If a surface finish designation is placed on a leader-landing, it is possible to create leader-landing branches pointing to these objects - if they intersect with the designation plane.
31.If copy saving is enabled when scaling a body or surface, the scaling operation has two subordinate objects in the Tree: a copy of the source object and the scaled body or surface (previously - only a copy of the source object).
32.Added the ability to display the ordinal numbers of operationsin the Design tree. Operation numbers are also shown when viewing object relations, are taken into account when searching in the Design tree, and are included in the information generated by the Object info.
command.Operations are numbered in the order of their sequence in the Tree, which has a design history view, so after adding/deleting/moving operations, the underlying operations are renumbered.
33.New features for reading and writing data files (used when working with versions, families, curves, points, surfaces, arrays, etc).:
•reading of Excel 2007-365 format (*.xlsx) and writing to this format has become available,
•to read and write to the Calc format (*.ods) it is no longer necessary to have a tool for working with files of this format installed on your workplace (for example, OpenOffice or LibreOffice).
34.The Curvature graph command now has the ability to calculate the stress of a curve. The calculated value is displayed next to the curve and is changed when the curve is edited.
35.Added a new method for calculating CMP of an assembly component: By source mass. In this method, the mass of the component is always taken from its source file, and the center of mass and moments of inertia are calculated from the actual geometry (or can be set manually). This method is automatically applied to a component modified using the Deformed buildings operation.
36.Added command Object selection: now it is available to select entire compound objects, such as sketches, multi-segment curves, surfaces, bodies, components. In addition, object enumeration is now available in an additional model window.
37.New features when working with load types:
•Selection of the load type component before inserting it into the assembly. t is available now to speed up the process of adding "heavy" subassemblies to an assembly: when selecting the model to be inserted it is possible to set the load type for it, for example, Empty, and then place by specifying the coordinates.
•View the product BOM, i.e. the list of incoming components, for sub assemblies with load types Empty and Size at all levels of nesting. Information about the product BOM is loaded at the moment when the branch of the subassembly is opened in the Tree — when the mouse clicks on the "triangle" icon.
38.Editing in the window has become available for the component , that is a local part. This expands the possibilities for establishing the component's display: this editing method makes it possible to control, for example, the optical properties of separate objects.
39.It is now possible to insert a component into an assembly with Component parts enabled. Previously, its inclusion was only available after insertion.
40.When editing a contour, creation with matching became available. That is, by specifying new source curves for the contour, the user can establish a correspondence between the original and new segments of the contour. This ensures that objects based on replaced contour segments will not lose them, but will use the new ones. For example, if some contour segments have been projected into the sketch, editing the contour with the match setting will produce projections of the new segments in the sketch. Editing without setting the match will result in errors in the sketch.
41.The following commands have been added to improve navigation through the model:
•Collapse all — in the context menu of root of Design tree element. The command collapses all branches which were unfolded at all levels. At the same time, the root element itself remains unfolded.
•Collapse — in the context menu of branch of Design tree. The command collapses all its subordinate branches and the branch itself.
•Show in tree — in the context menu of the component specified in the graphic area. Previously, it was present only in the context menu of a specified primitive or geometric object.
42.Added the ability to product structure of Standard part in the Design tree.
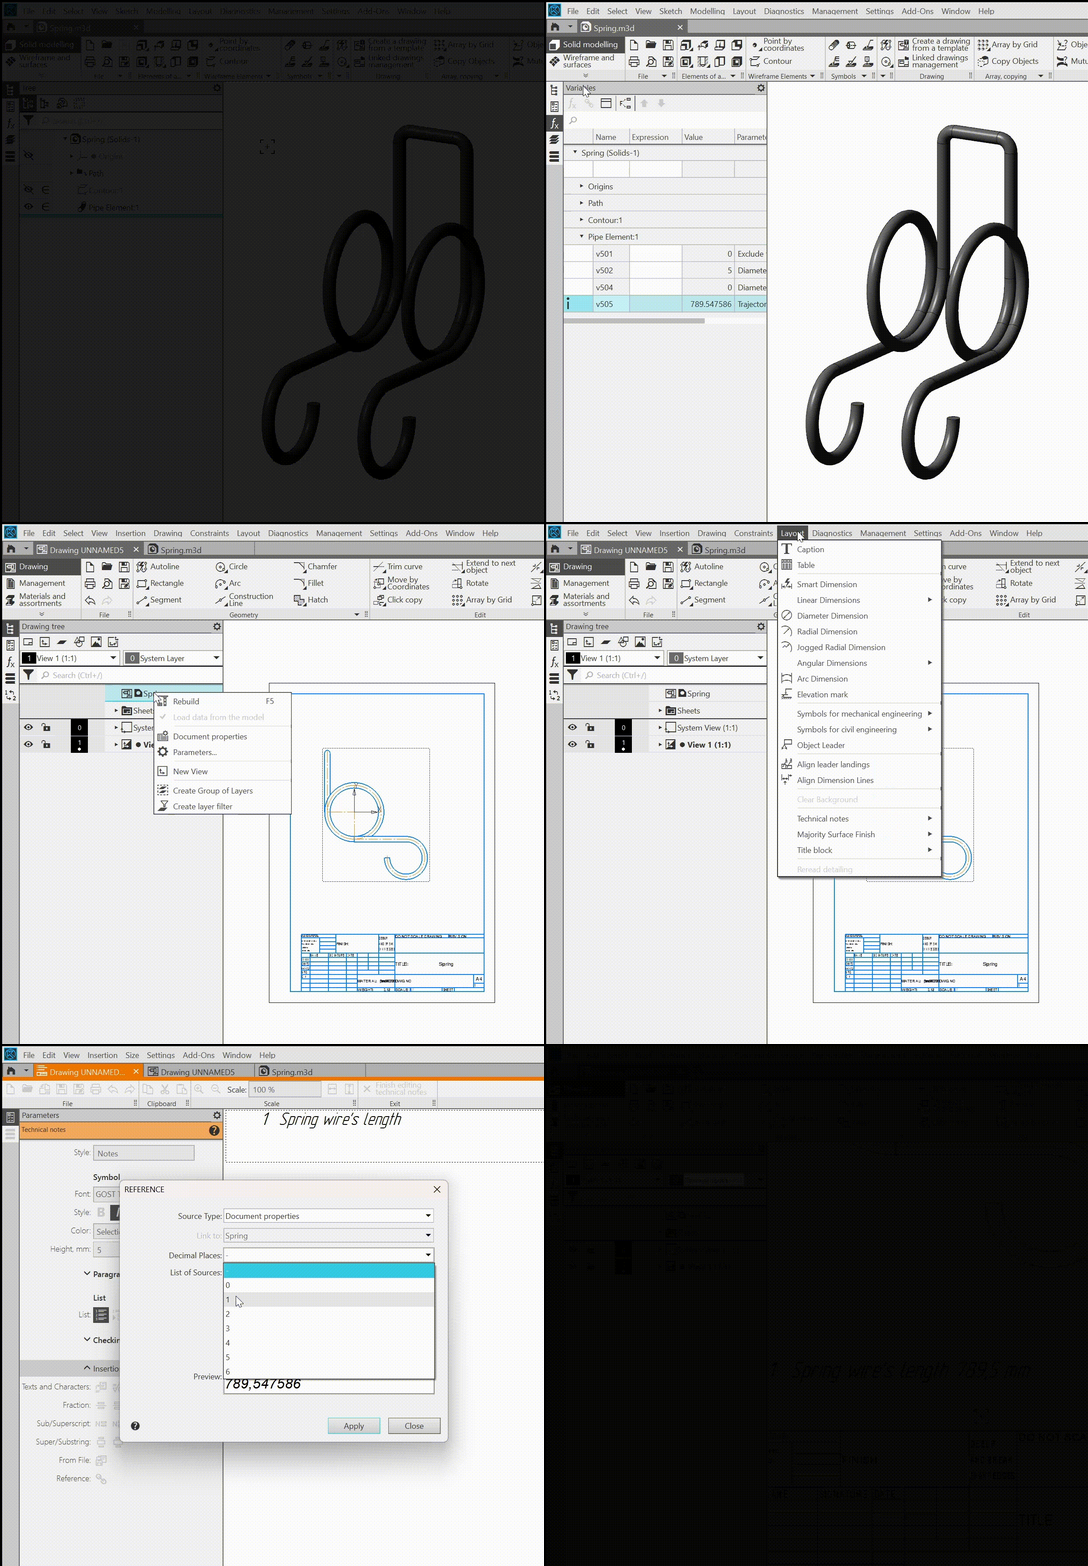
43.An information variable of the trajectory length has been added to the set of variables of the element and surface along the trajectory.
44.Normal and Center line types of line of macro-elements included in sketches are displayed and can be used outside of sketch mode (previously, macro-elements had to be exploded to do this).
45.When measuring area you can specify bodies and surfaces — the areas of all their faces will be calculated.
46.Versions and variants of a model that depend on the same version and are located on the same level can be replaced with each other in the Tree by dragging them with the mouse.
47.A majority surface finish designation is now displayed as an object in the Design tree. This makes it easier to manage the visibility of the designation and to switch to editing it.
48.Icons for which display in the Tree is enabled (visibility, load type, projection, ordinal numbers, etc.)are also shown in the Relationship tree at the bottom of the Design tree.
49.Performance of the KOMPAS-3D system is significantly increased when displaying phantoms during work with large assemblies.
50.Improved performance of KOMPAS-3D when using load types: reduced time, as well as RAM consumption when opening an assembly with a custom load type, in which components of the second and subsequent nesting levels have the Empty load type.
51.Optimized data storage in models that contain operations based on the same object, such as many points on the same surface. Due to optimization, the speed of rebuilding has been increased and the file size of such models has been reduced.
52.Experimental functionality "Metaspline" is excluded from KOMPAS-3D. Metasplines existing in models that were created in previous versions of KOMPAS-3D will be correctly processed, but it is no longer possible to create new metasplines.